How to deploy Amazon Bedrock AgentCore with CloudFormation
This document captures the deployment, setup and testing procedure of the Tech 42 base AgentCore deployment. This solutions includes the following components:
- Strands agent
- Accessible to MCP servers
- Short term memory (7-365 days retention)
- Observability (Cloudwatch / Langfuse)
- Browser search tool
- Code interpreter tool
- Bedrock knowledge base retriever tool
- Guardrails
Watch the video and follow the sections below to subscribe to and deploy AgentCore in your AWS account.
You can also use our AgentCore cost calculator to estimate the costs of running your AI agent.
1. Subscribe to the AgentCore Starter Pack
Step 1.a: Go to AWS Marketplace -> Discover products -> Type in “Tech 42 - AI Agent Starter Pack” in the search bar and select the product or go this product link.
Step 1.b: Click on “View purchase options.”

Step 1.c: Bottom right hit “Subscribe” (Wait couple minutes for the subscription to validate).
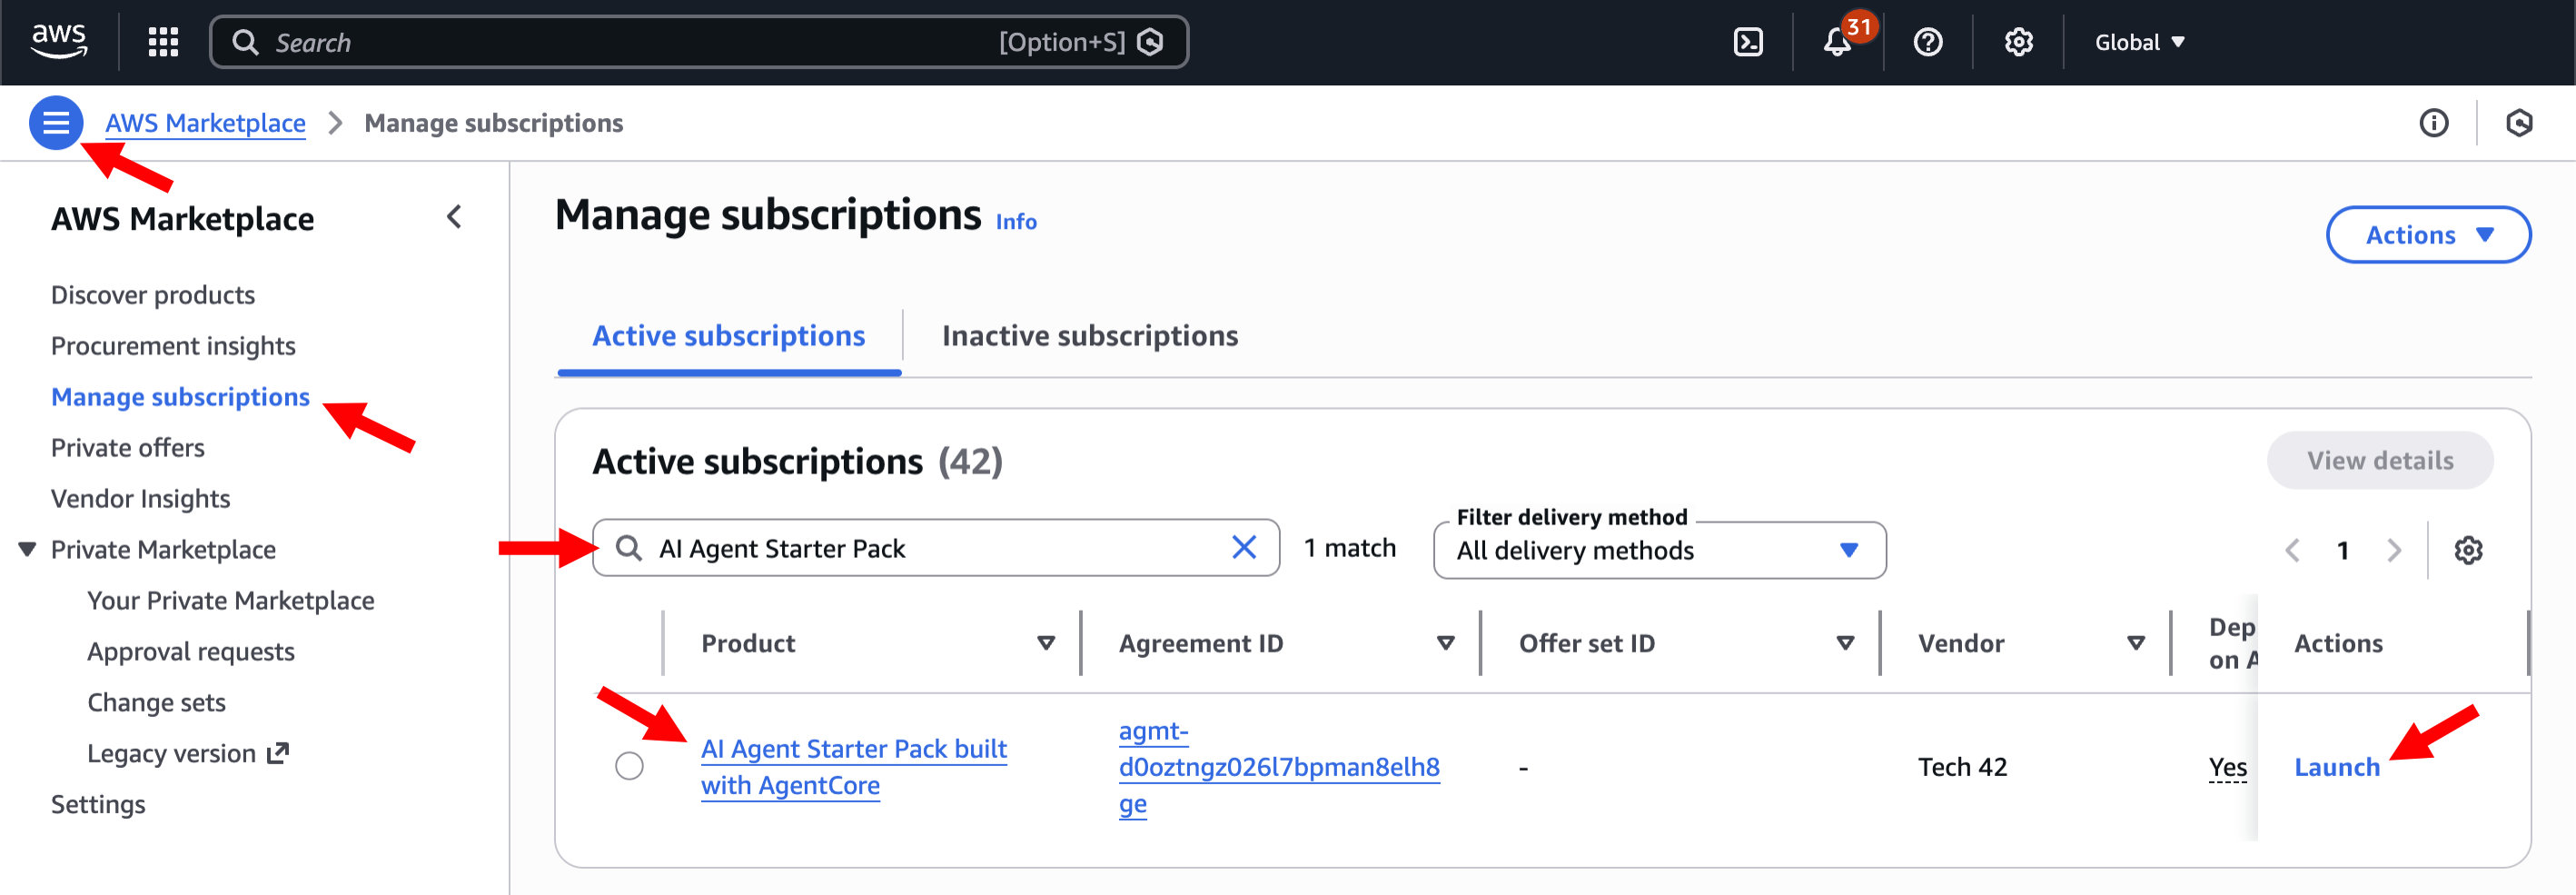
Step 1.d: Go to “AWS Marketplace” in your AWS account console.
Step 1.e: Go to “Manage subscriptions” on the left. Find the subscription by searching for “AI Agent Starter Pack”. If the starter pack shows up, you are successfully subscribed.
Step 1.f: Click on "Launch" under Actions.
2. Deployment Instructions
You have two options for deplyoing the AgentCore Starter Pack. CloudFormation is the preferred deployment method (fastest and easiest) covered in this guide. This leverages Tech 42's template to create necessary components and roles. If you prefer to handle all steps of the deployment in the AWS console, reach out to us for console deployment instructions, which requires addition setup steps for IAM policies and memory.
2.1. CloudFormation Deployment
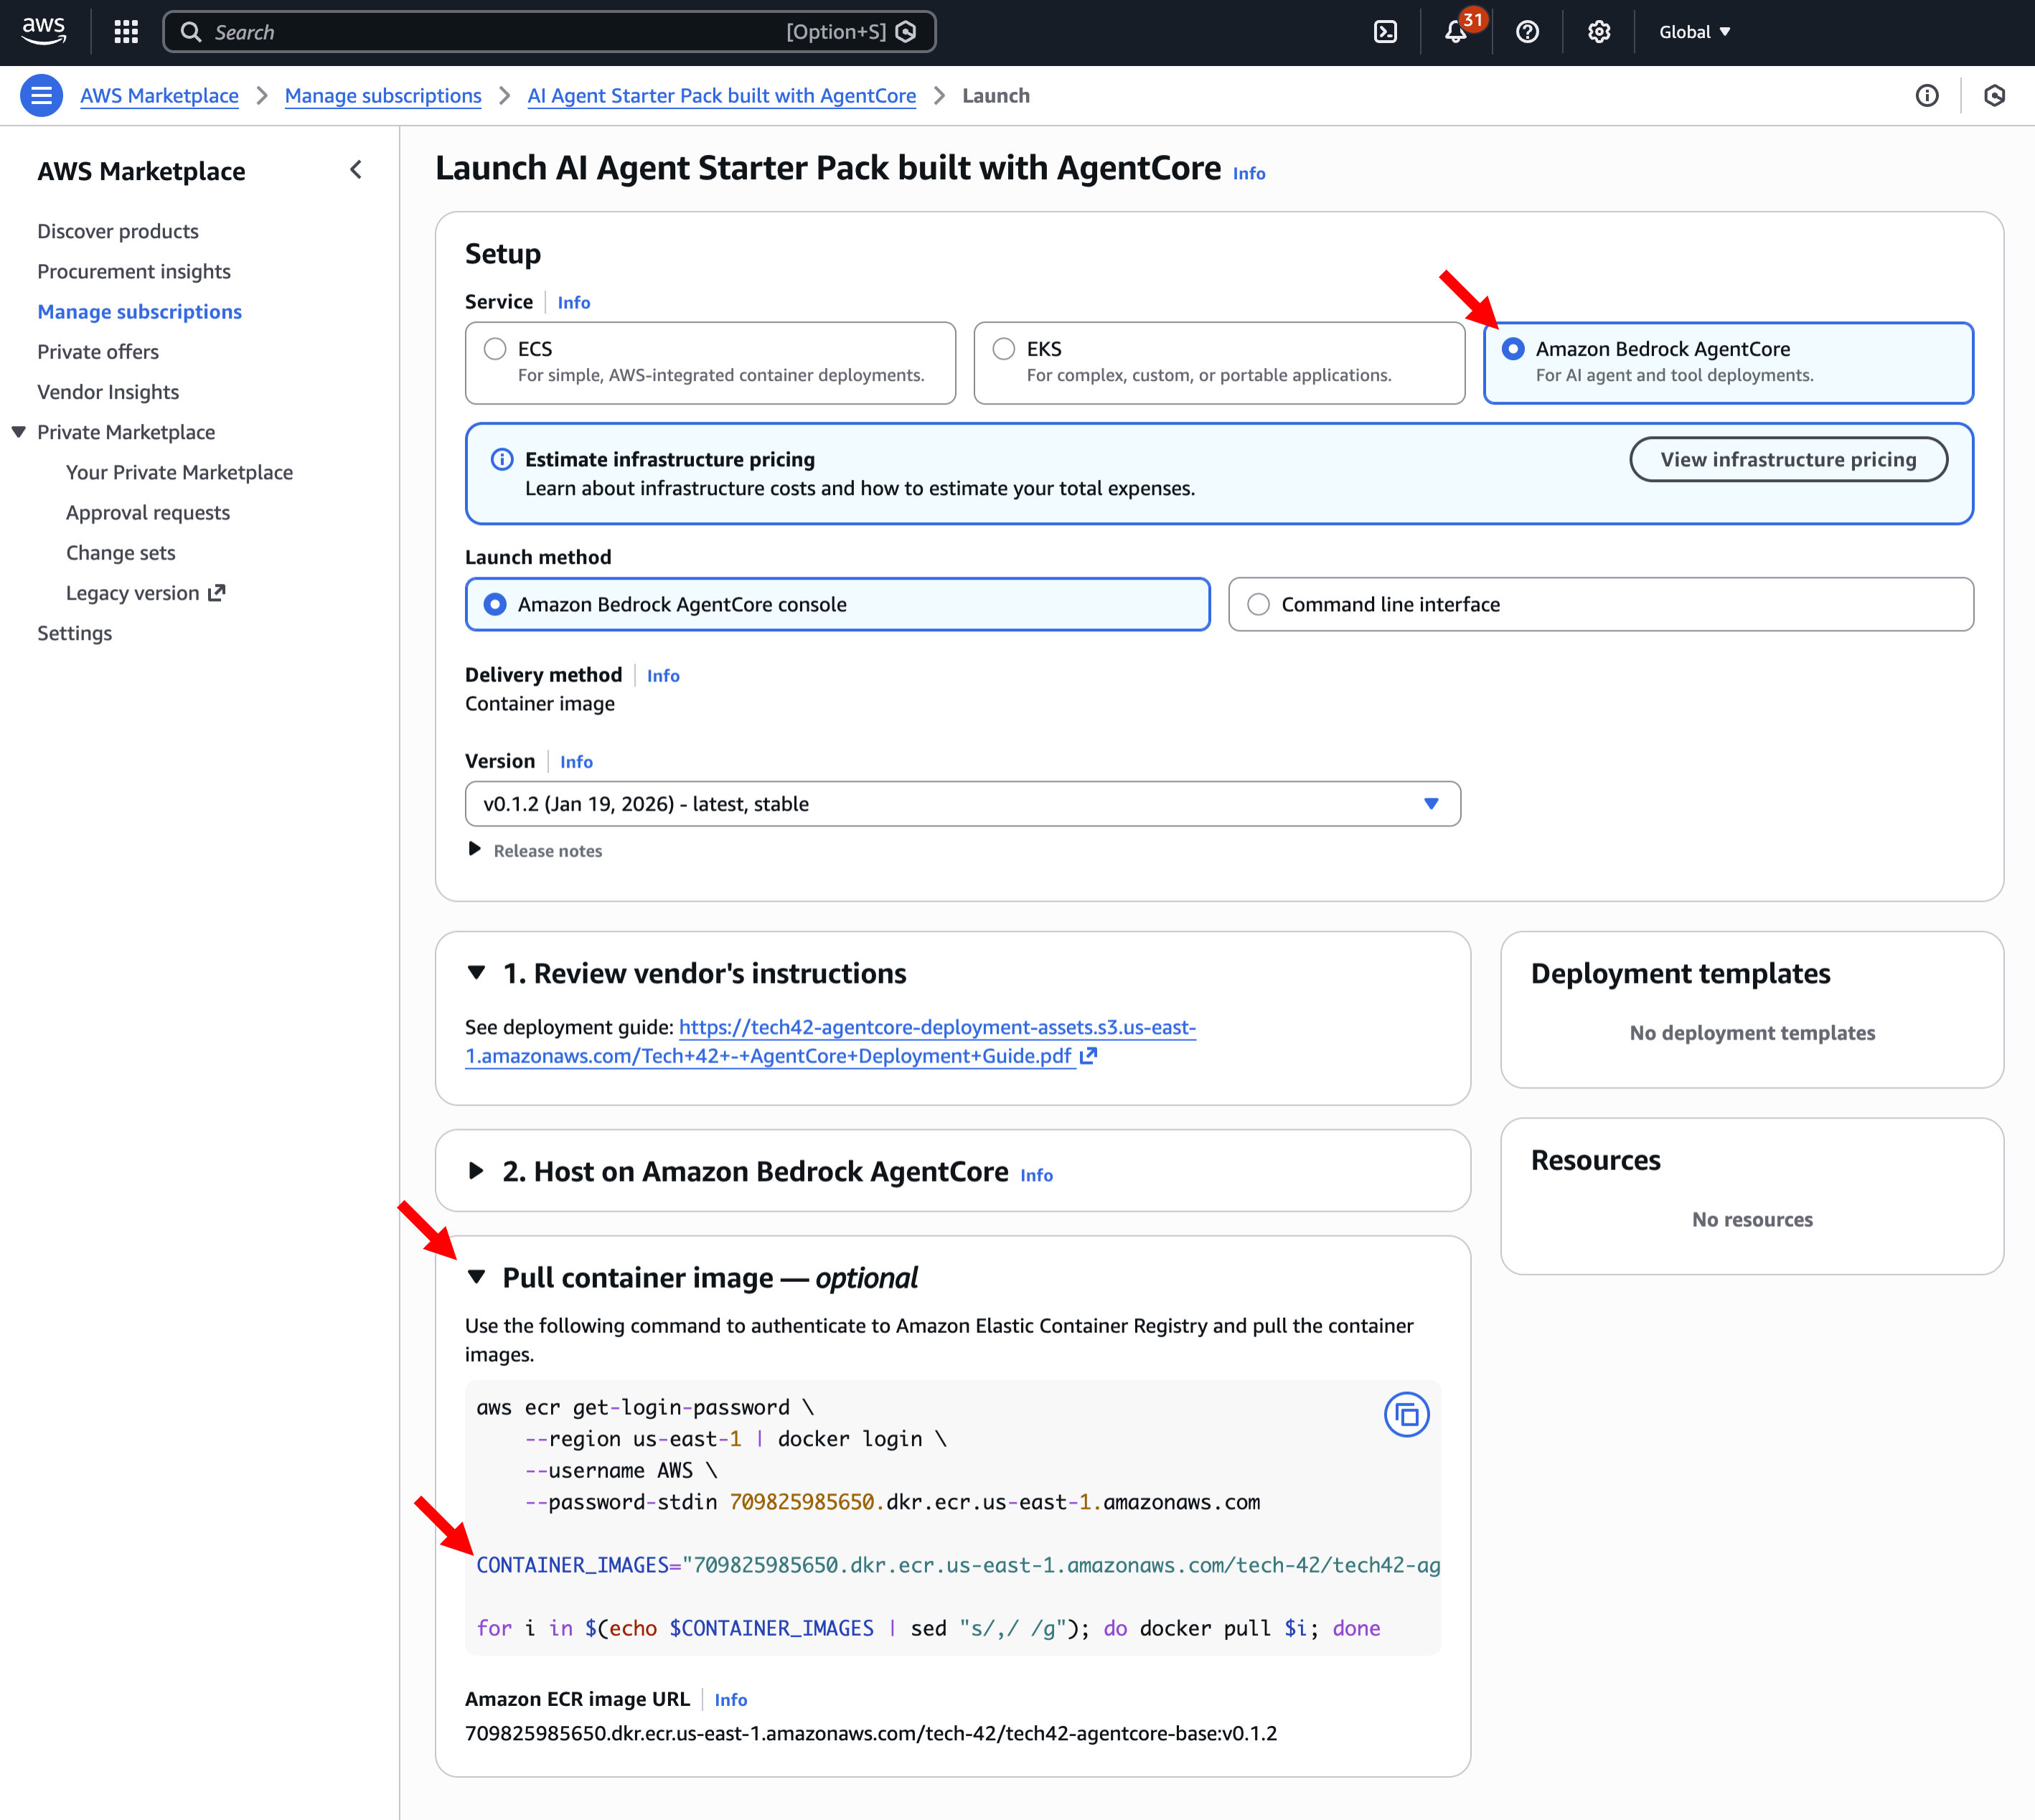
Step 2.1.a: Setup via “Amazon Bedrock AgentCore” -> Click on "Pull container image" -> Retrieve the container image URI which will look something like the example below. You will need this for the CloudFormation deployment step.
Note: If using LangFuse for monitoring, make sure to choose an ECR image that is labeled "langfuse". The URI does not generate automatically. Make sure to replace the URI version with the langfuse container version.
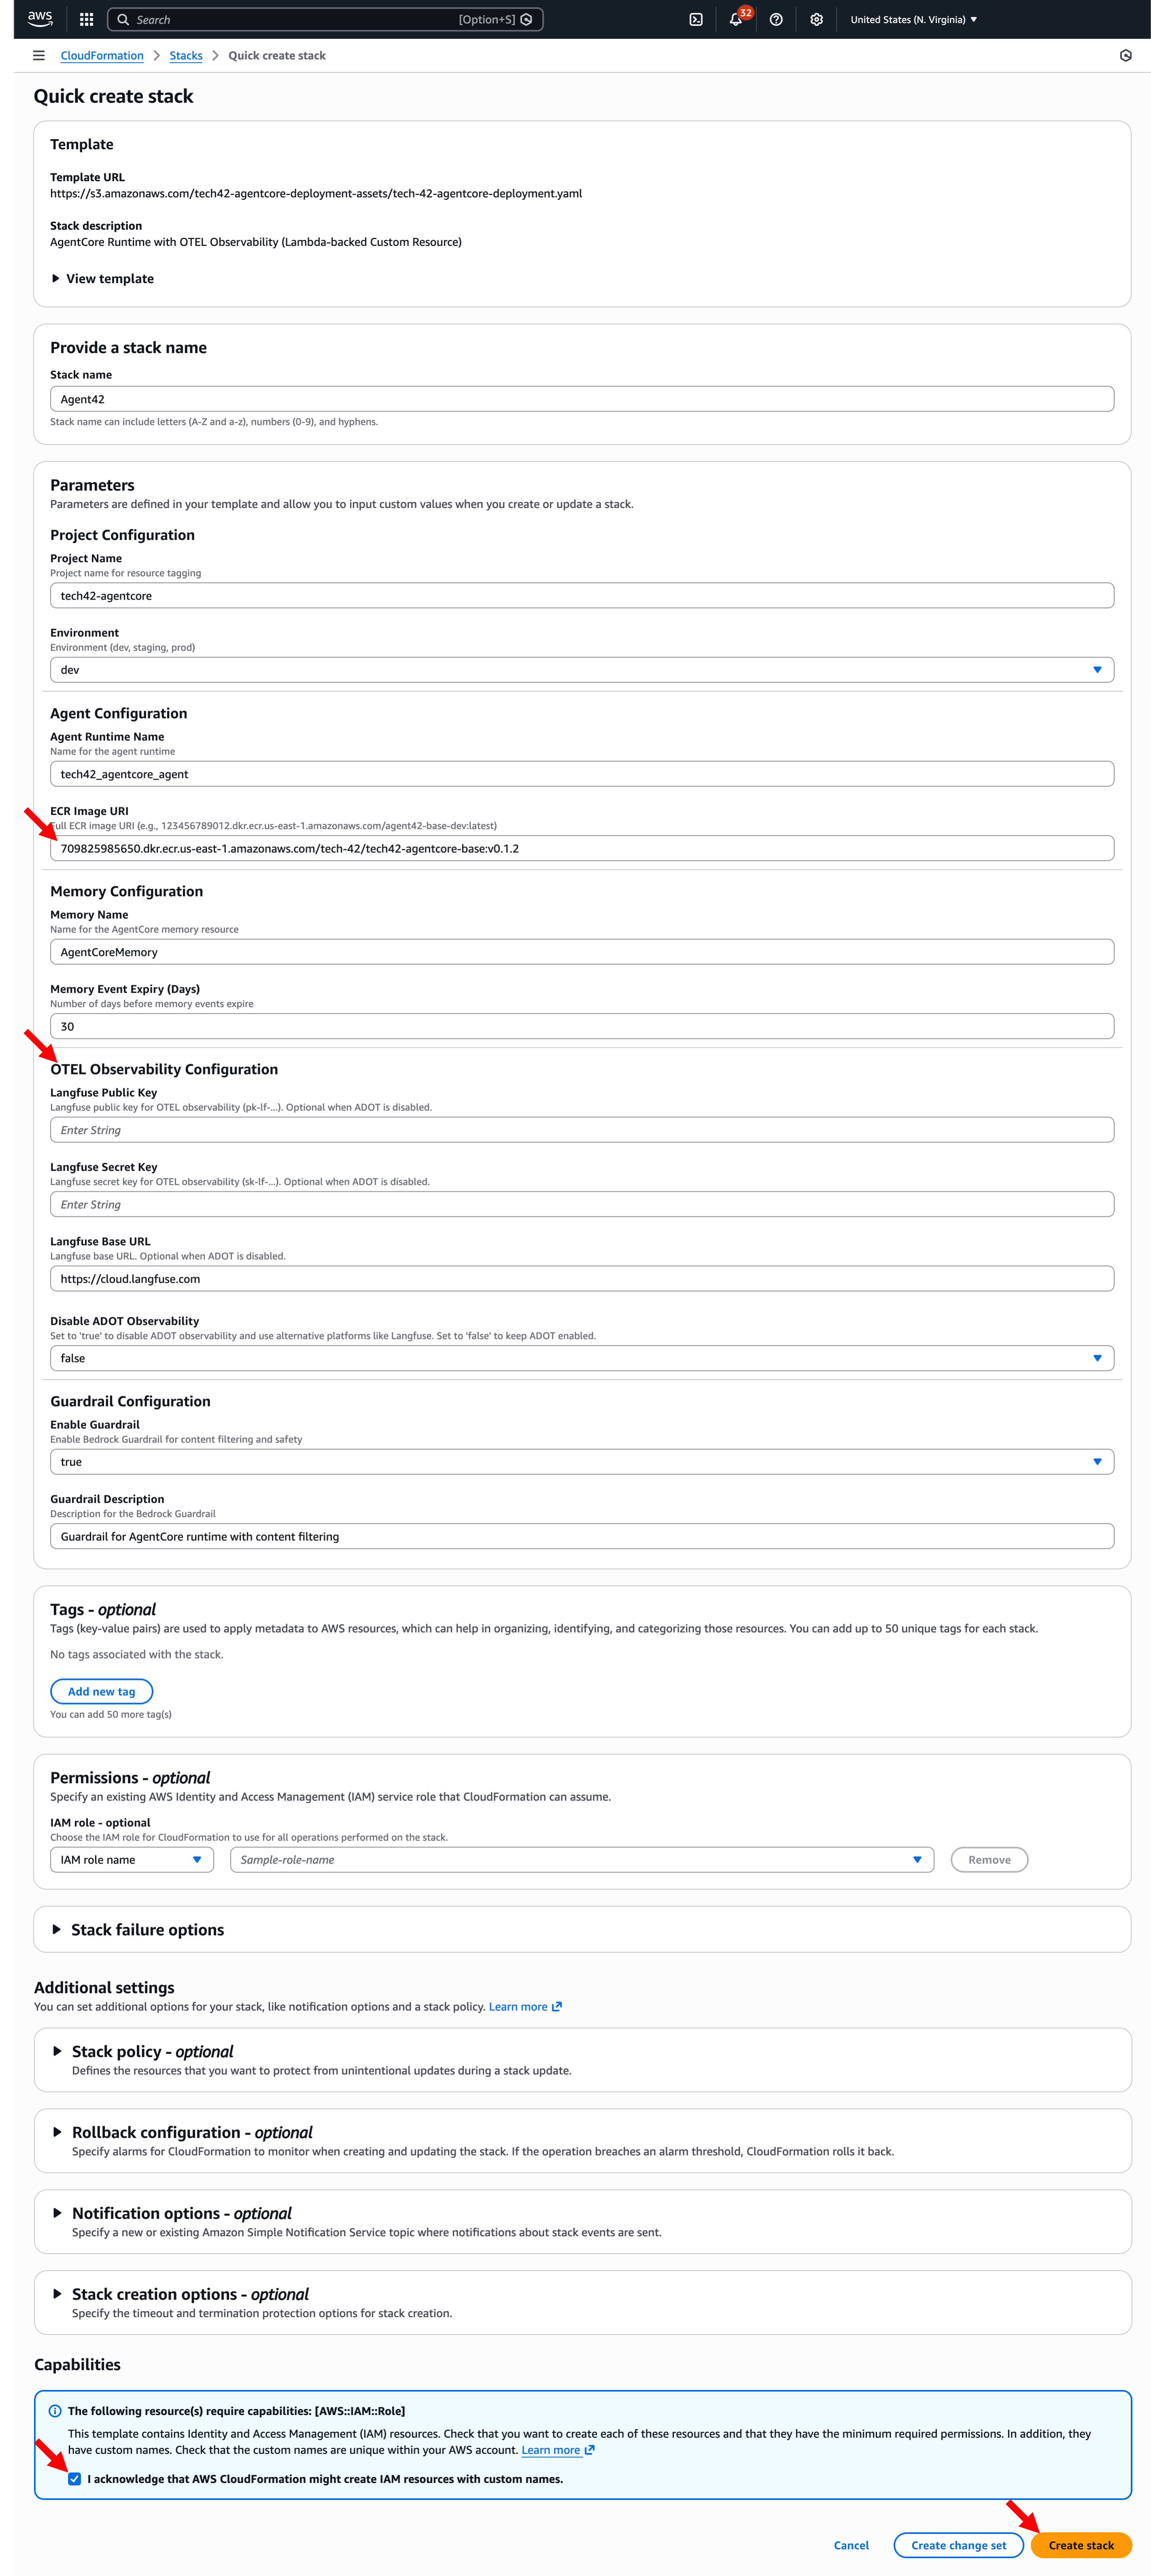
Step 2.1.b: Click this link to create a new CloudFormation Stack based on the AgentCore Starter Pack template.
Step 2.1.c: Fill out the parameters list in the next page, including entering in the container image URI from step 2.1.a, reviewing observability settings, and acknowledging resource conditions. When you've filled out the form, click "Create stack." This will begin the deployment process, which will take about 5 minutes.
Notes:
- If you are using Langfuse make sure your ECR Image URI has a suffix of .langfuse at the end. Also you will need to provide the required Langfuse credentials and set “Disable ADOT Observability” parameter to true. See our video for more detail on these settings.
- Many of the stack details are prepopulated when you use the link above. You can edit the stack and project name, but these names are reused for other elements (e.g. memory naming), so using longer names for the stack or project can cause deployment errors.
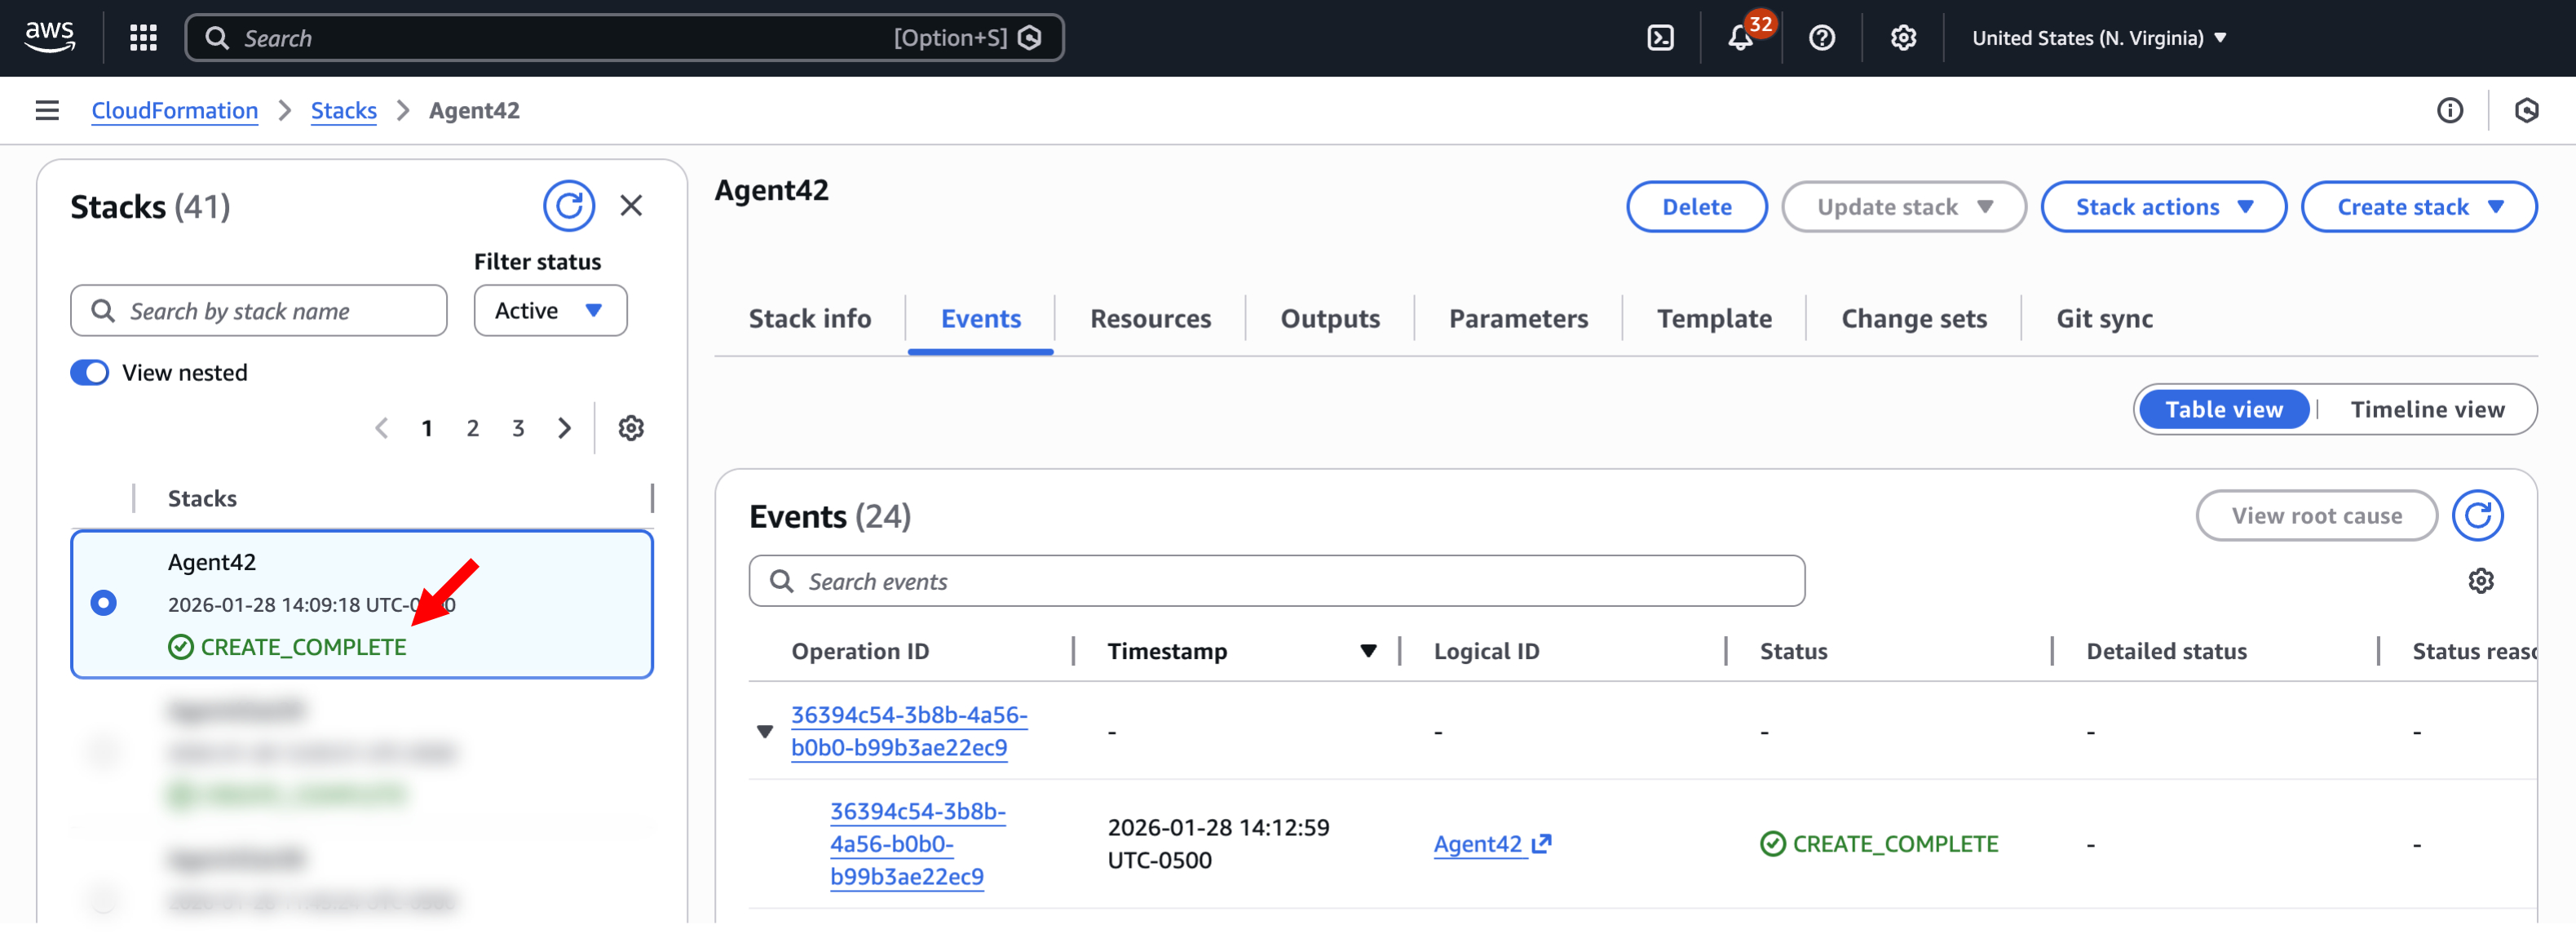
When the deployment is complete, you'll see "CREATE_COMPLETE" in your stack list:
2.2. Quick Console Test
Once you've deployed your agent, you can do a quick functionality test in the AWS console.
Step 2.2.a: In a new tab, search for and open Amazon Bedrock AgentCore -> Click "Agent sandbox" in the left menu
Step 2.2.b: Select your agent in the Runtime agent field and use the DEFAULT endpoint -> Enter the sample prompt listed below -> Click Run to validate that the agent response is delivered

3. Adding a Knowledge Base (Enabling Retrieval-Augmented Generation)
Note: This will incur costs. Delete your knowledge base after testing if not required.
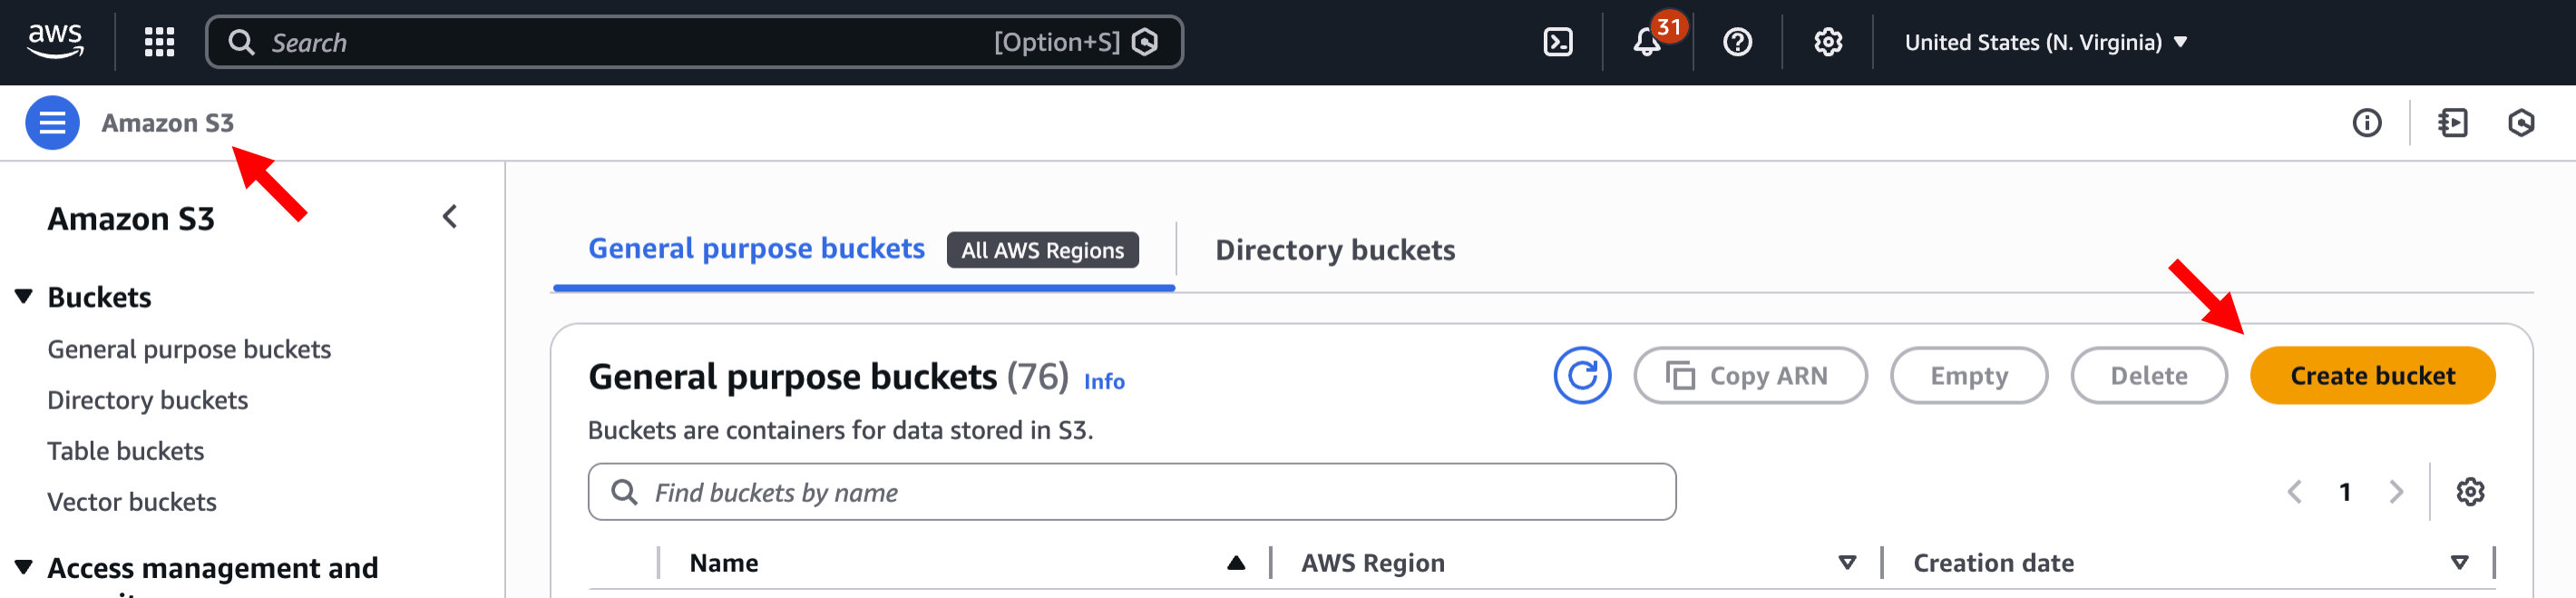
3.1. Create your S3 Bucket
Step 3.1.a: Search for and open S3 -> Click "Create bucket"
Step 3.1.b: Fill in the details of your bucket and click "Create bucket"
IMPORTANT NOTE: S3 Bucket names must be unique
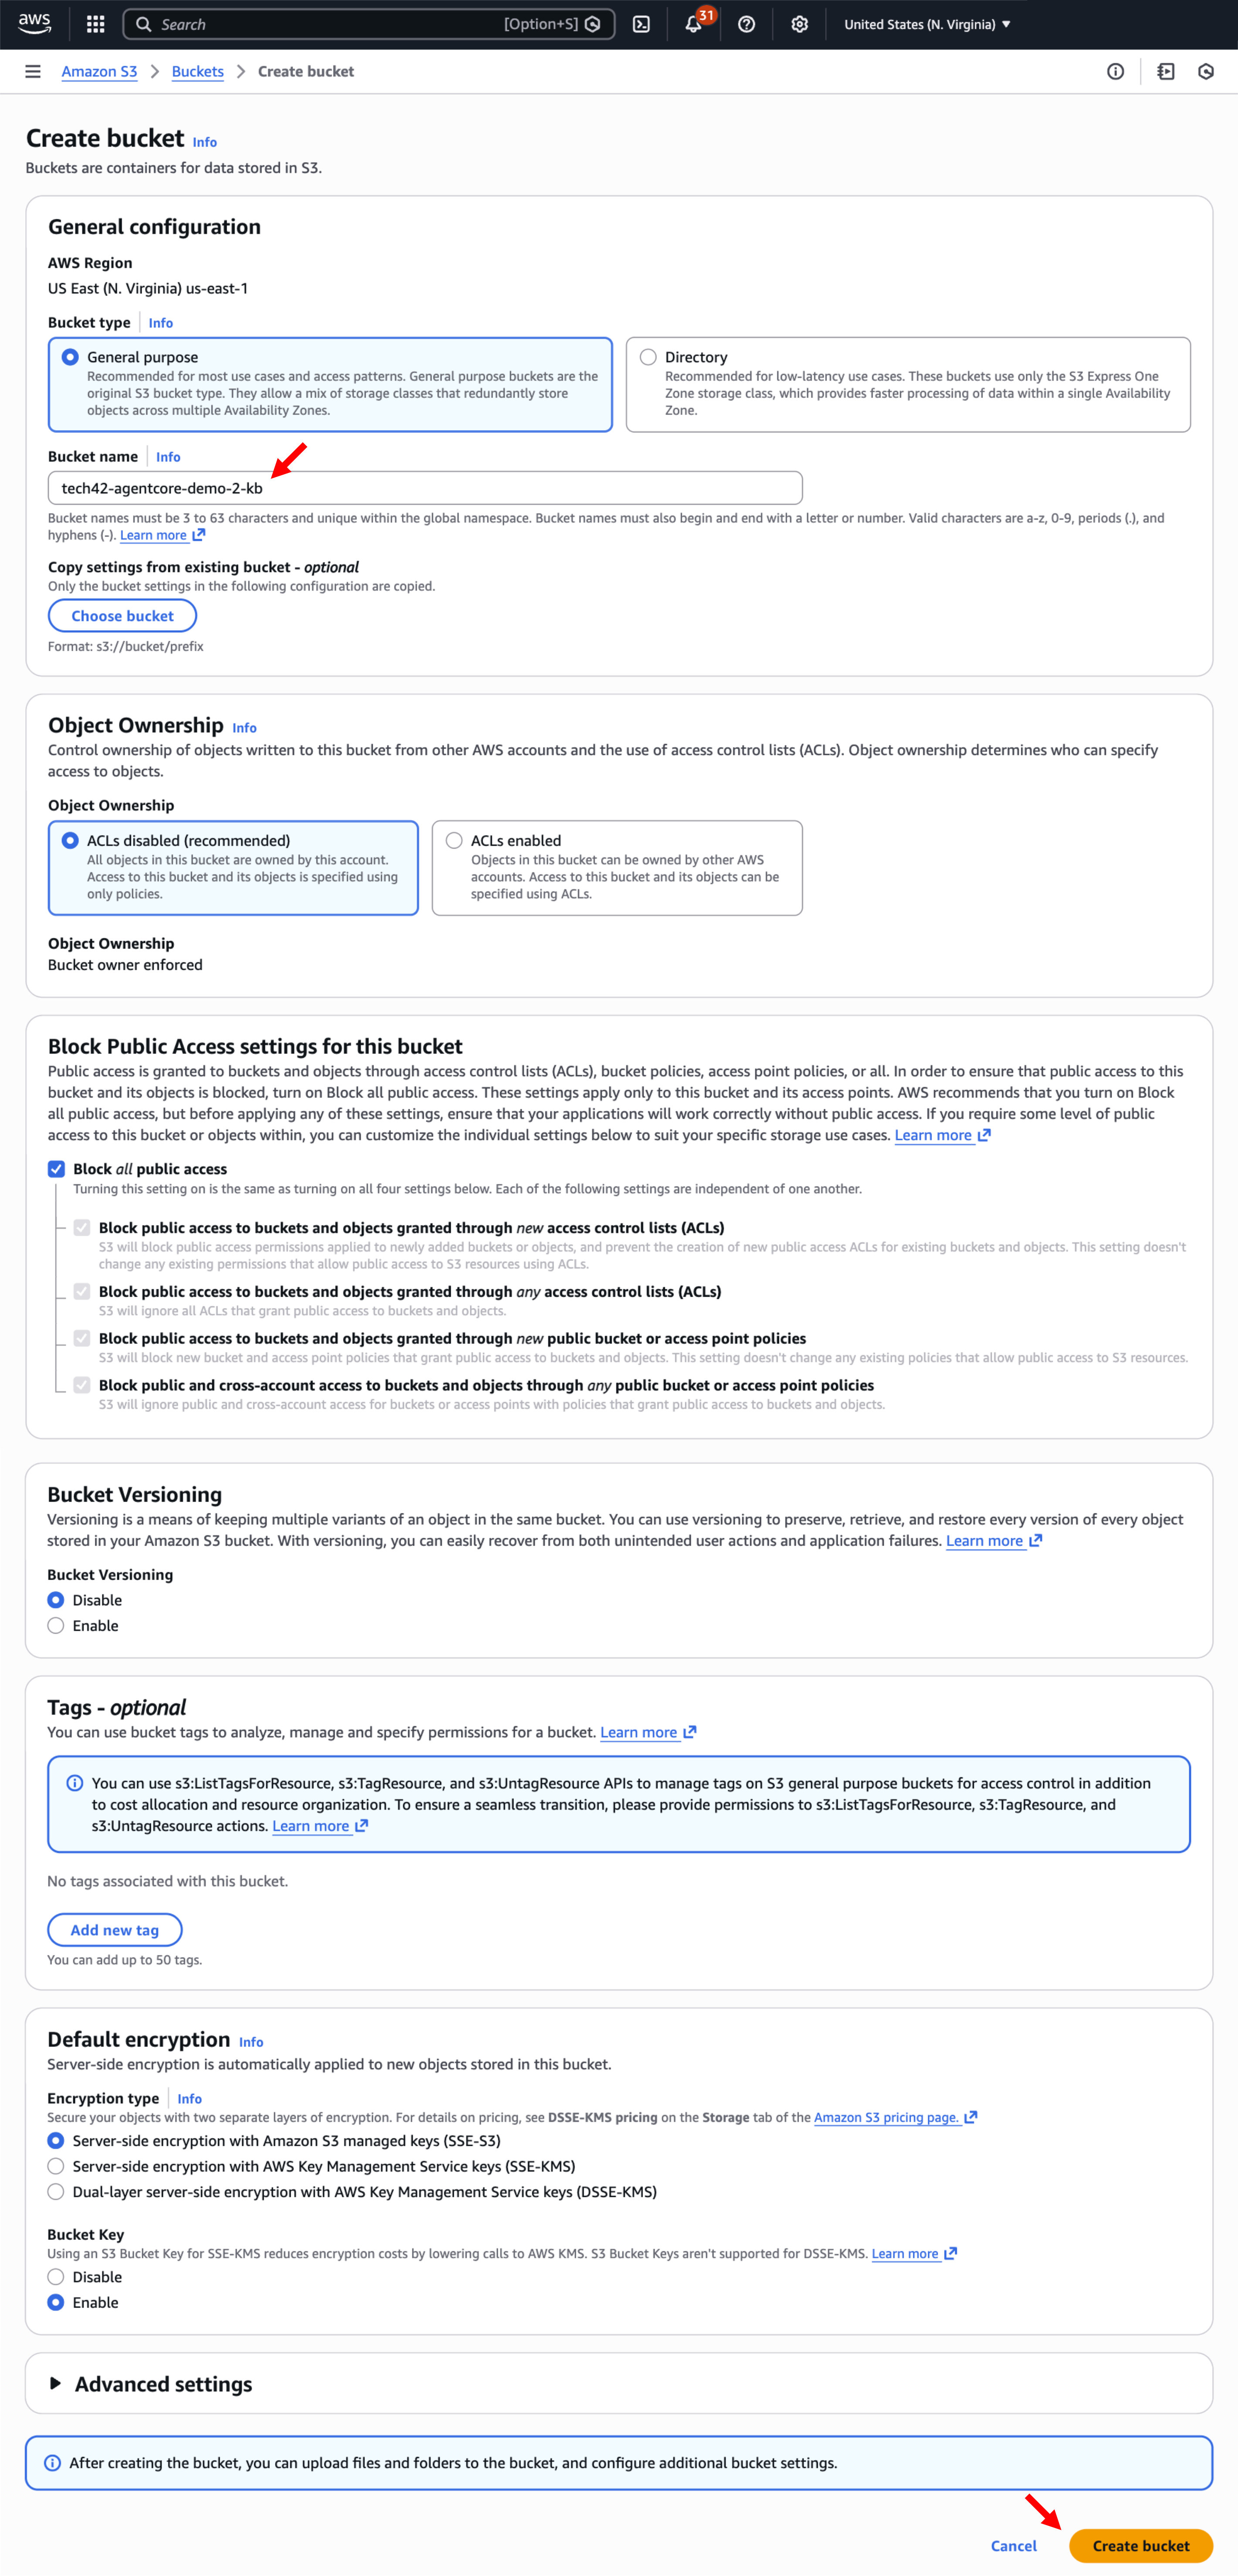
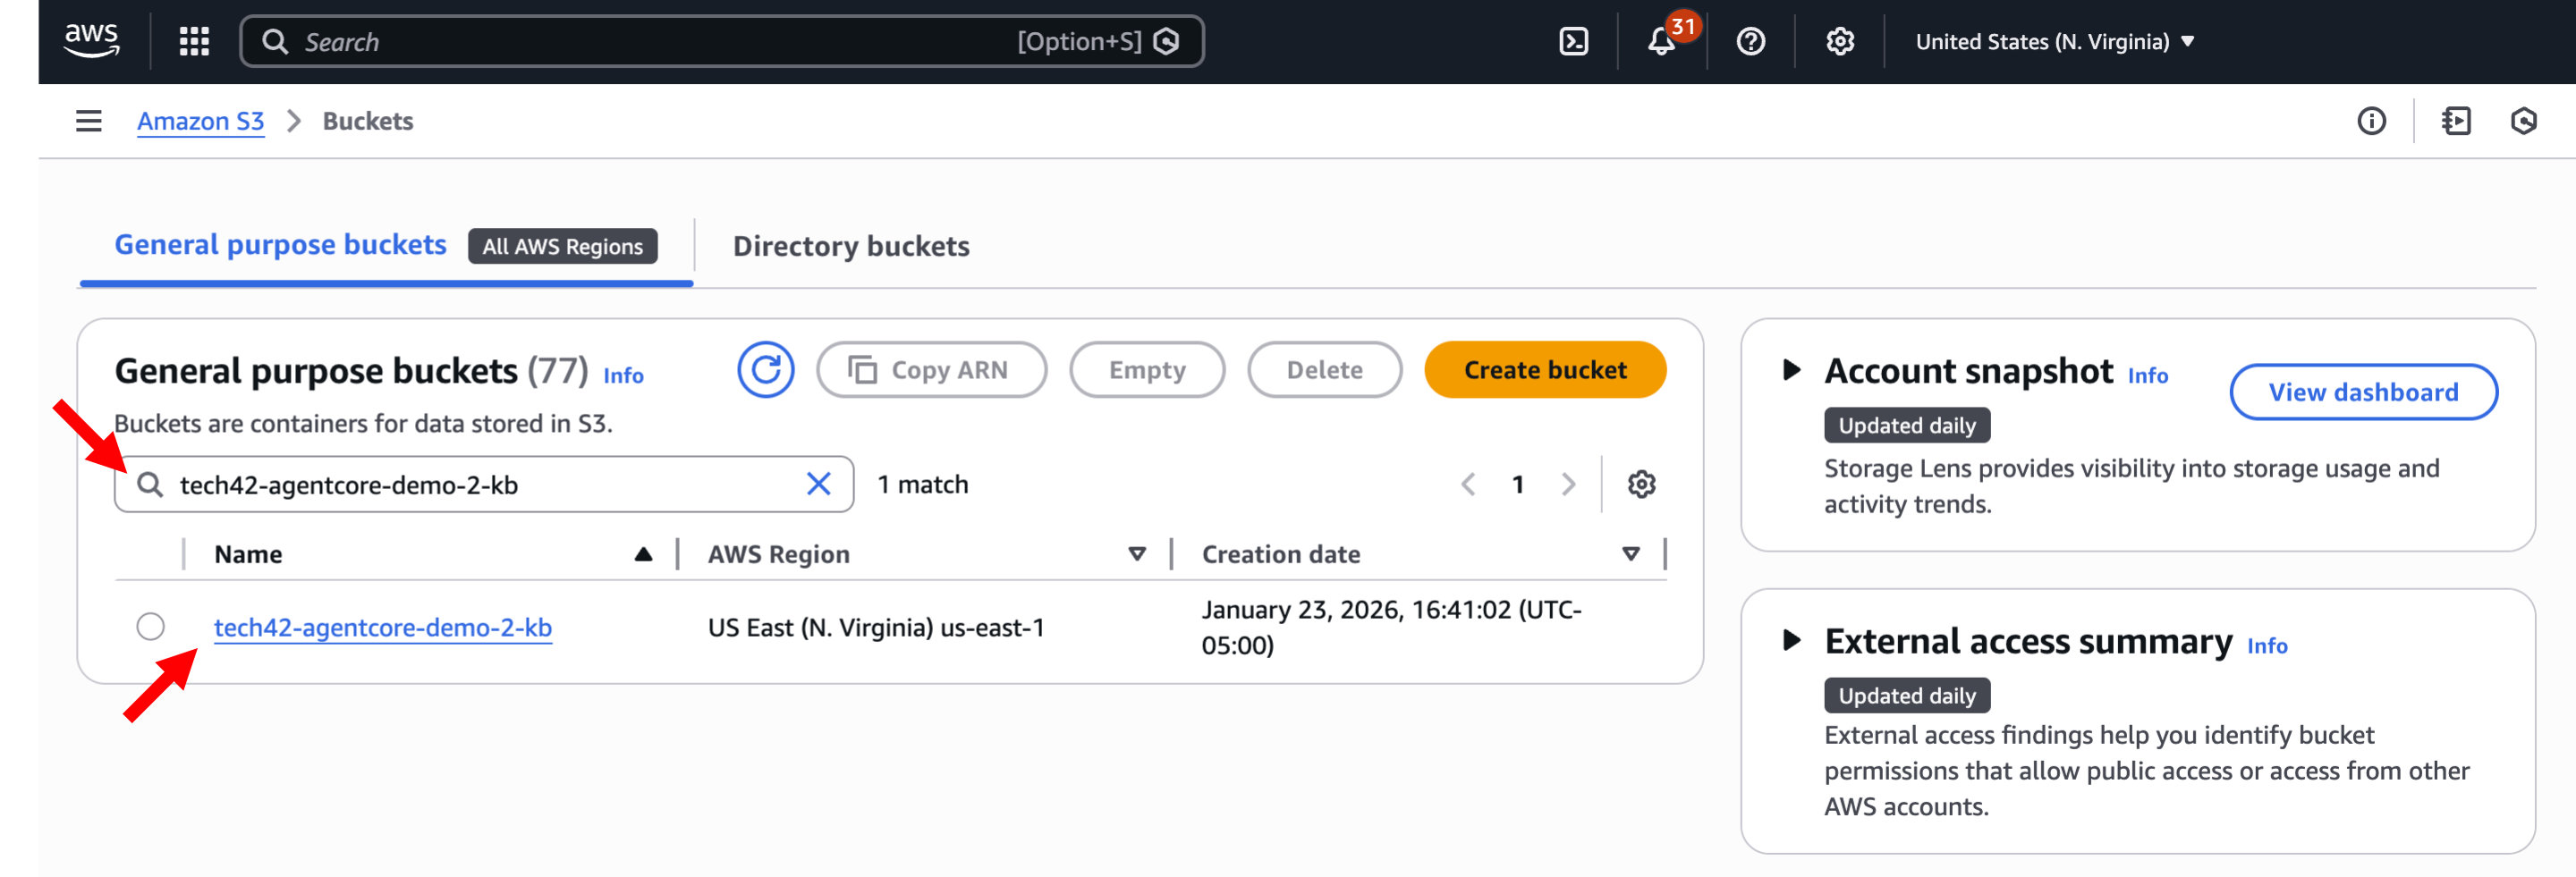
Step 3.1.c: Search for your bucket name -> Open your bucket and upload any files
As you are adding files, consider using information that may not be readily available on the internet or in an LLM training set.
3.2. Create the Knowledge Base in Amazon Bedrock
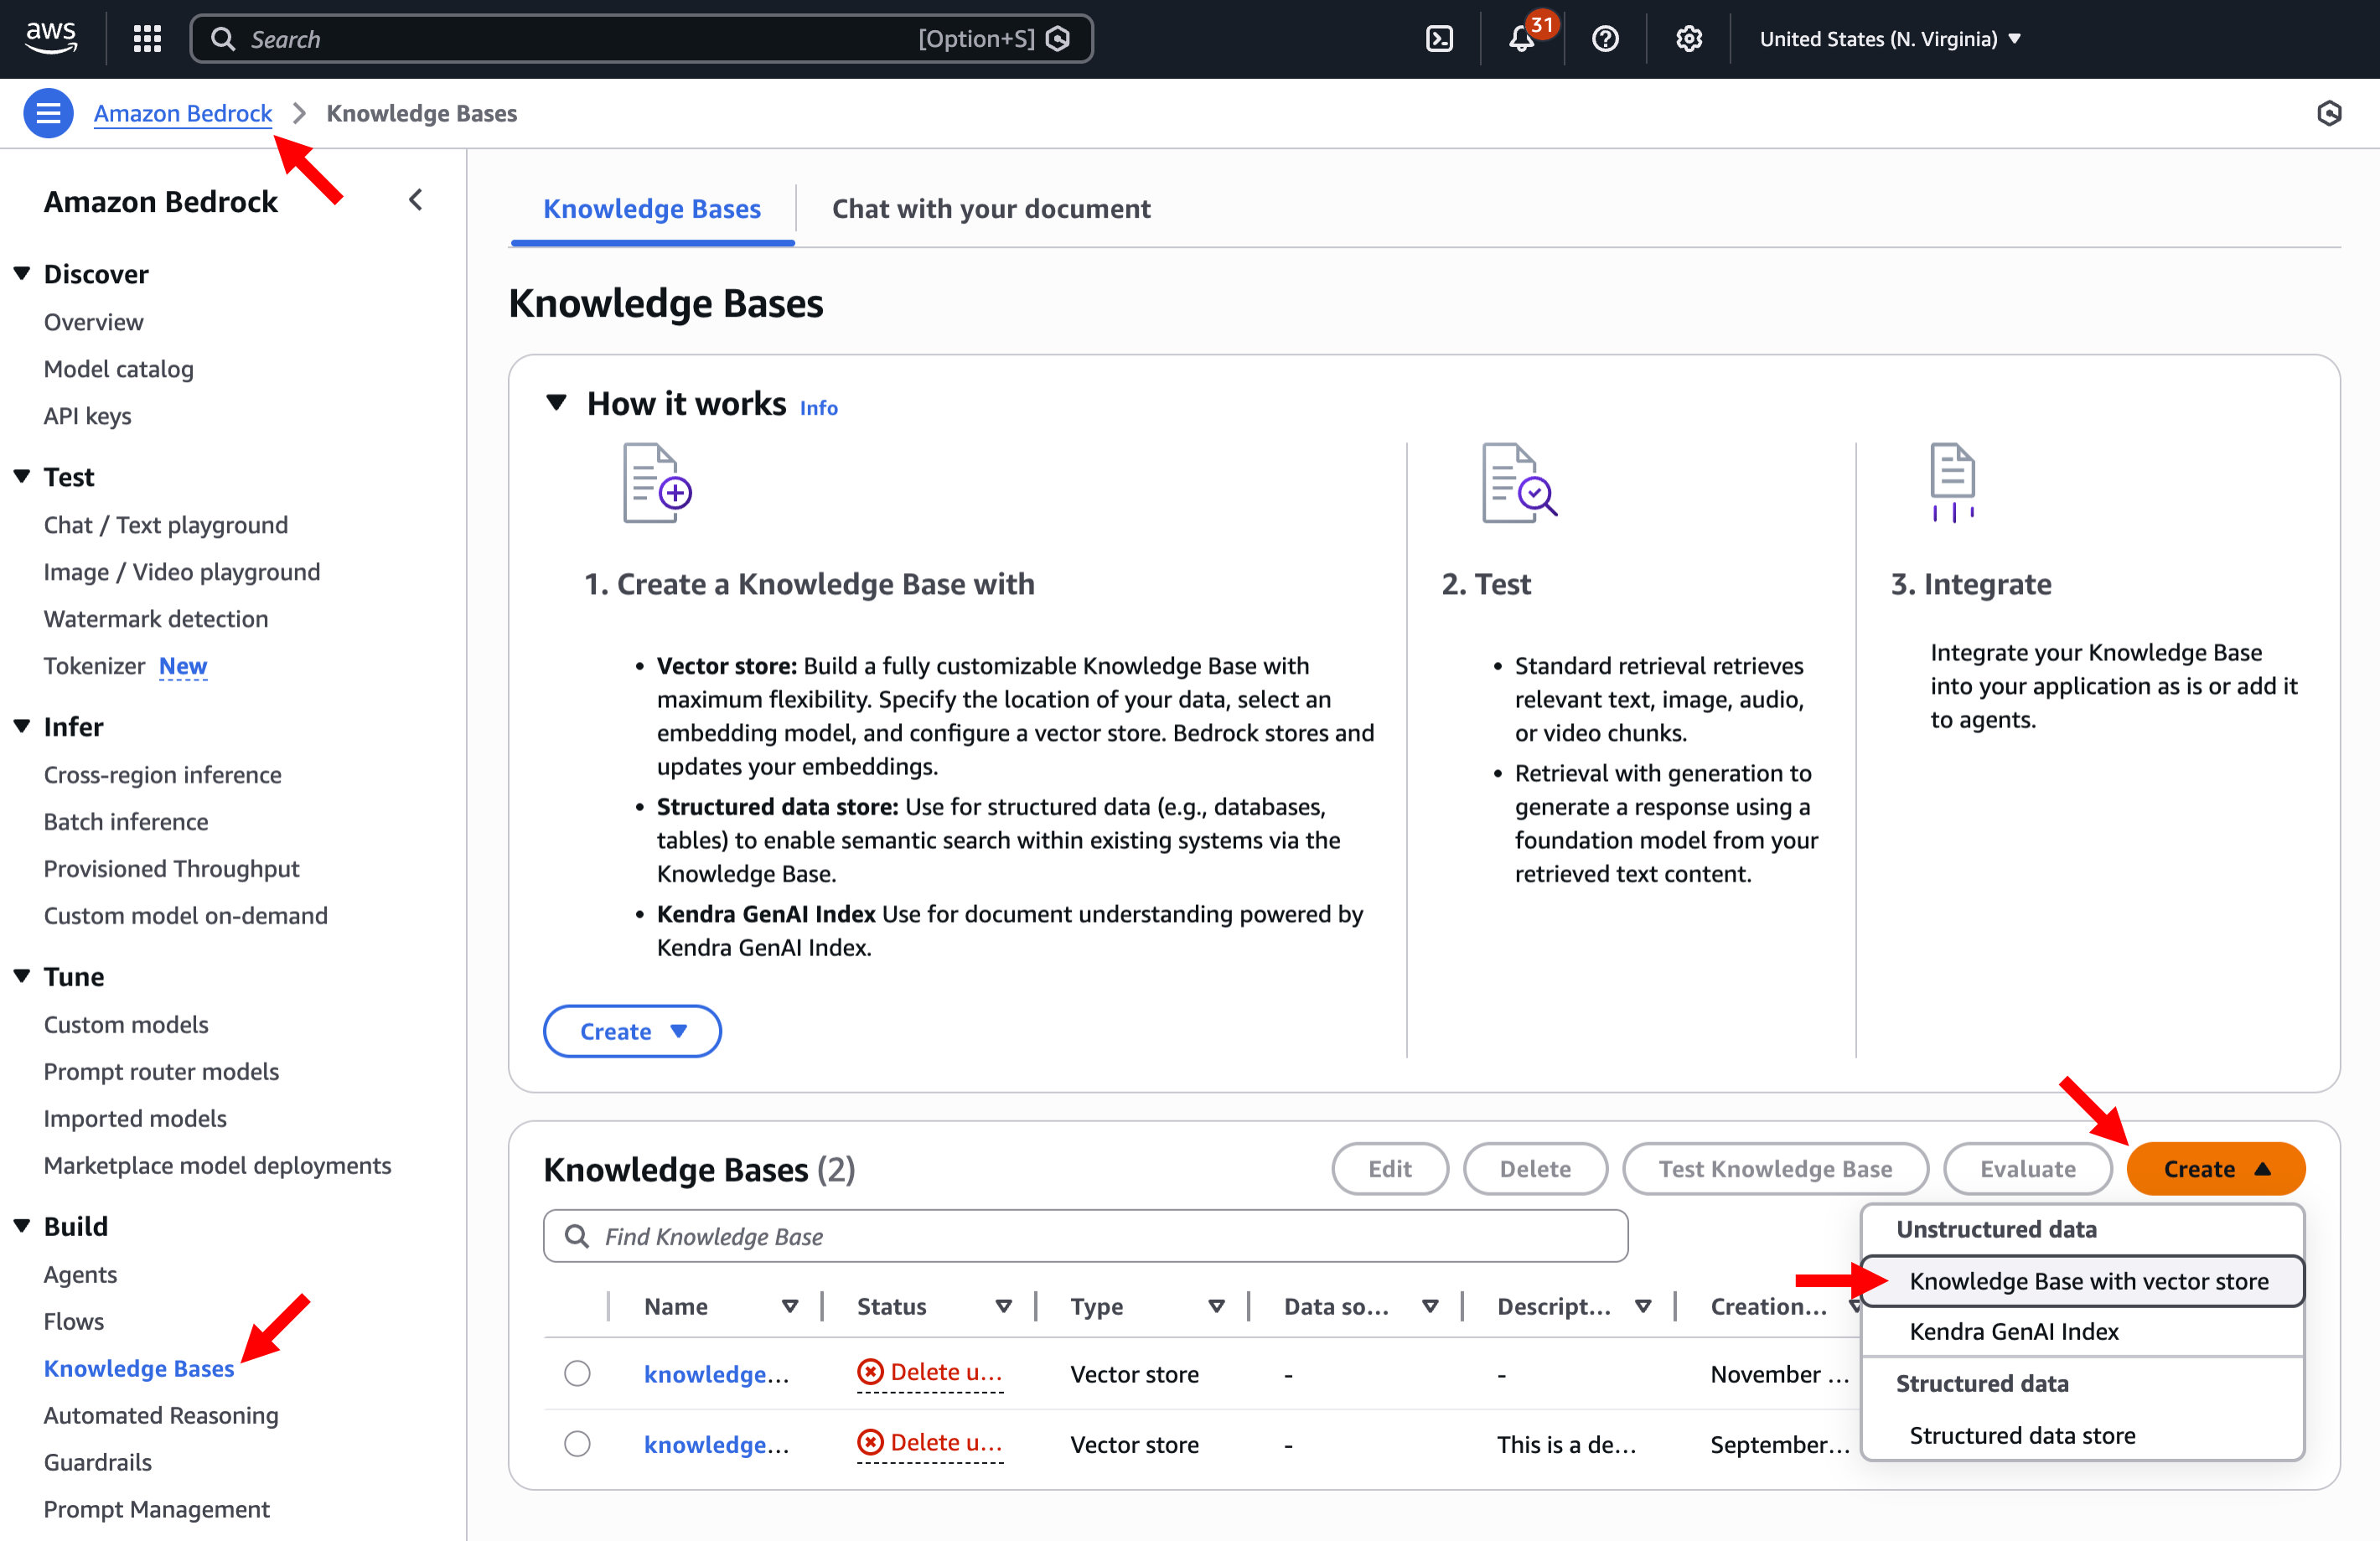
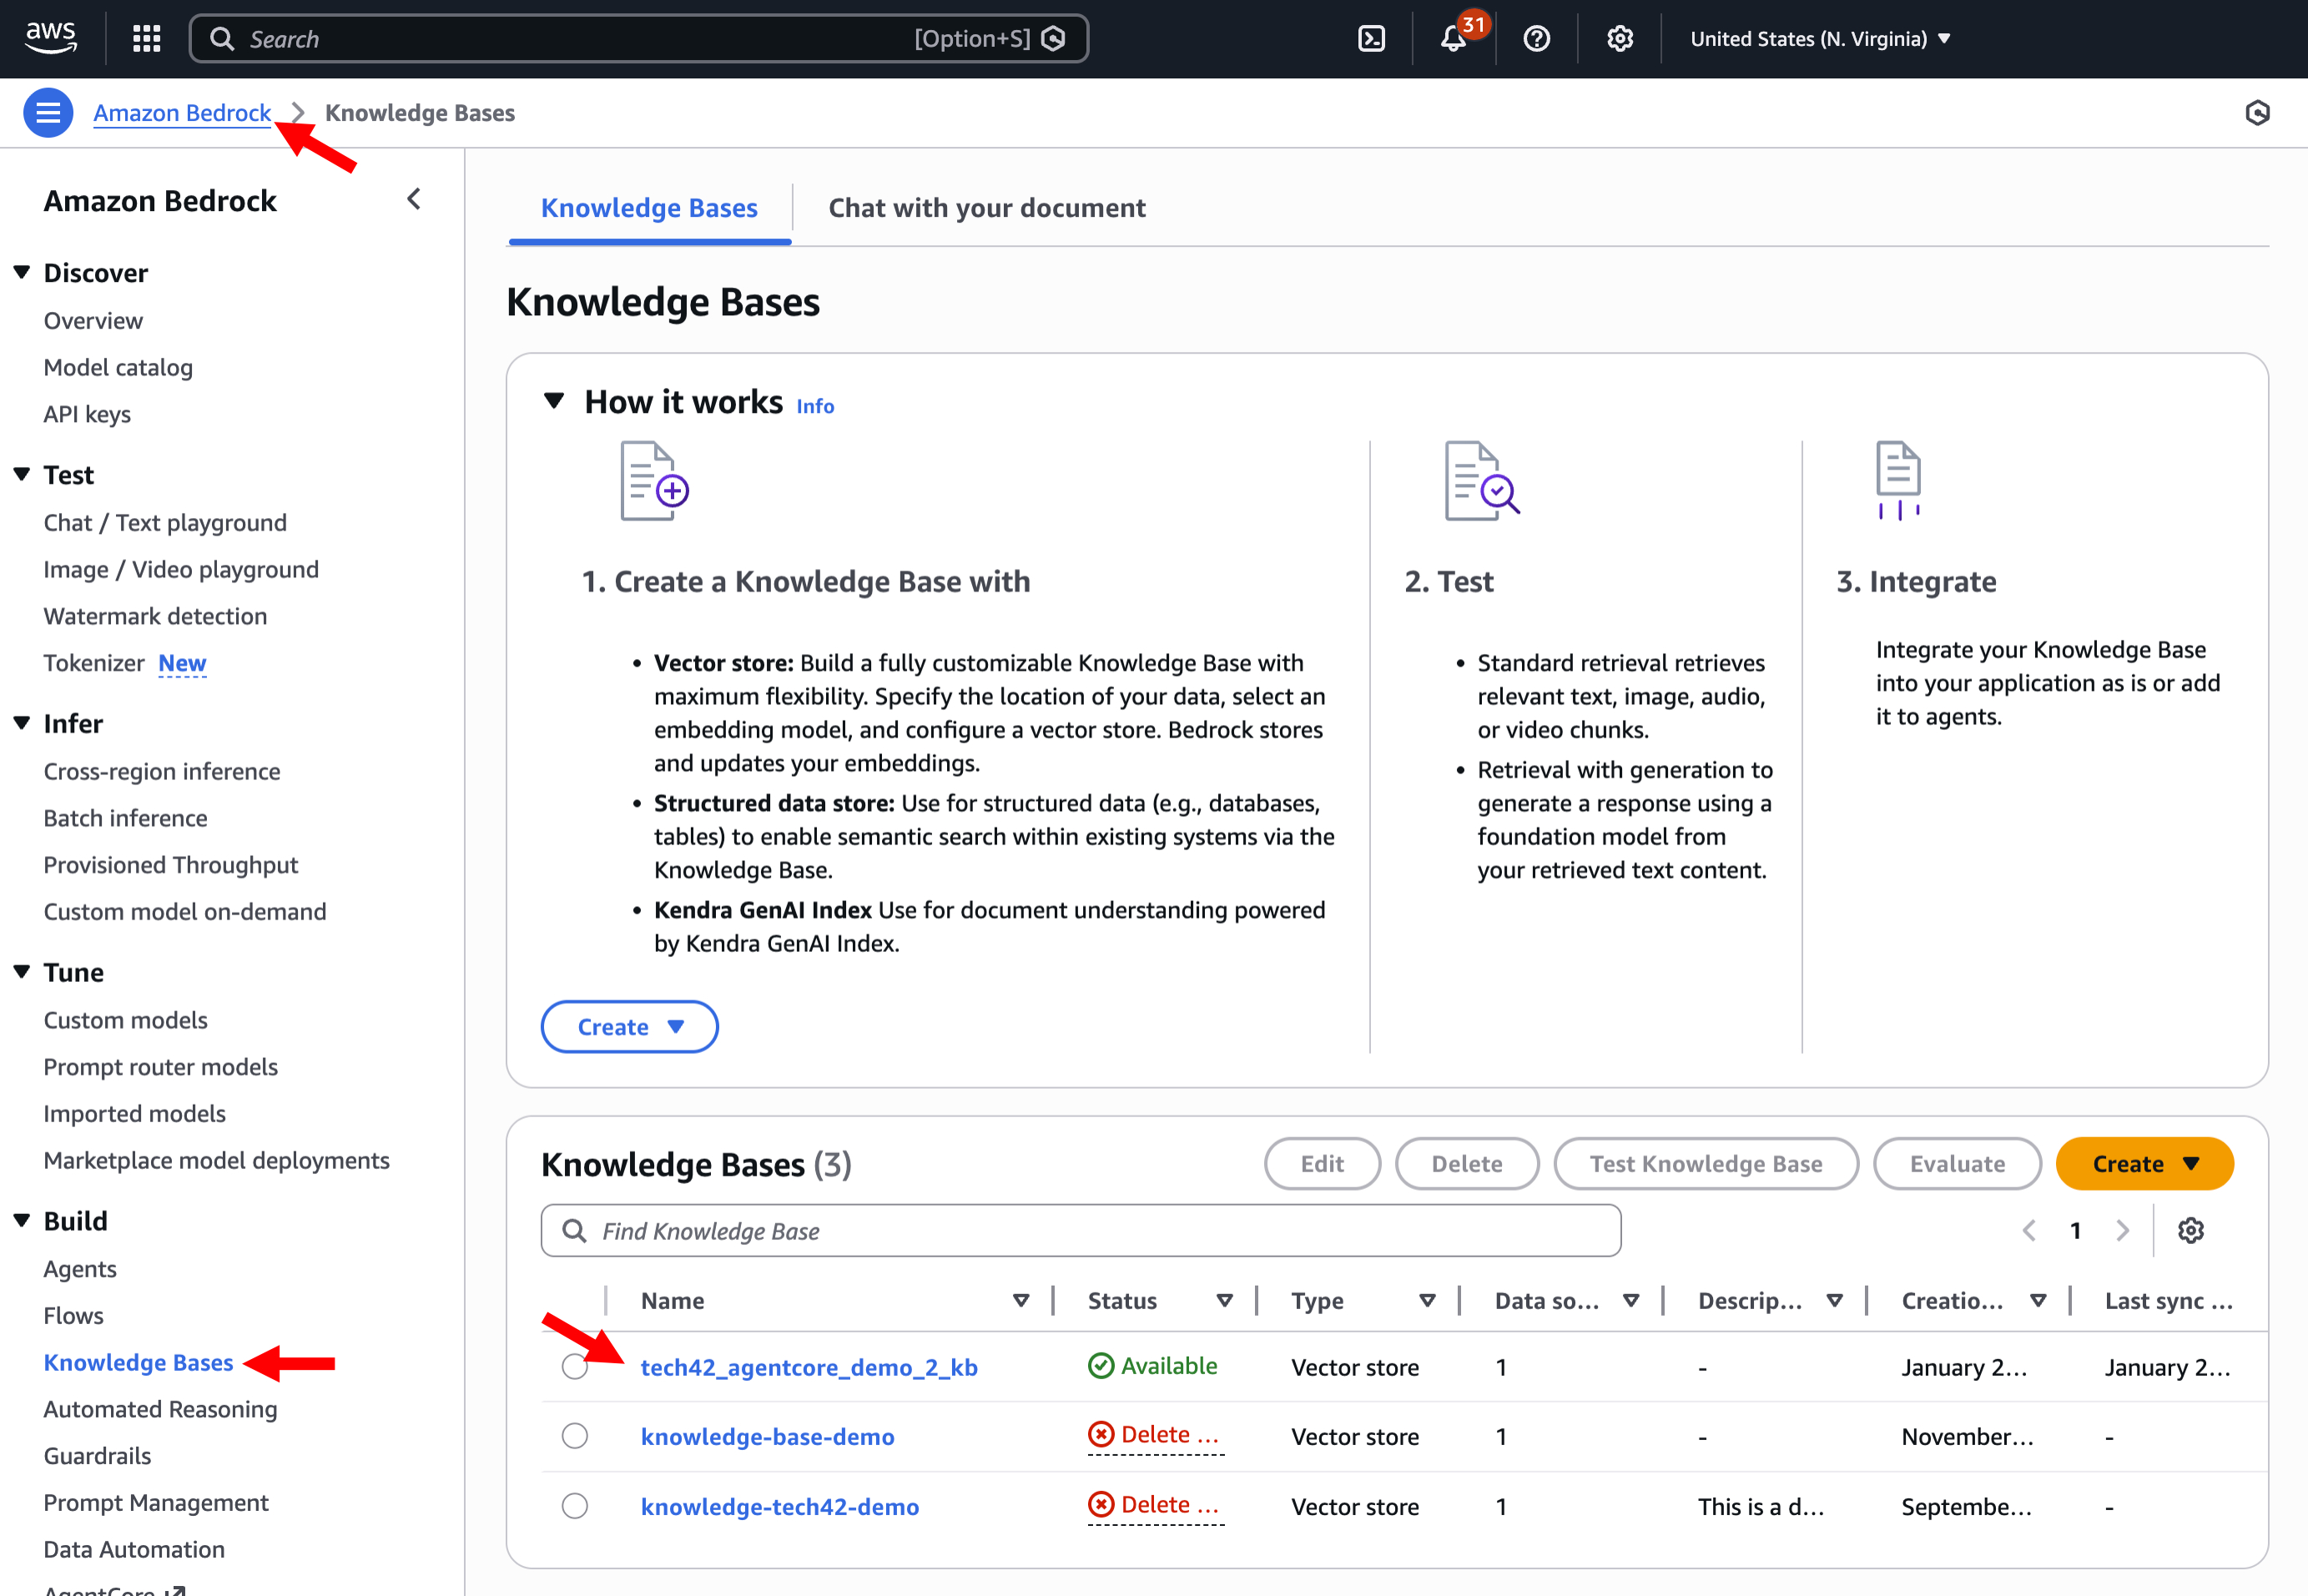
Step 3.2.a: Search for and open Amazon Bedrock-> Click "Knowledge Bases"
Step 3.2.b: Click on Create and select "Create knowledge base with vector store"
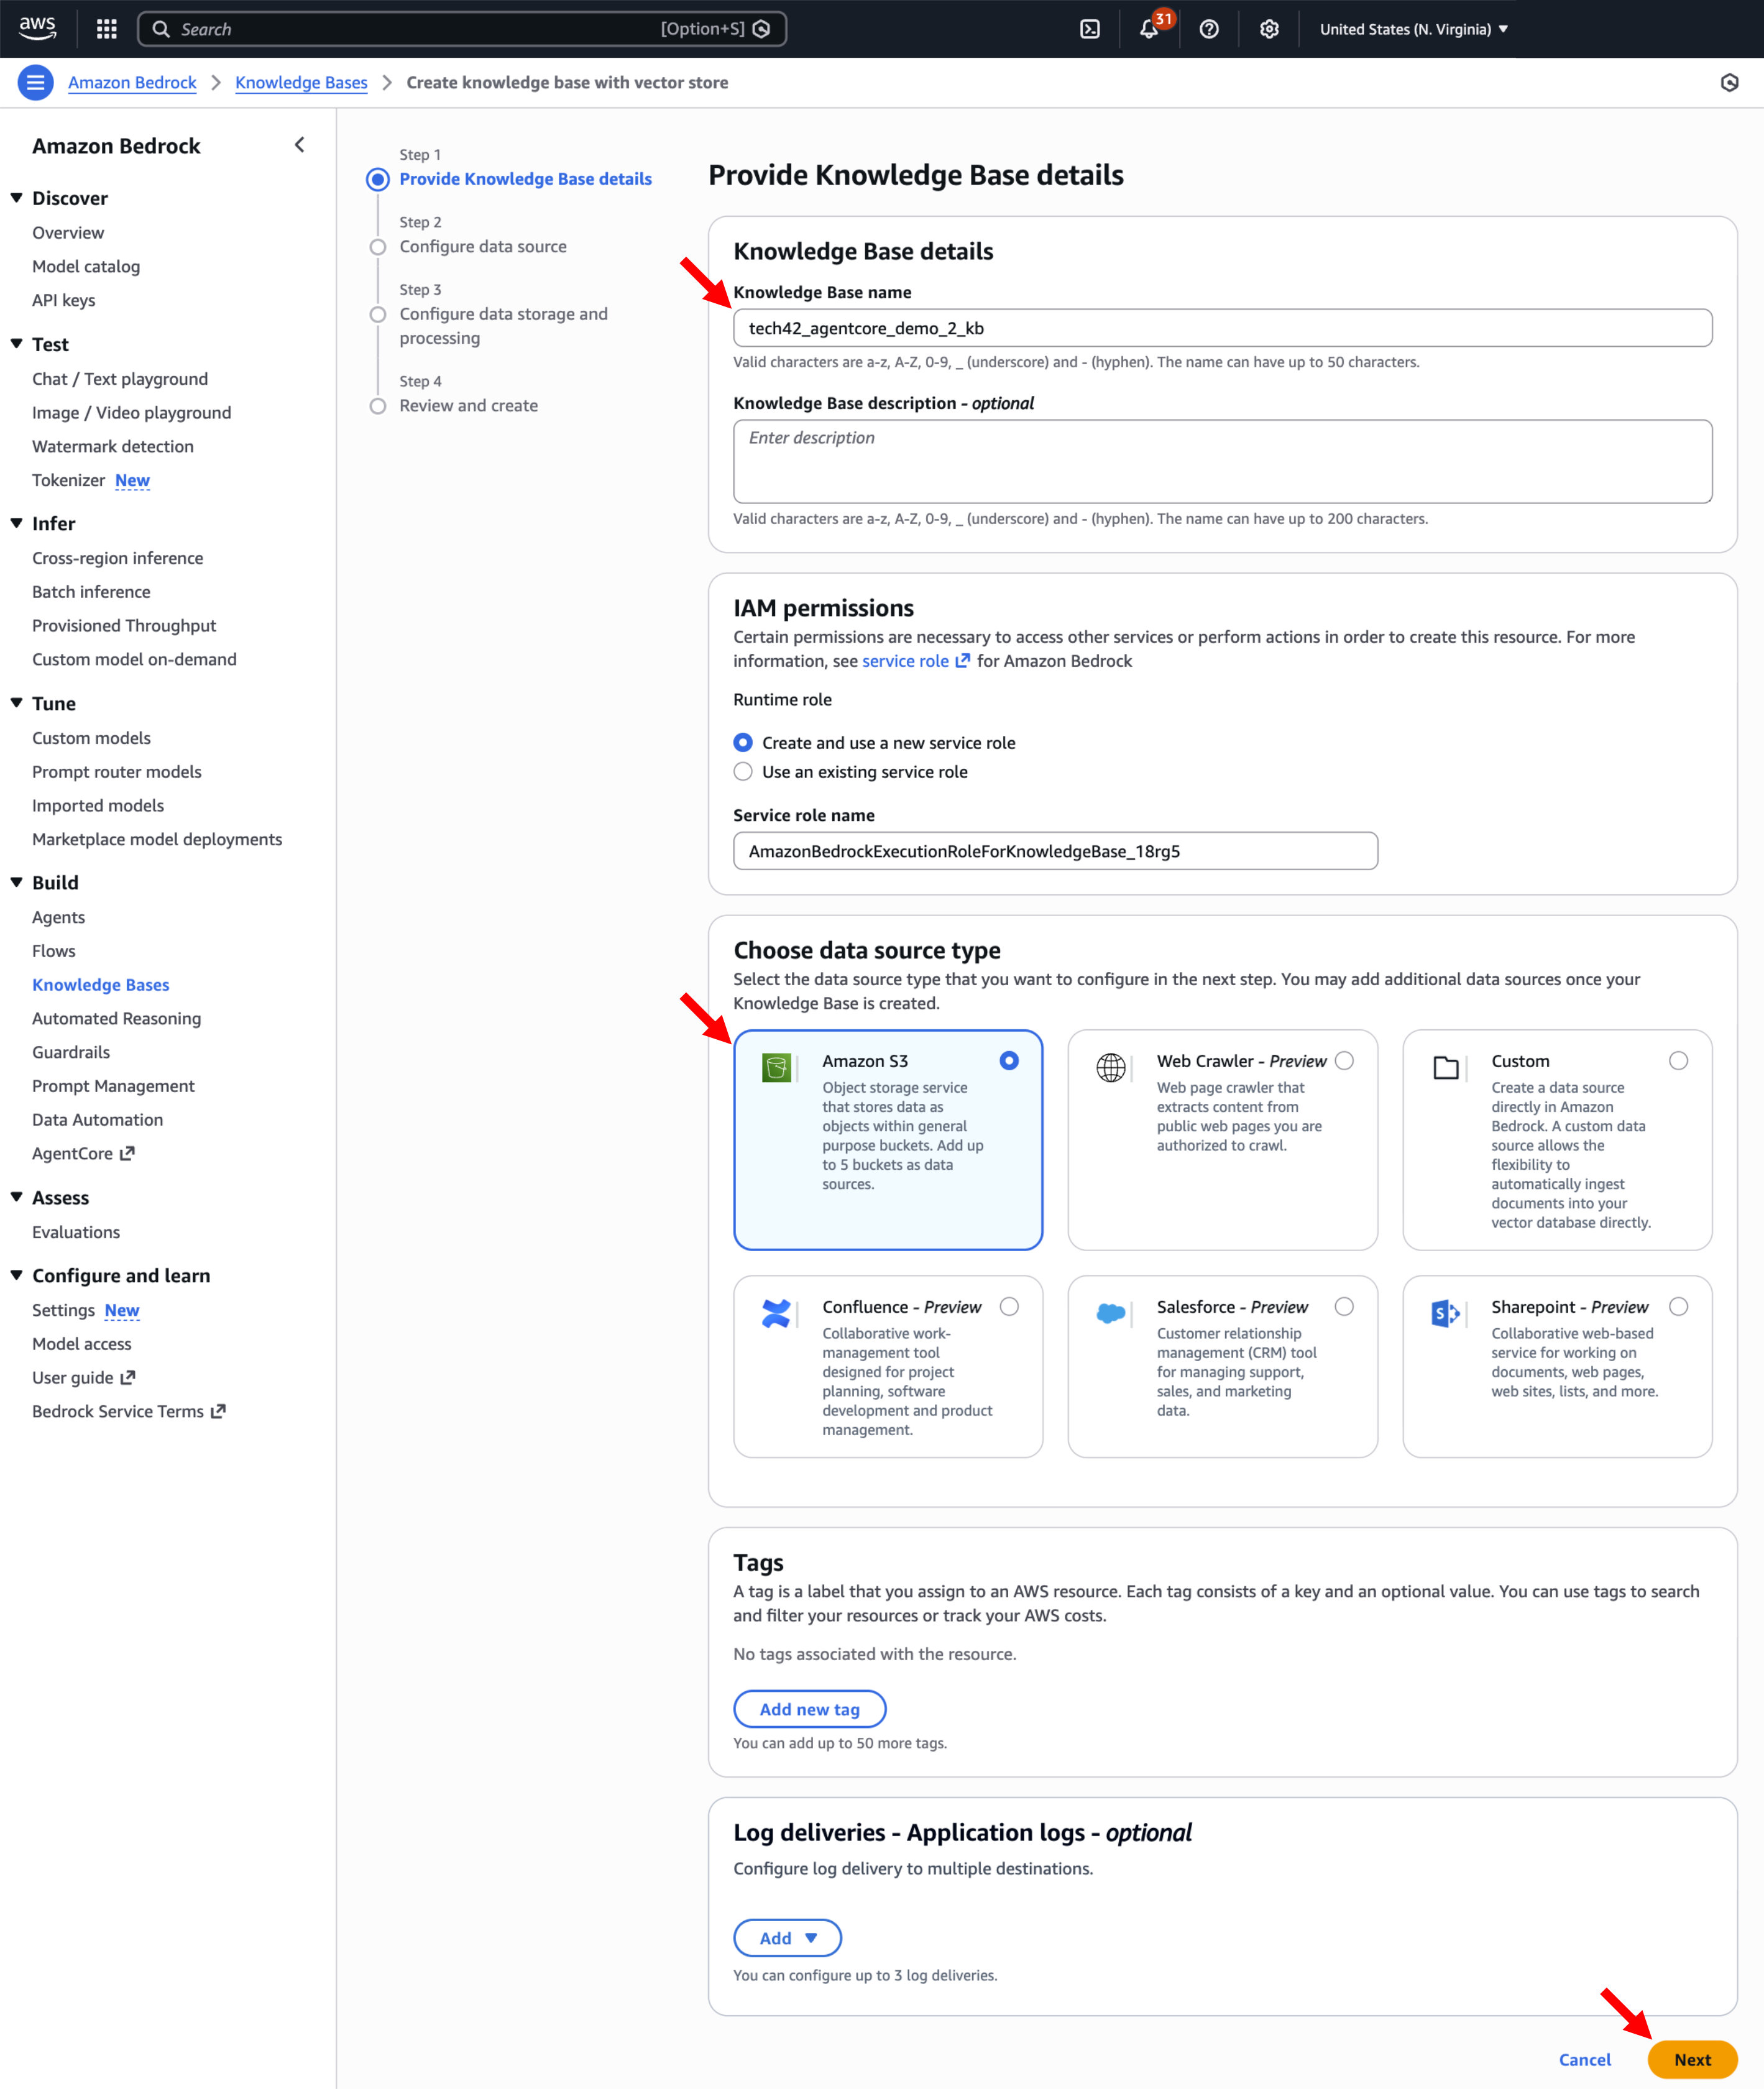
Step 3.2.c: Name your knowledge base ->Under "Choose data source type" choose Amazon S3 -> Click Next
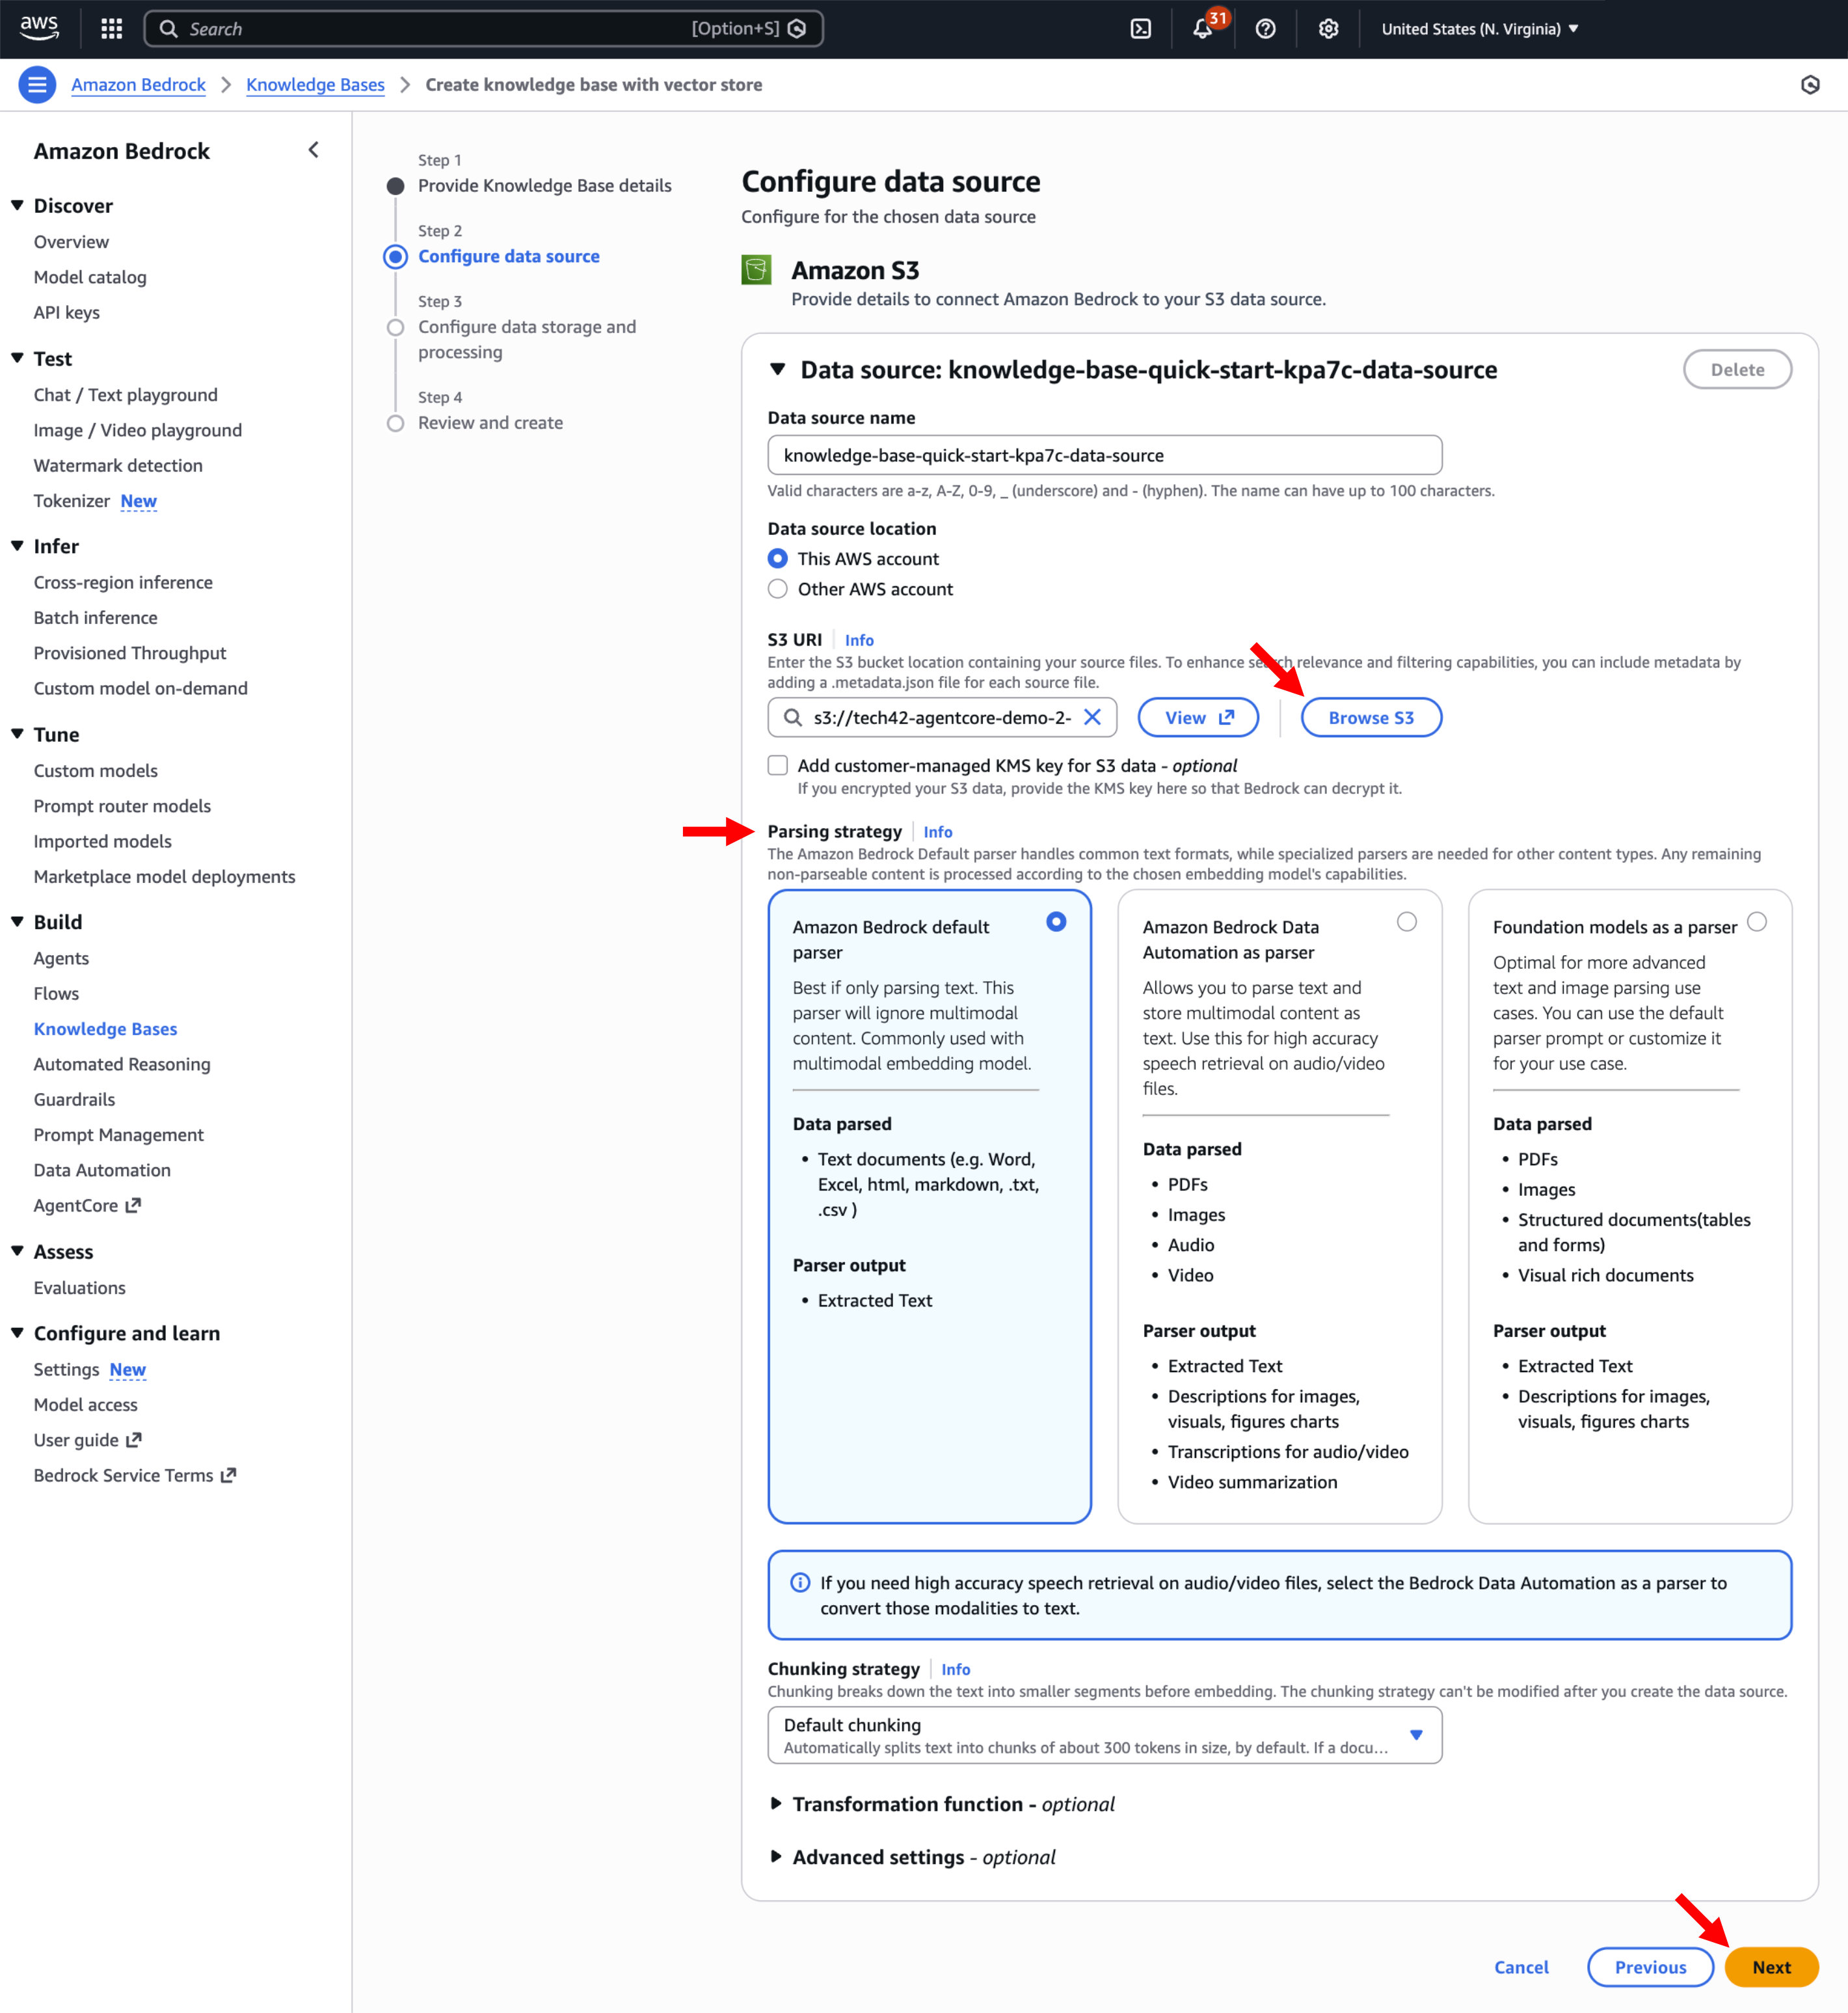
Step 3.2.d: Click "Browse S3" to find the bucket you created for your knowledge base files -> Select the parsing strategy that aligns with your file types -> Click Next
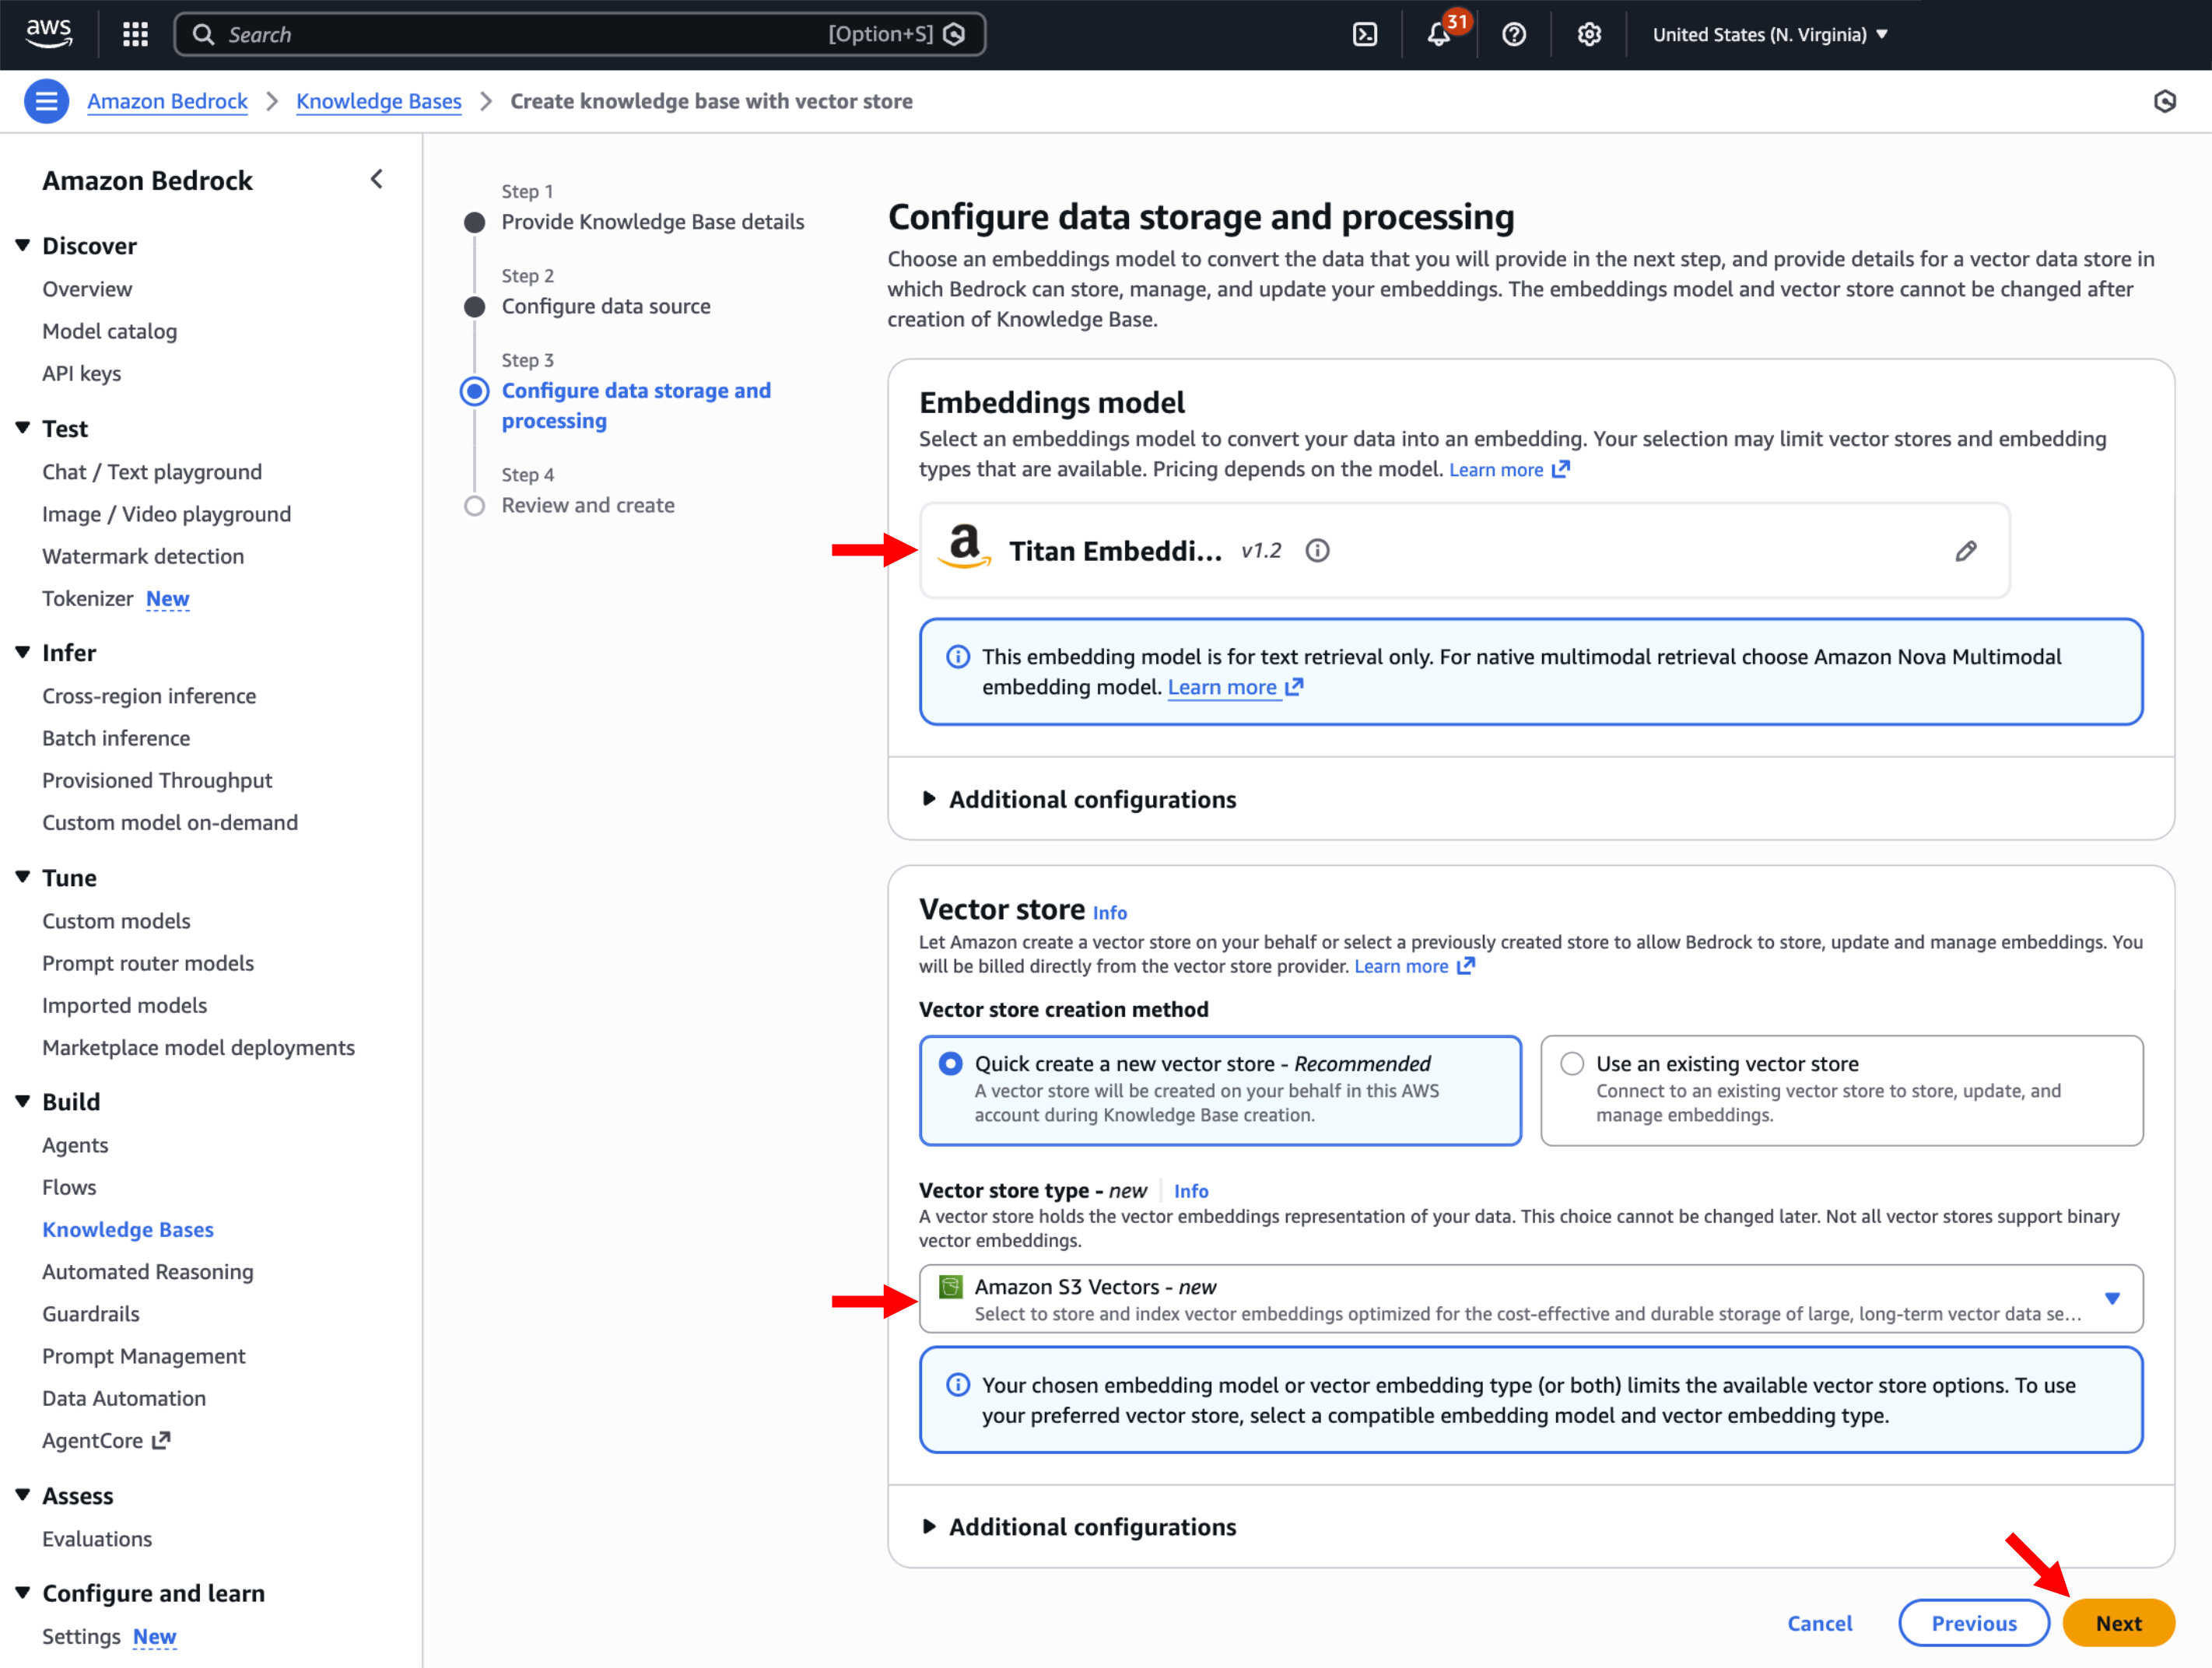
Step 3.2.e: Under Embeddings model, select a model: e.g Titan Text Embeddings V2 -> Under Vector store, choose a type (for testing S3 vectors will suffice) -> Click Next
Step 3.2.f: Review your setup and click "Create Knowledge Base"
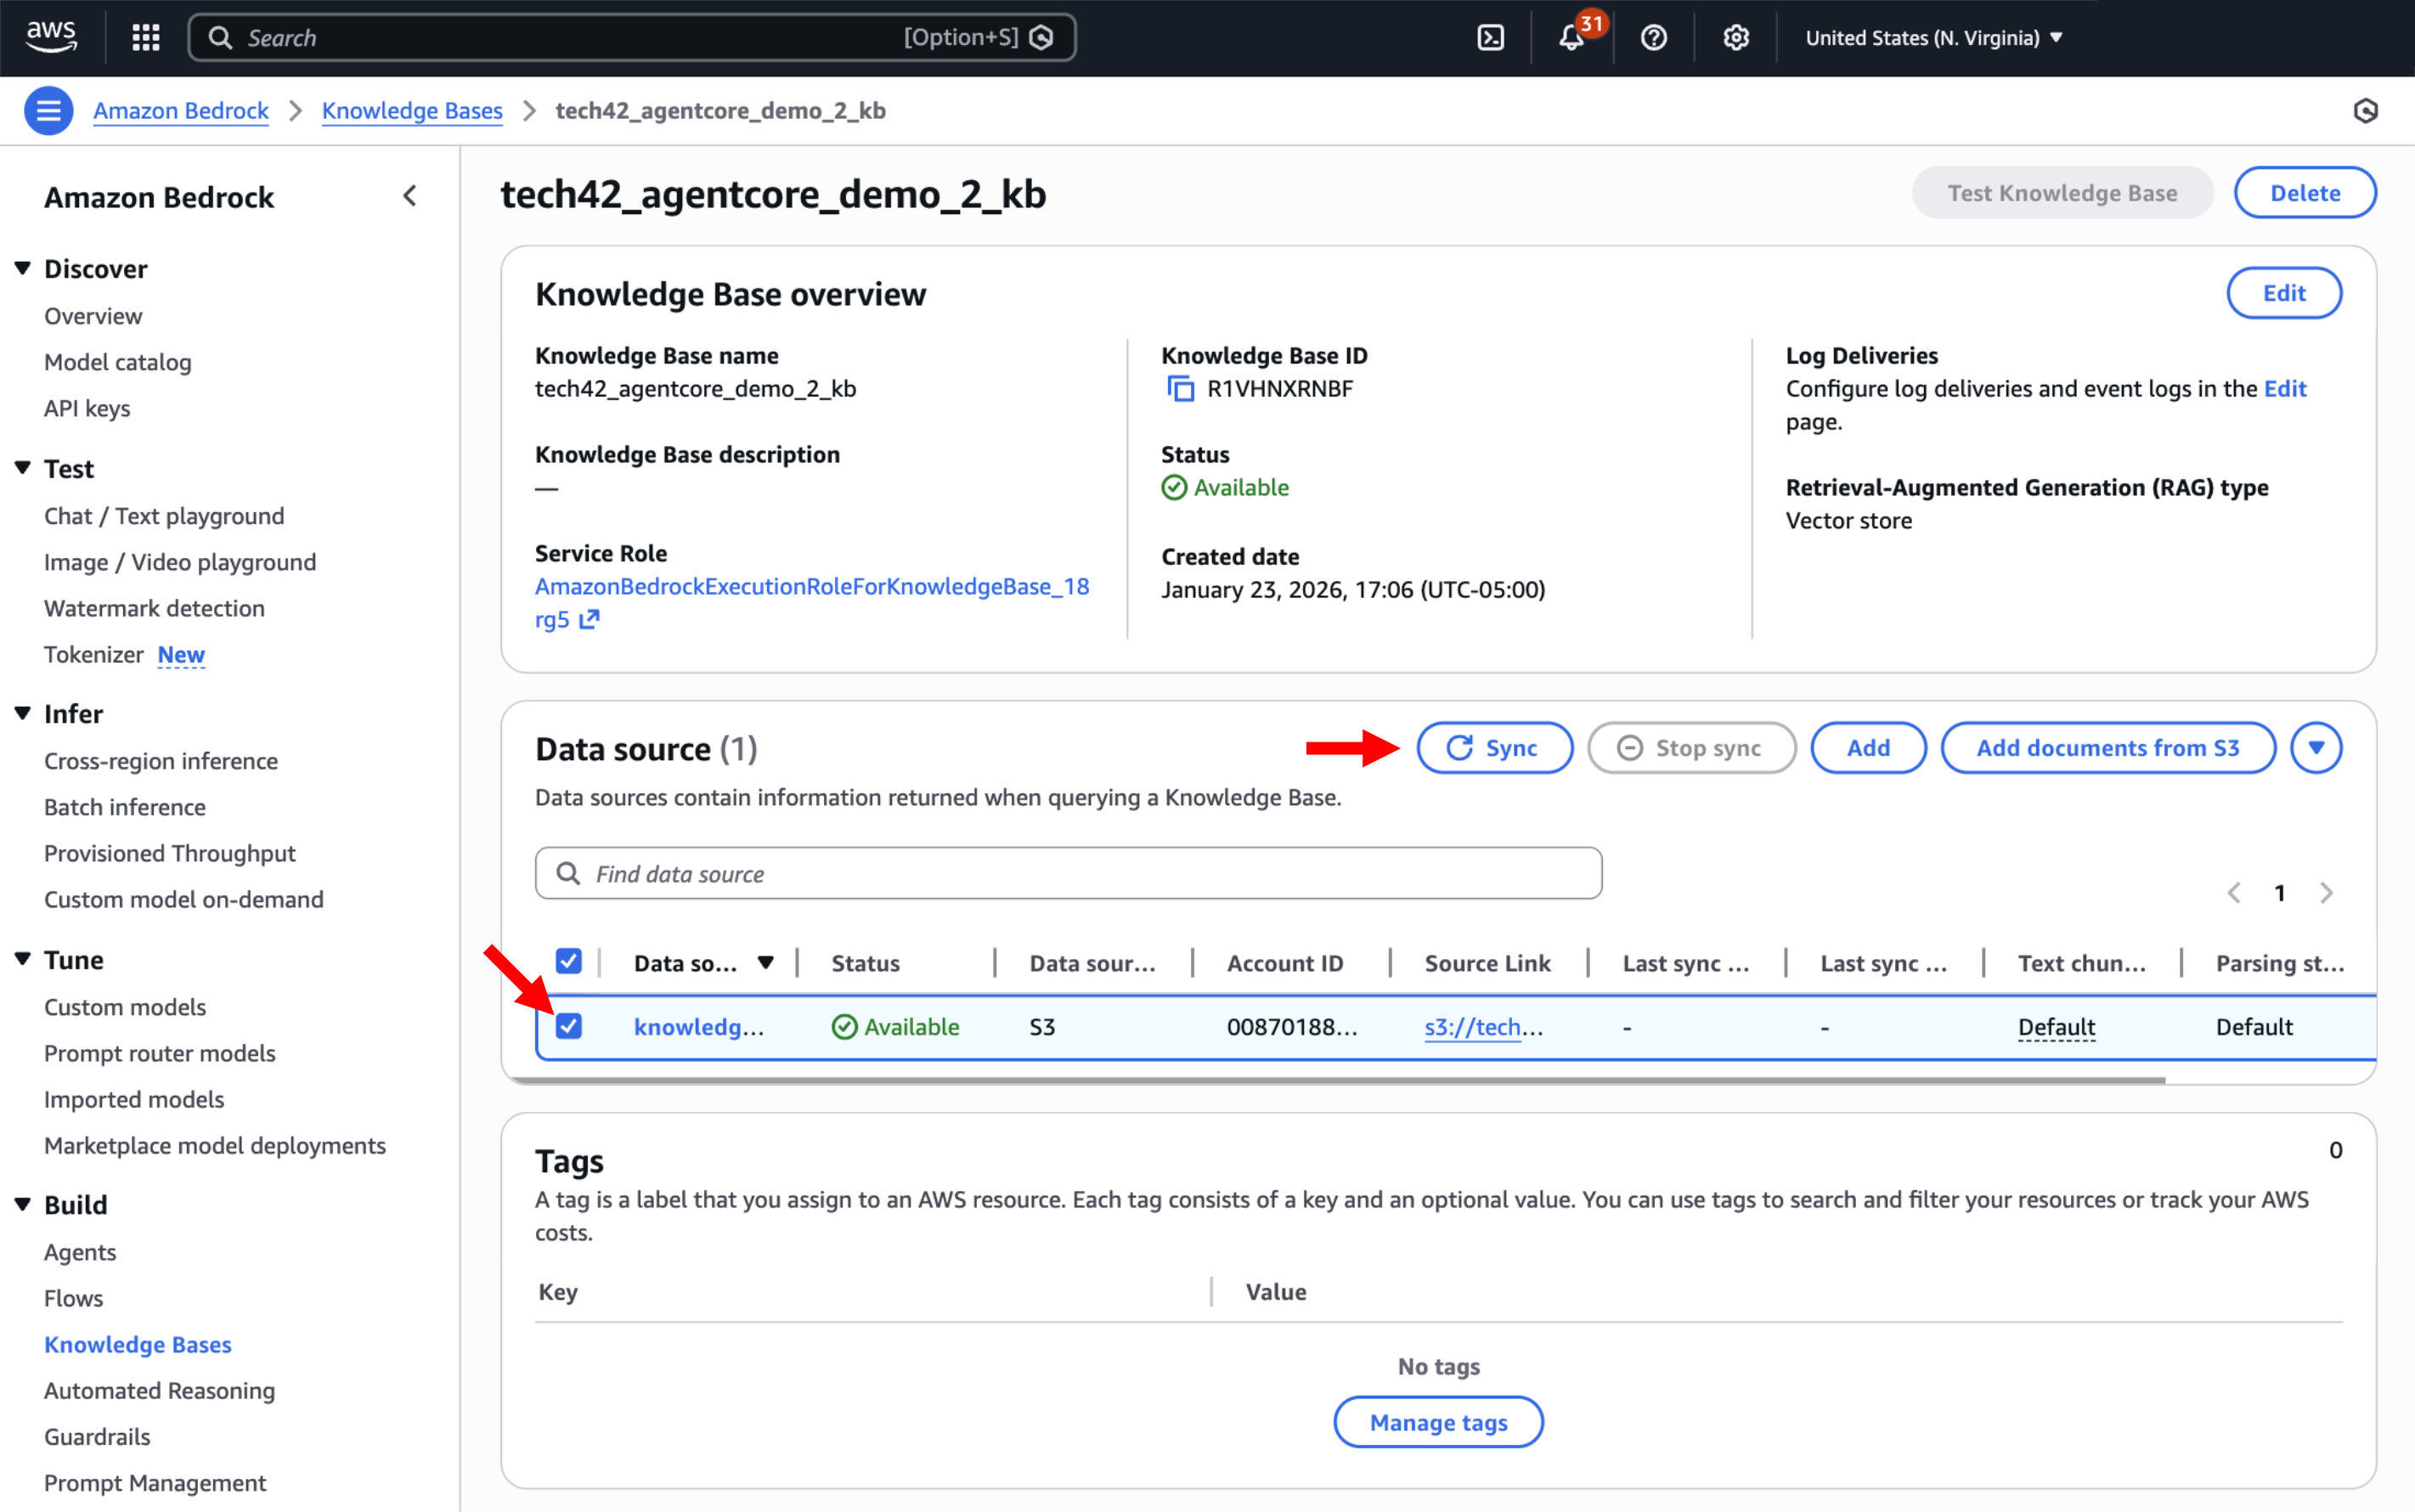
3.3. Sync the Data Source to ingest the documents into the knowledge base
Step 3.3.a: From your knowledge base details page in the console, select the data source in the "Data source" section -> Click "Sync"
4. Setting up Observability
You can set up observability through either ADOT or Langfuse. Follow the relevant section below based on your desired setup (determined based on your CloudFormation deployment) and skip the other.
4.1. ADOT (AWS Distro for OpenTelemetry)
This section guides you through setting up observability using ADOT (AWS Distro for OpenTelemetry), which is the observability framework integrated into Amazon Bedrock AgentCore. It collects and exports telemetry data from AI agents running in the AgentCore runtime, enabling comprehensive monitoring, tracing, and debugging of agent workflows. If you're not using this monitoring method, skip this section.
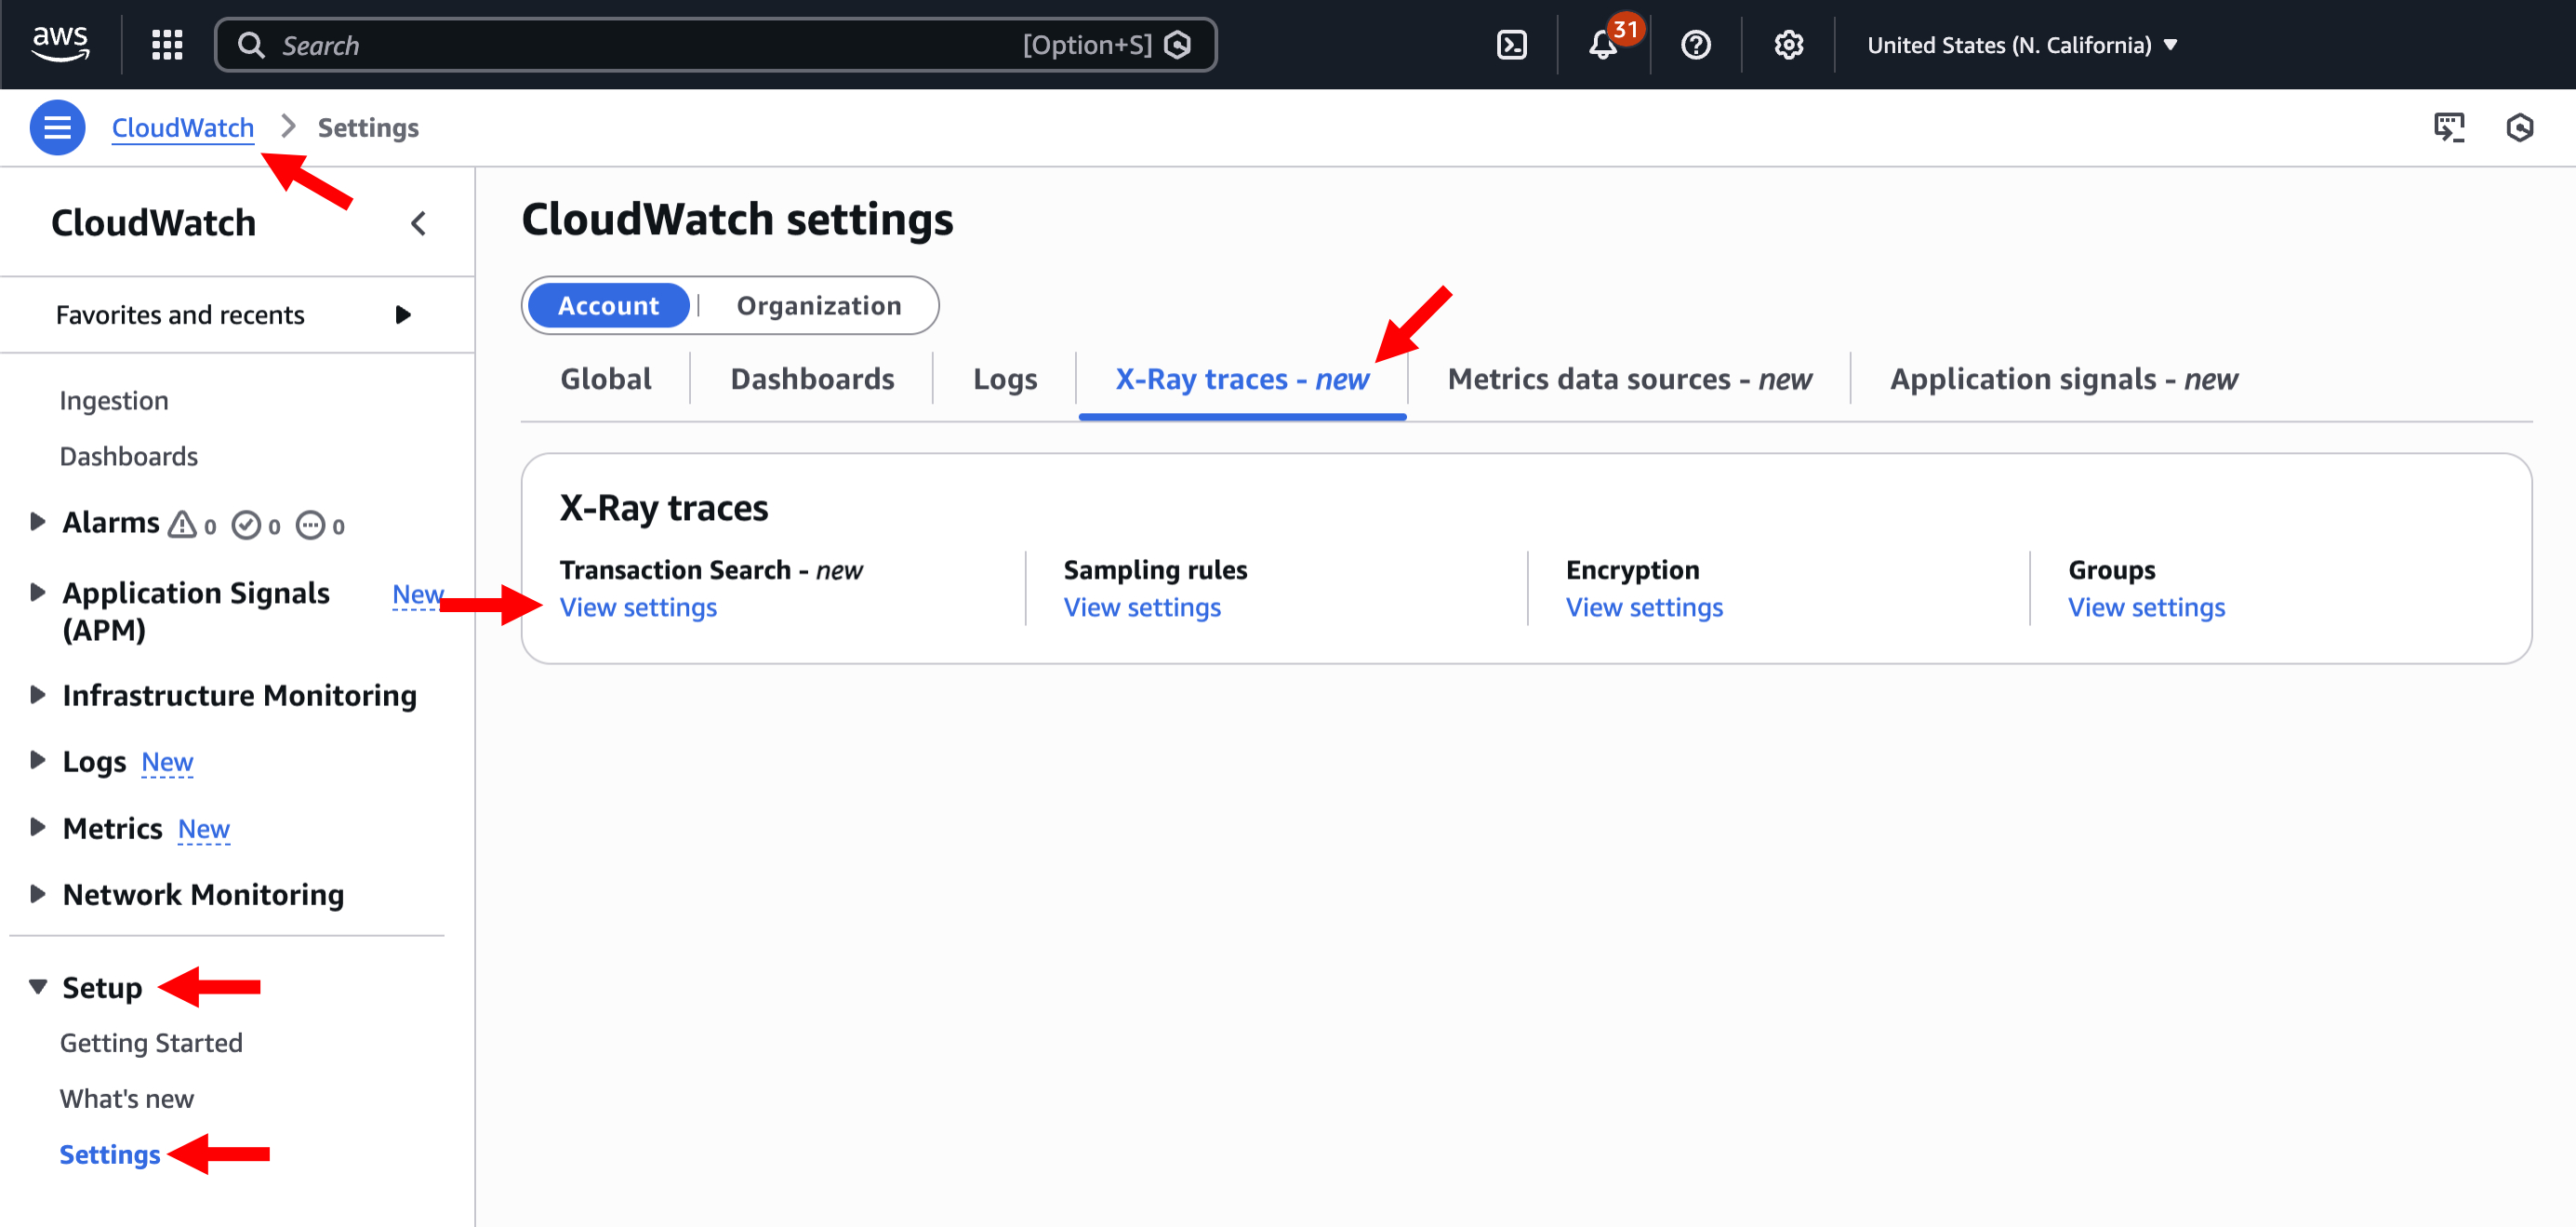
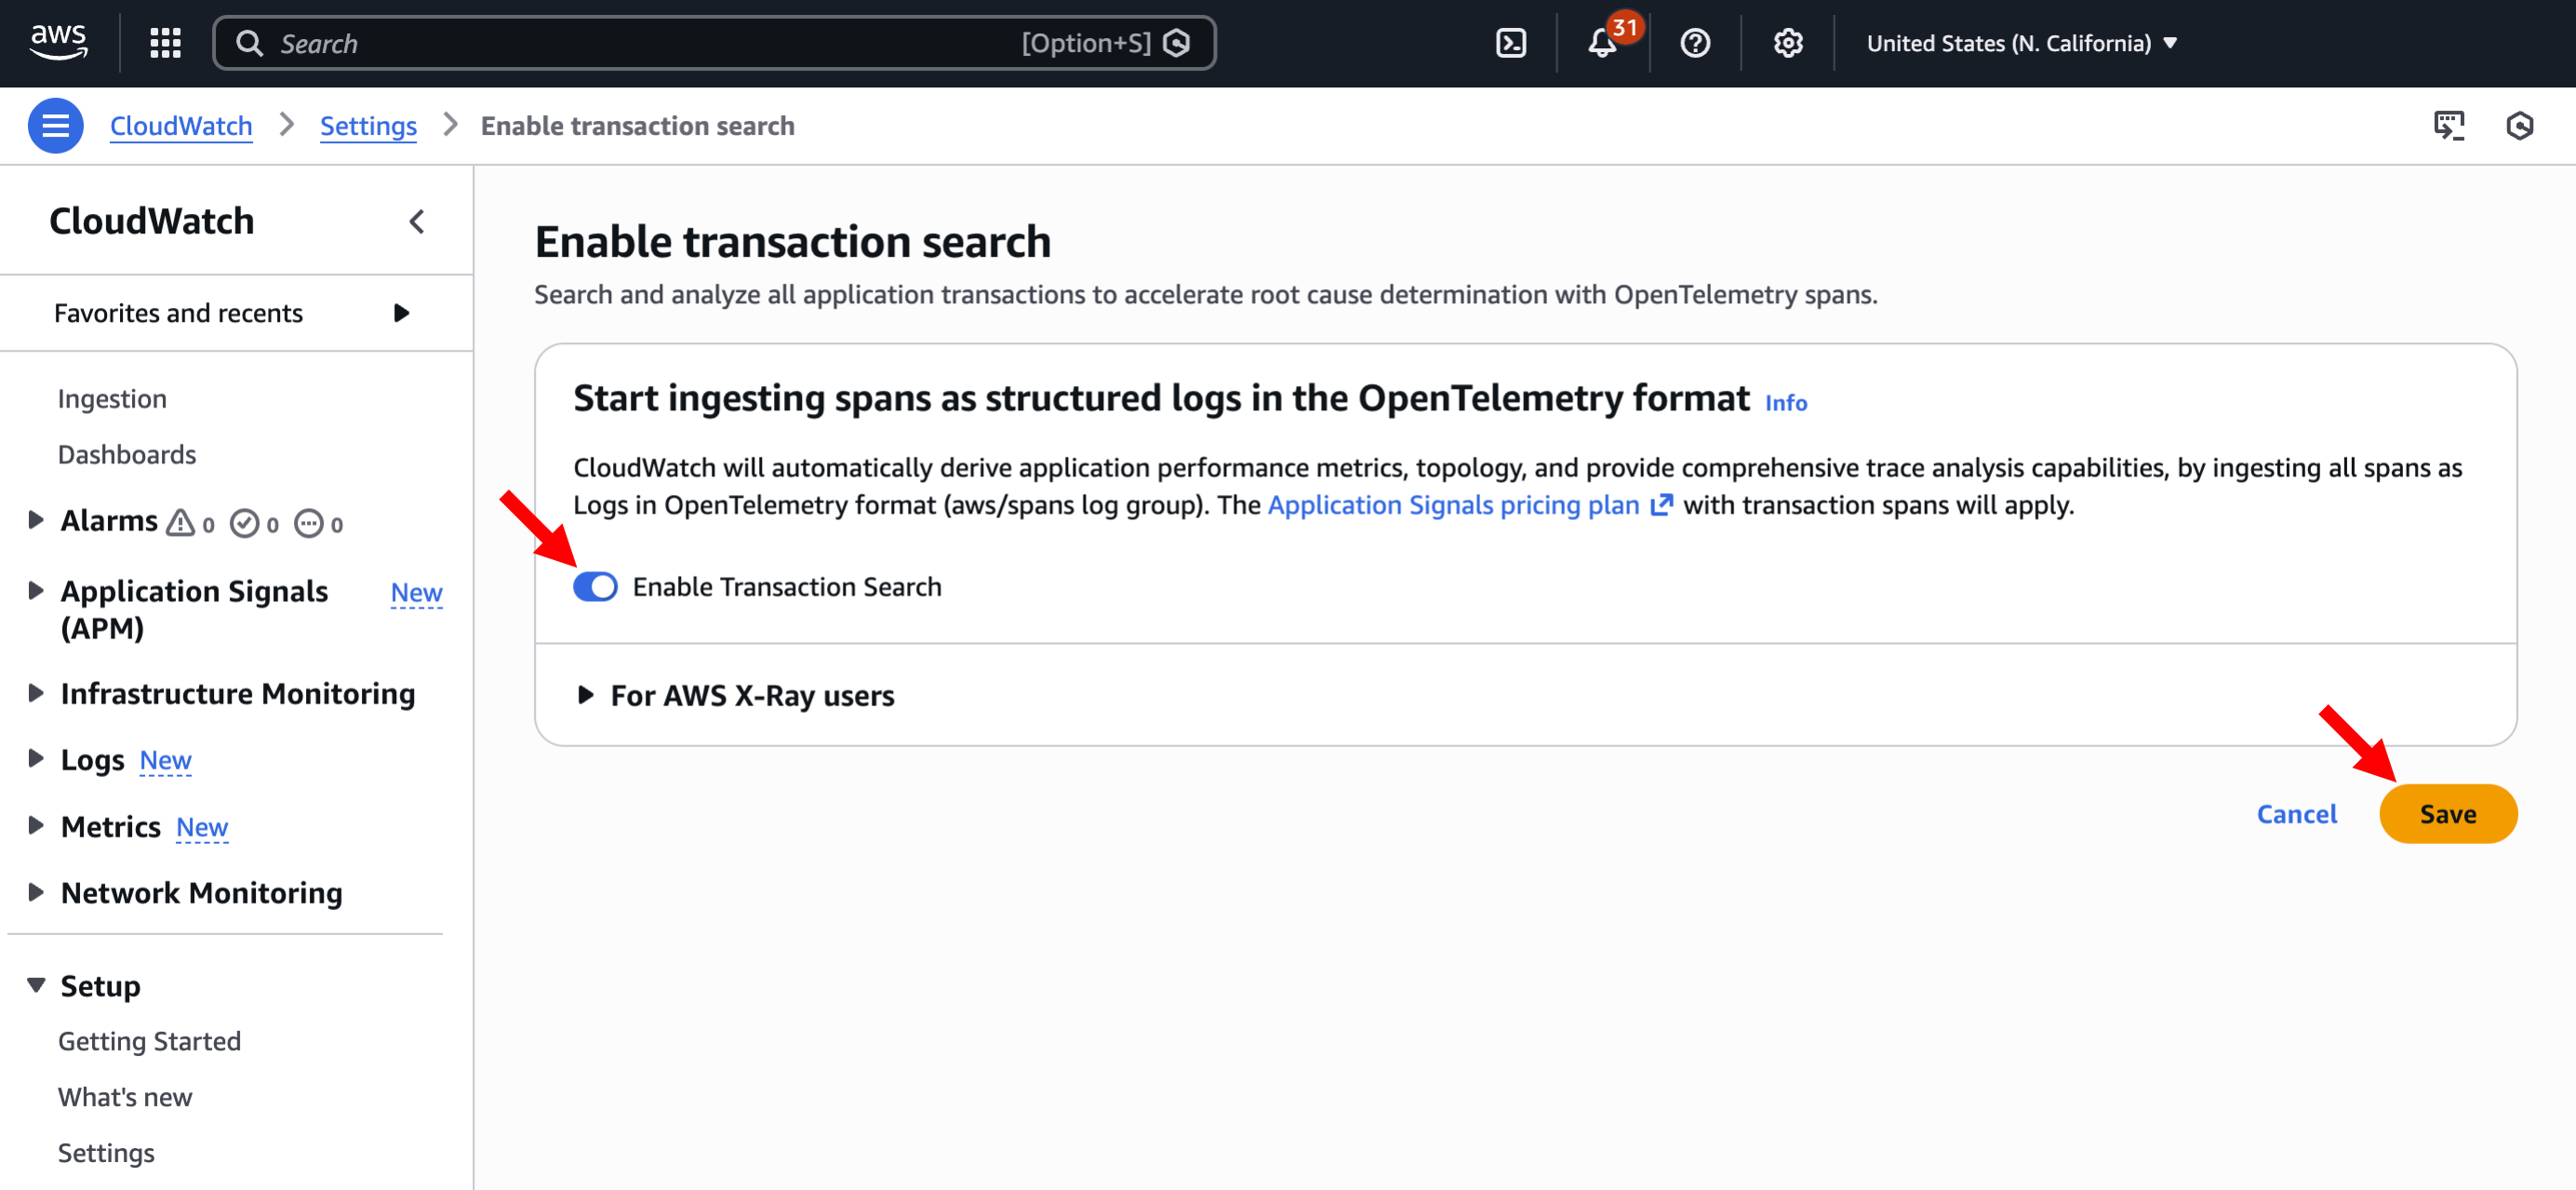
Step 4.1.a: To enable transaction search, search for and navigate to CloudWatch -> Expand "Setup" in the left menu -> Click on "Settings" -> Click on "X-Ray traces" -> Click on "View settings"
Step 4.1.b: Click on "Edit"
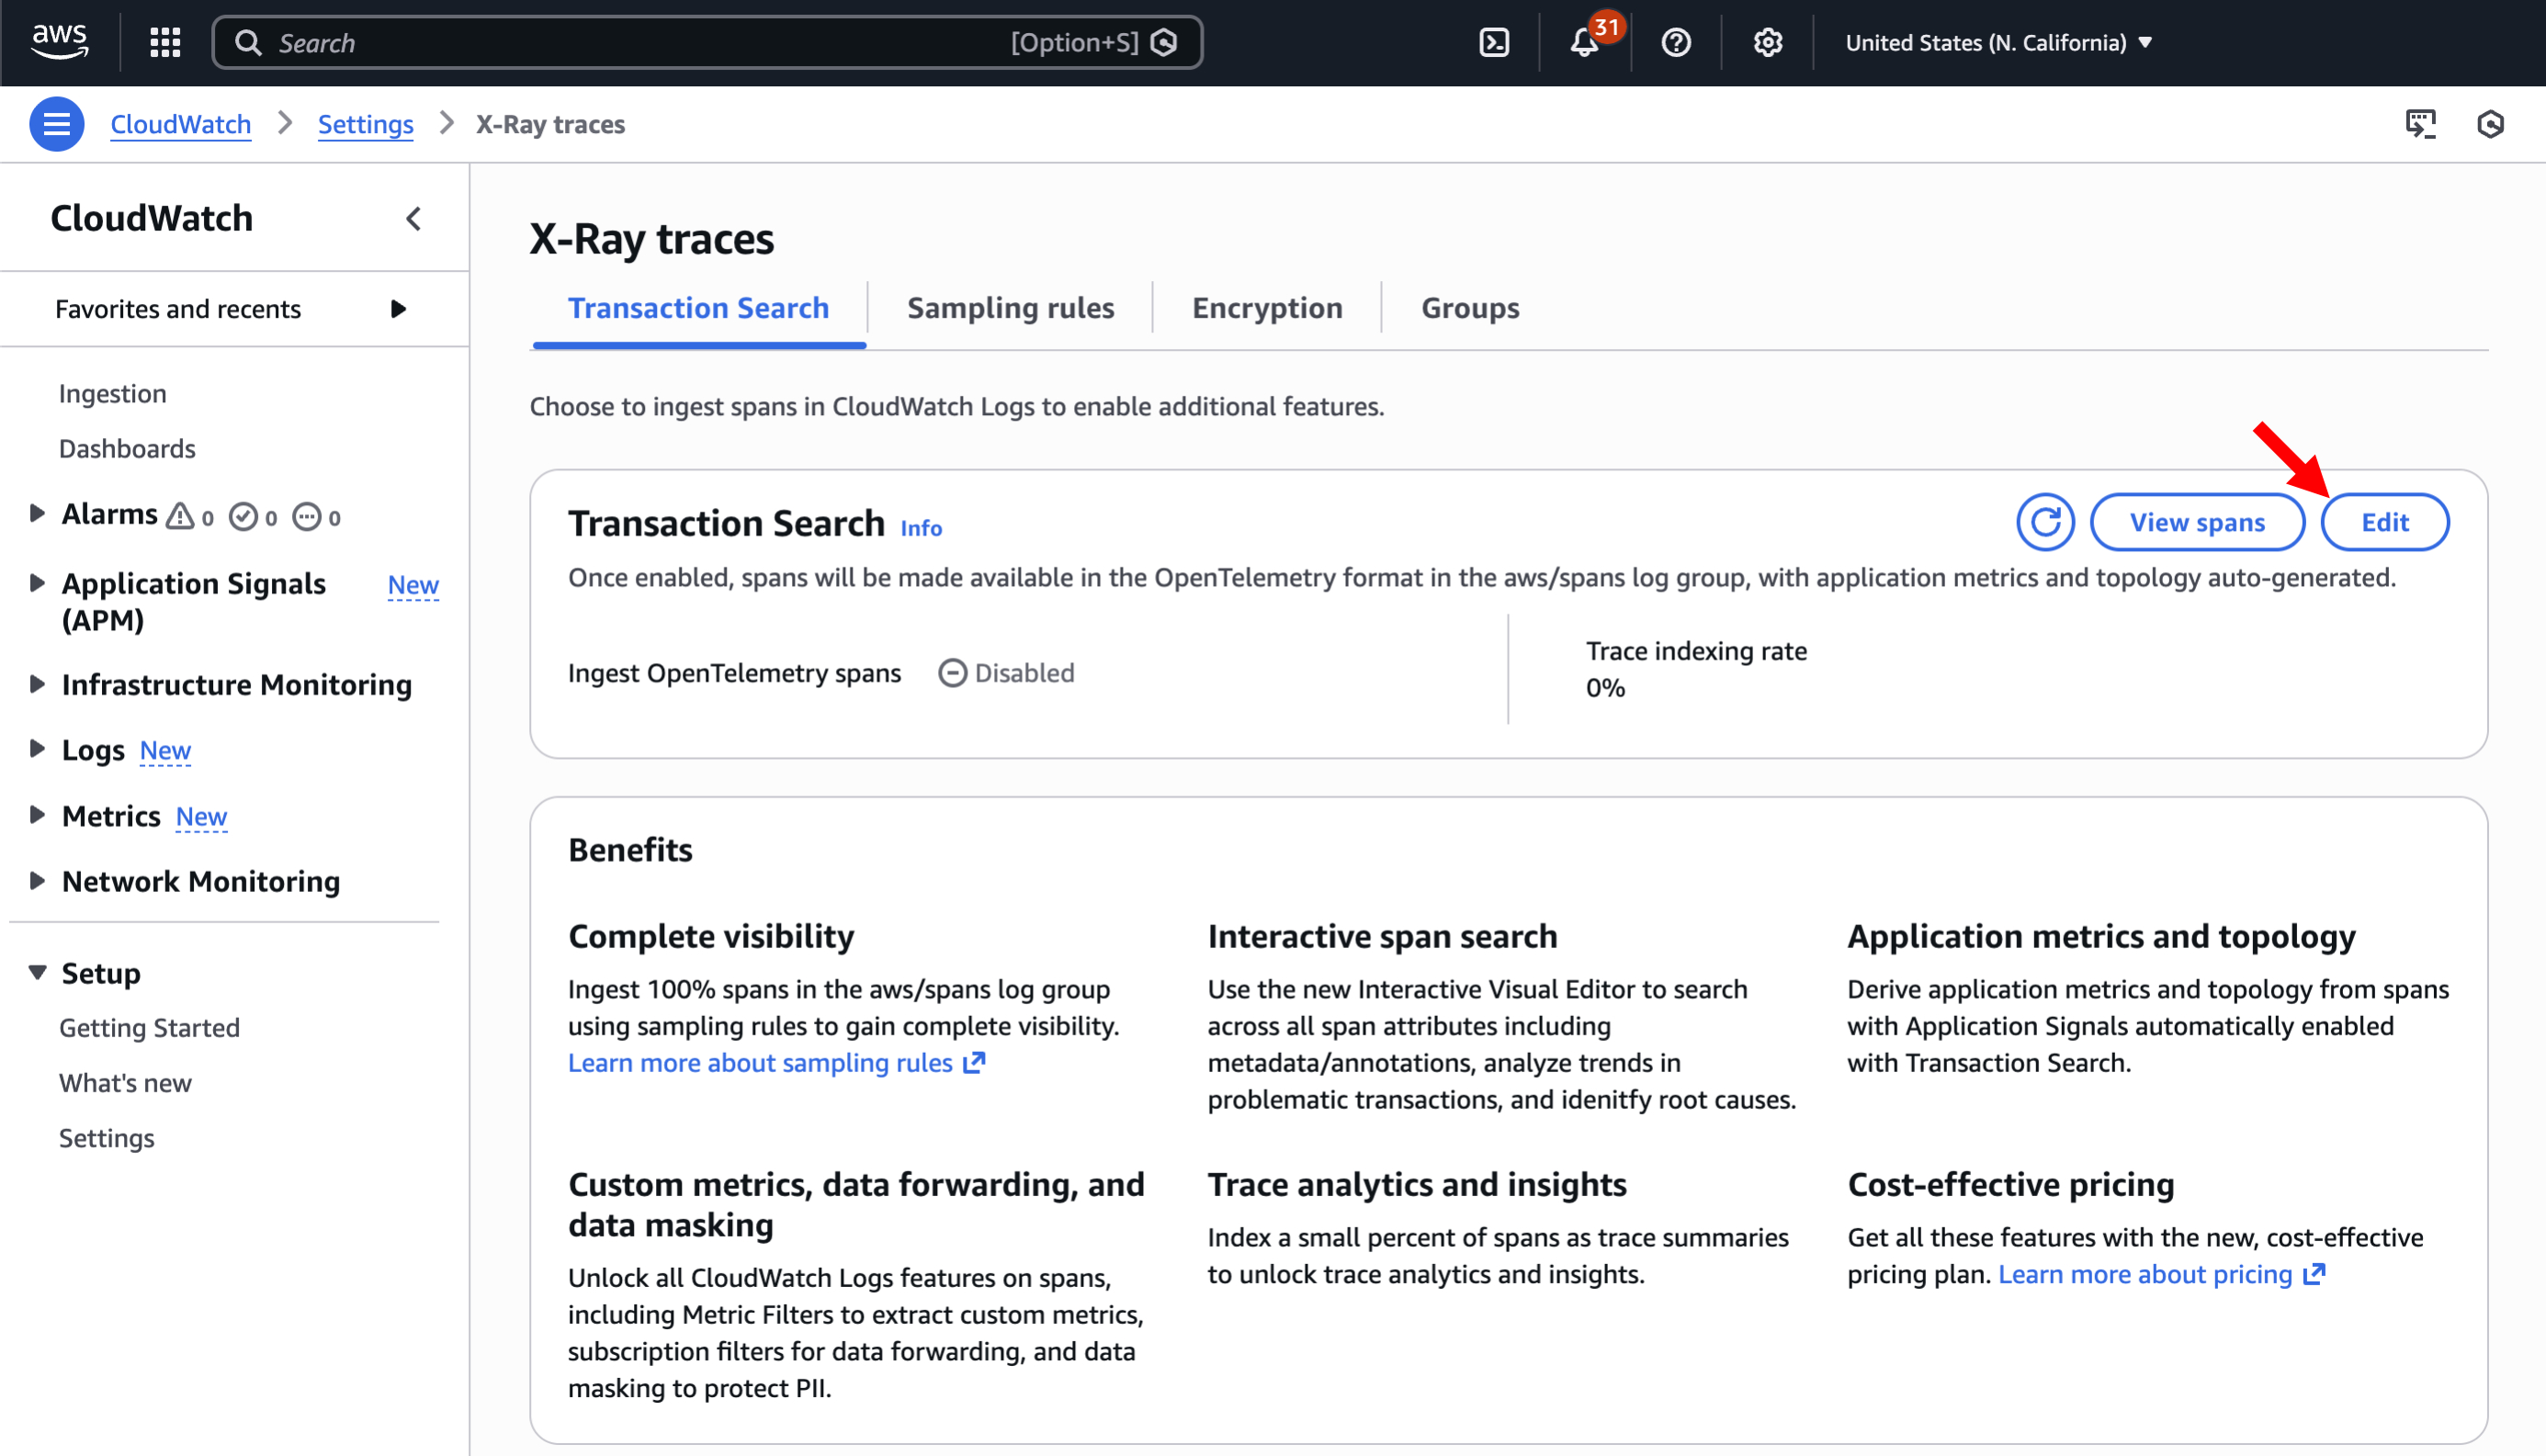
Step 4.1.c: Toggle "Enable Transaction Search" on ->Click "Save"
After saving, it will take time for the indexing process to complete.
Note: This is a region-wide setting, so this toggle may already be enabled for your account. If it is already enabled, continue to the next step.
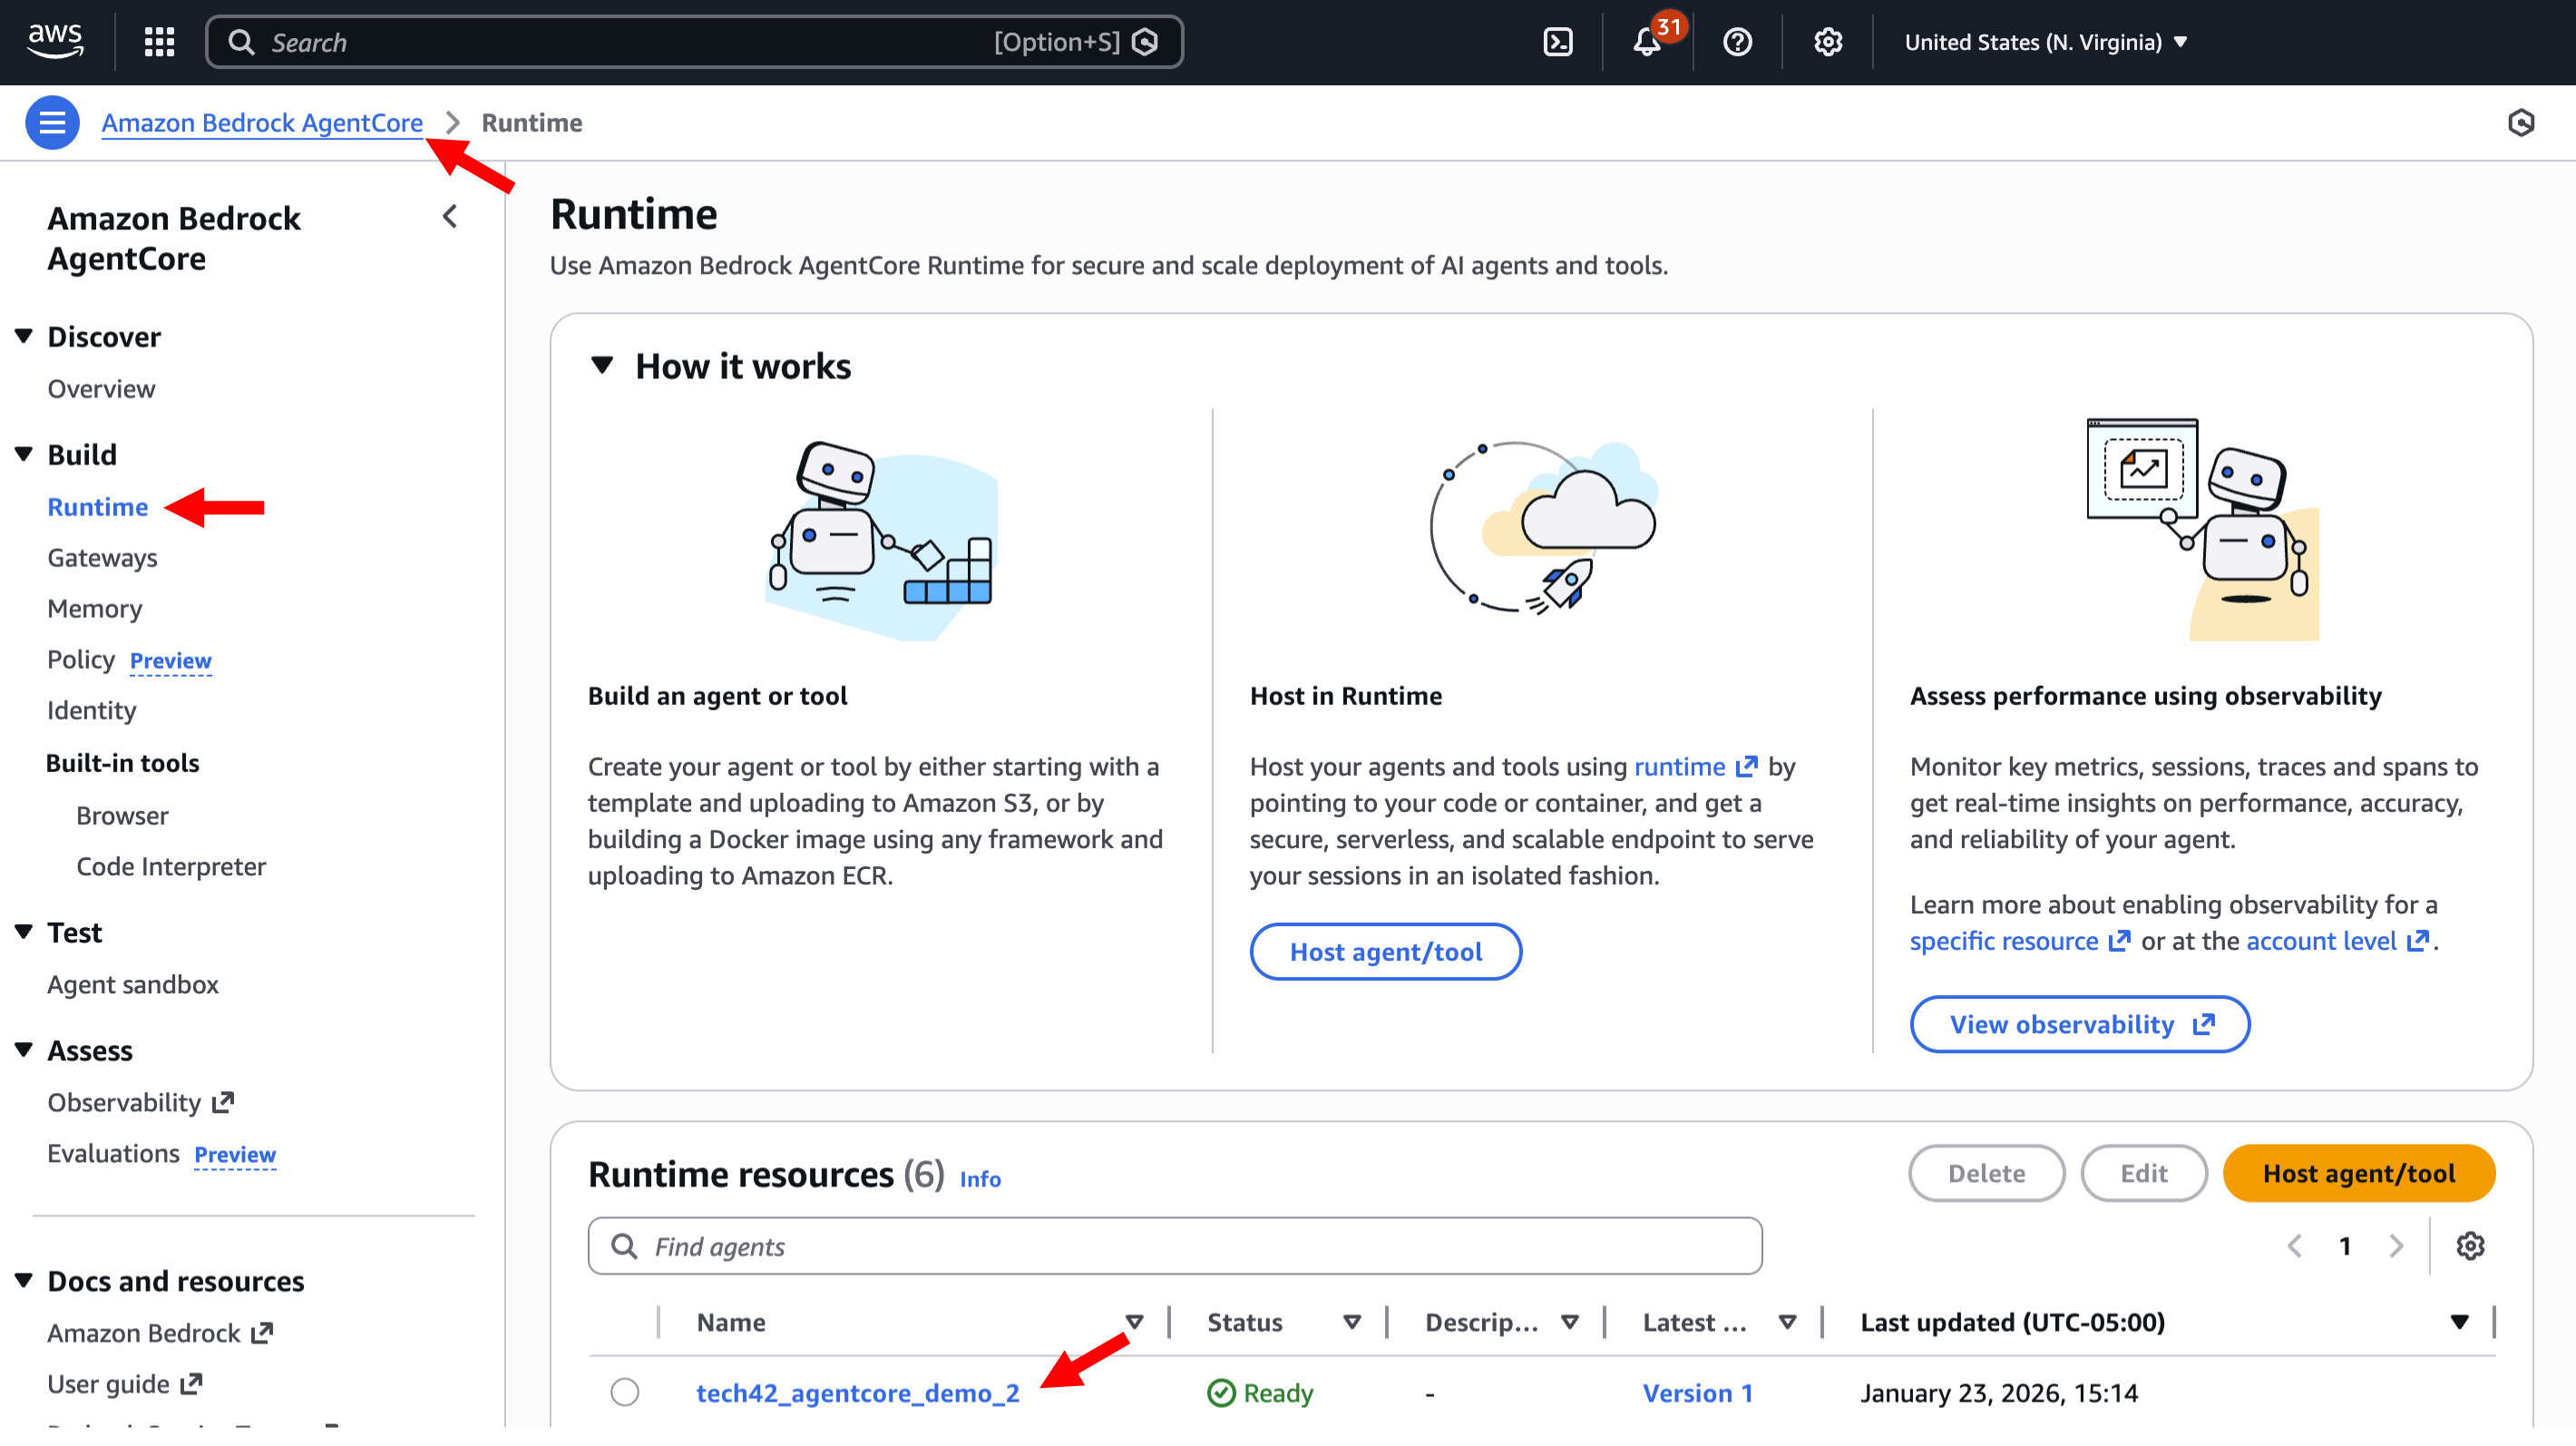
Step 4.1.d: Search for and navigate to "Amazon Bedrock AgentCore" -> Click on Runtime -> Click on your agent
Step 4.1.e: Scroll to the "Tracing" section -> Click Edit
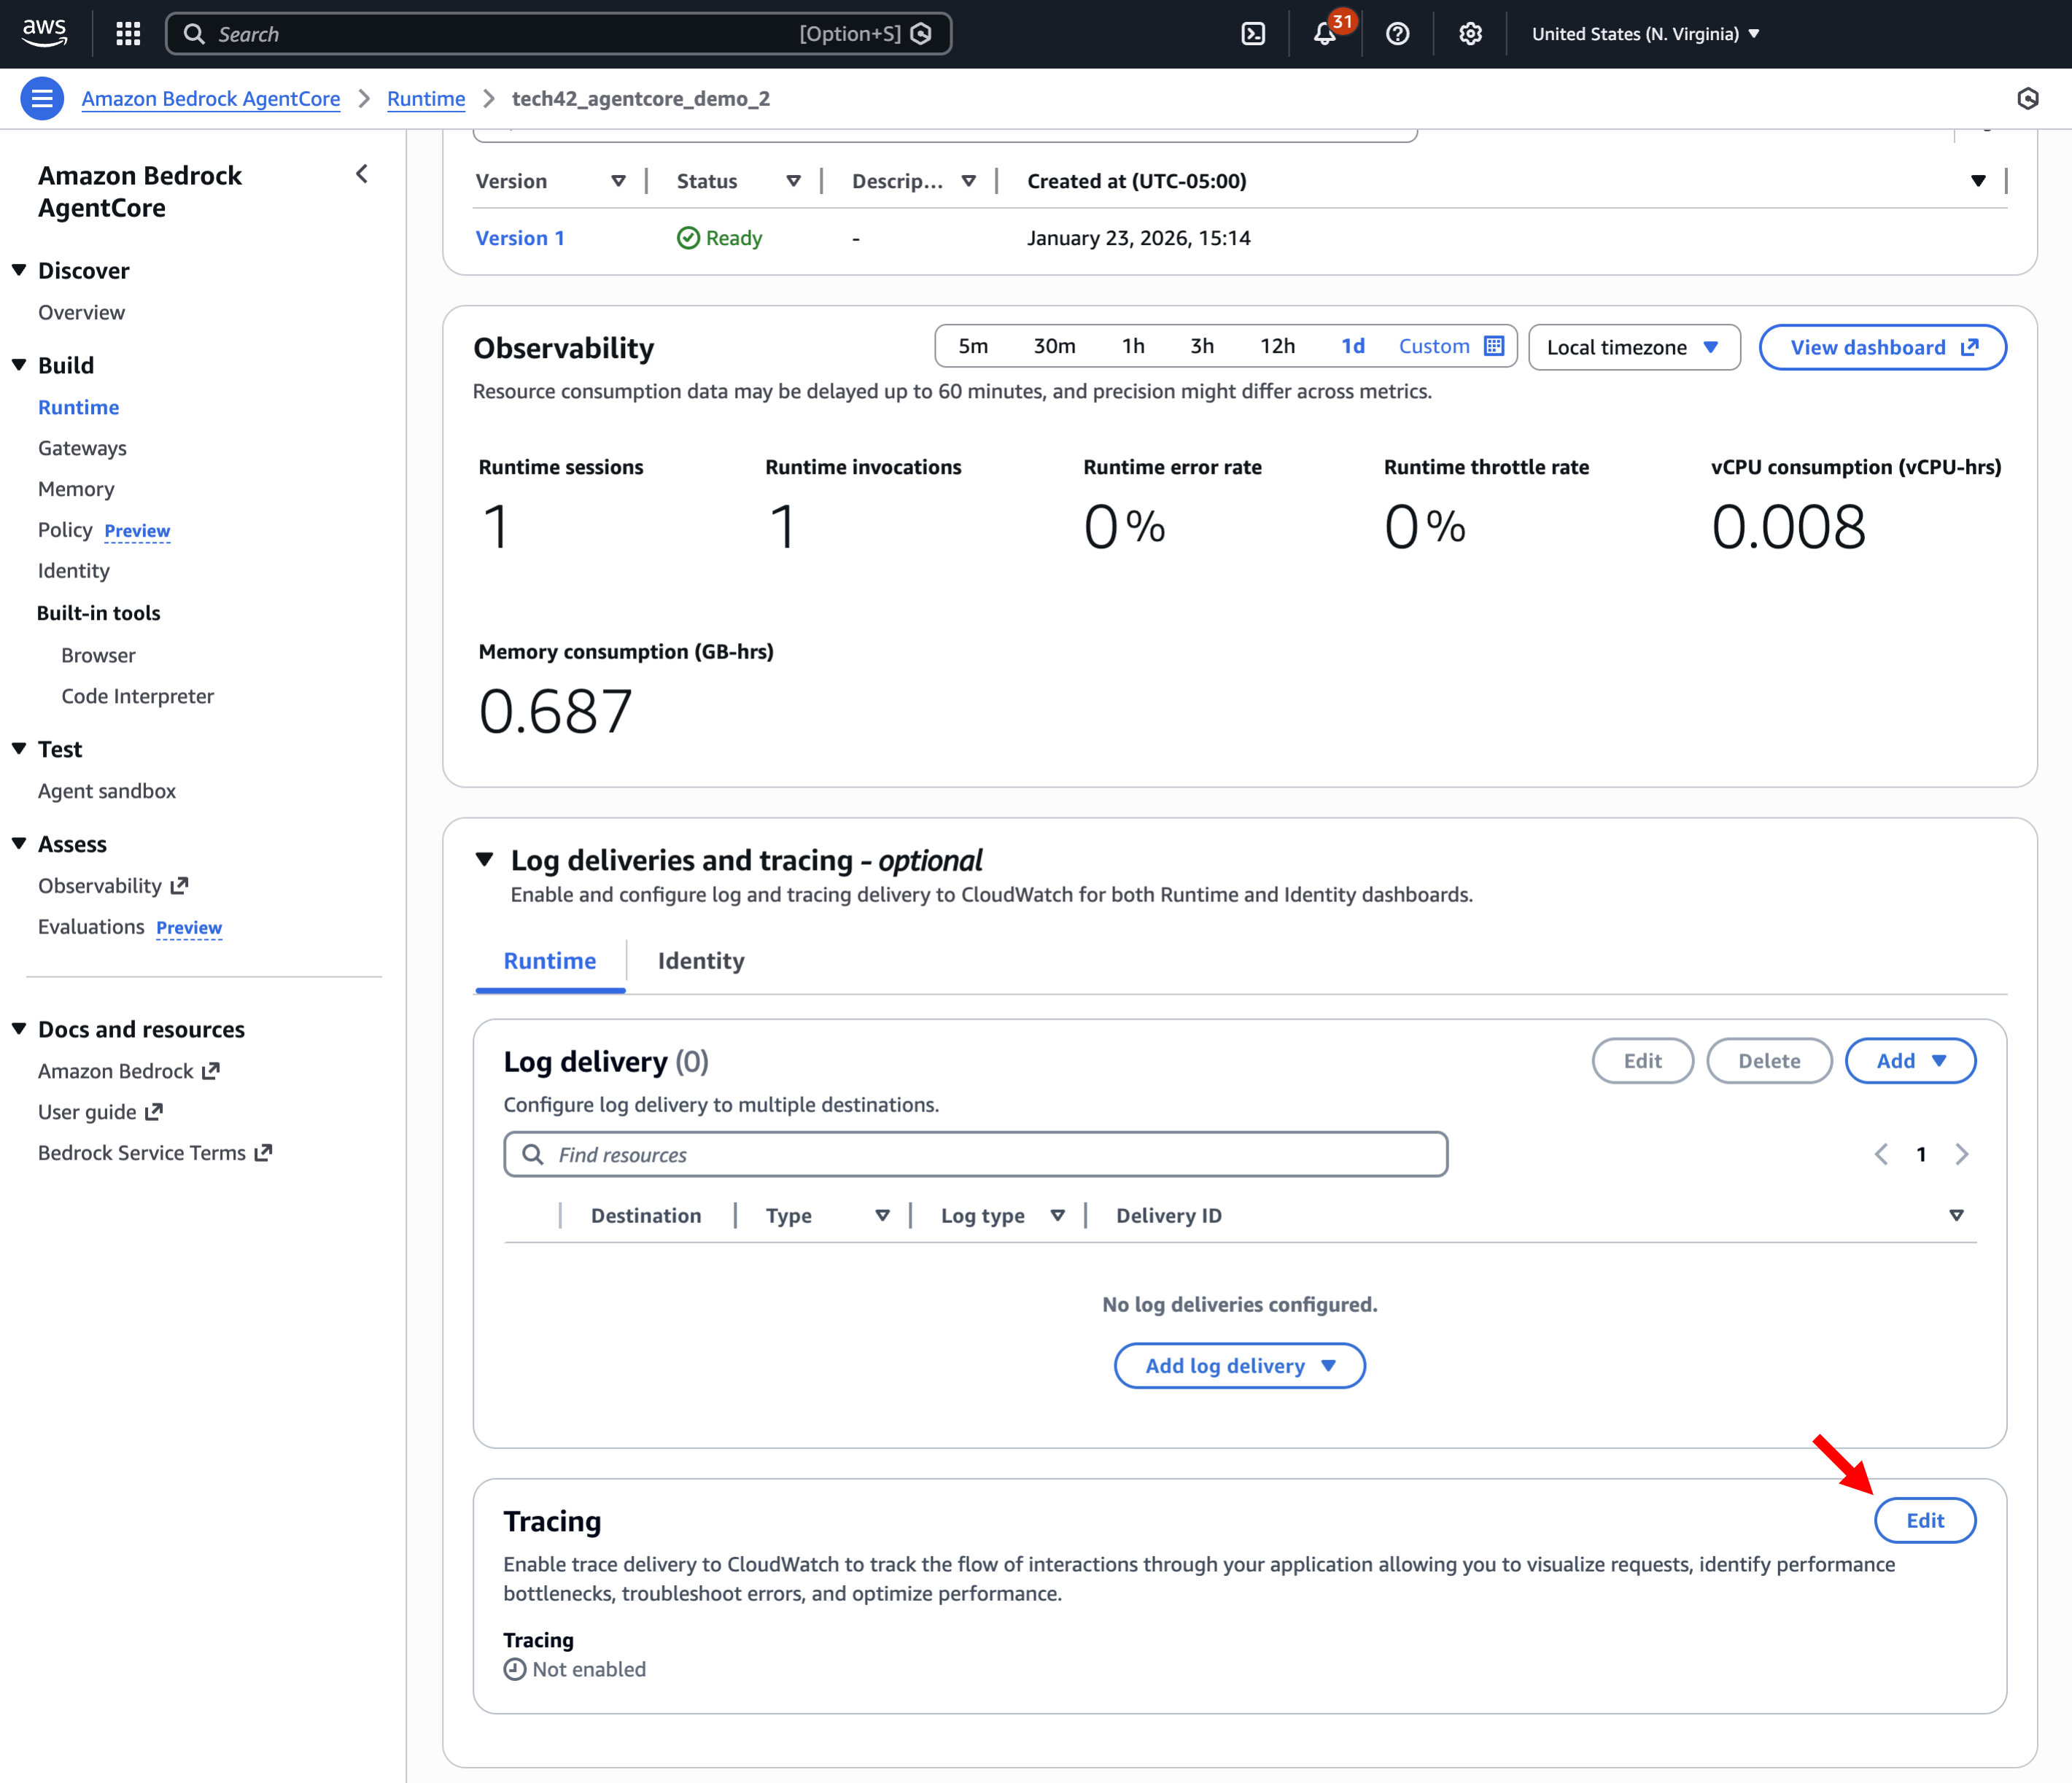
Step 4.1.f: Enable tracing -> Click Save

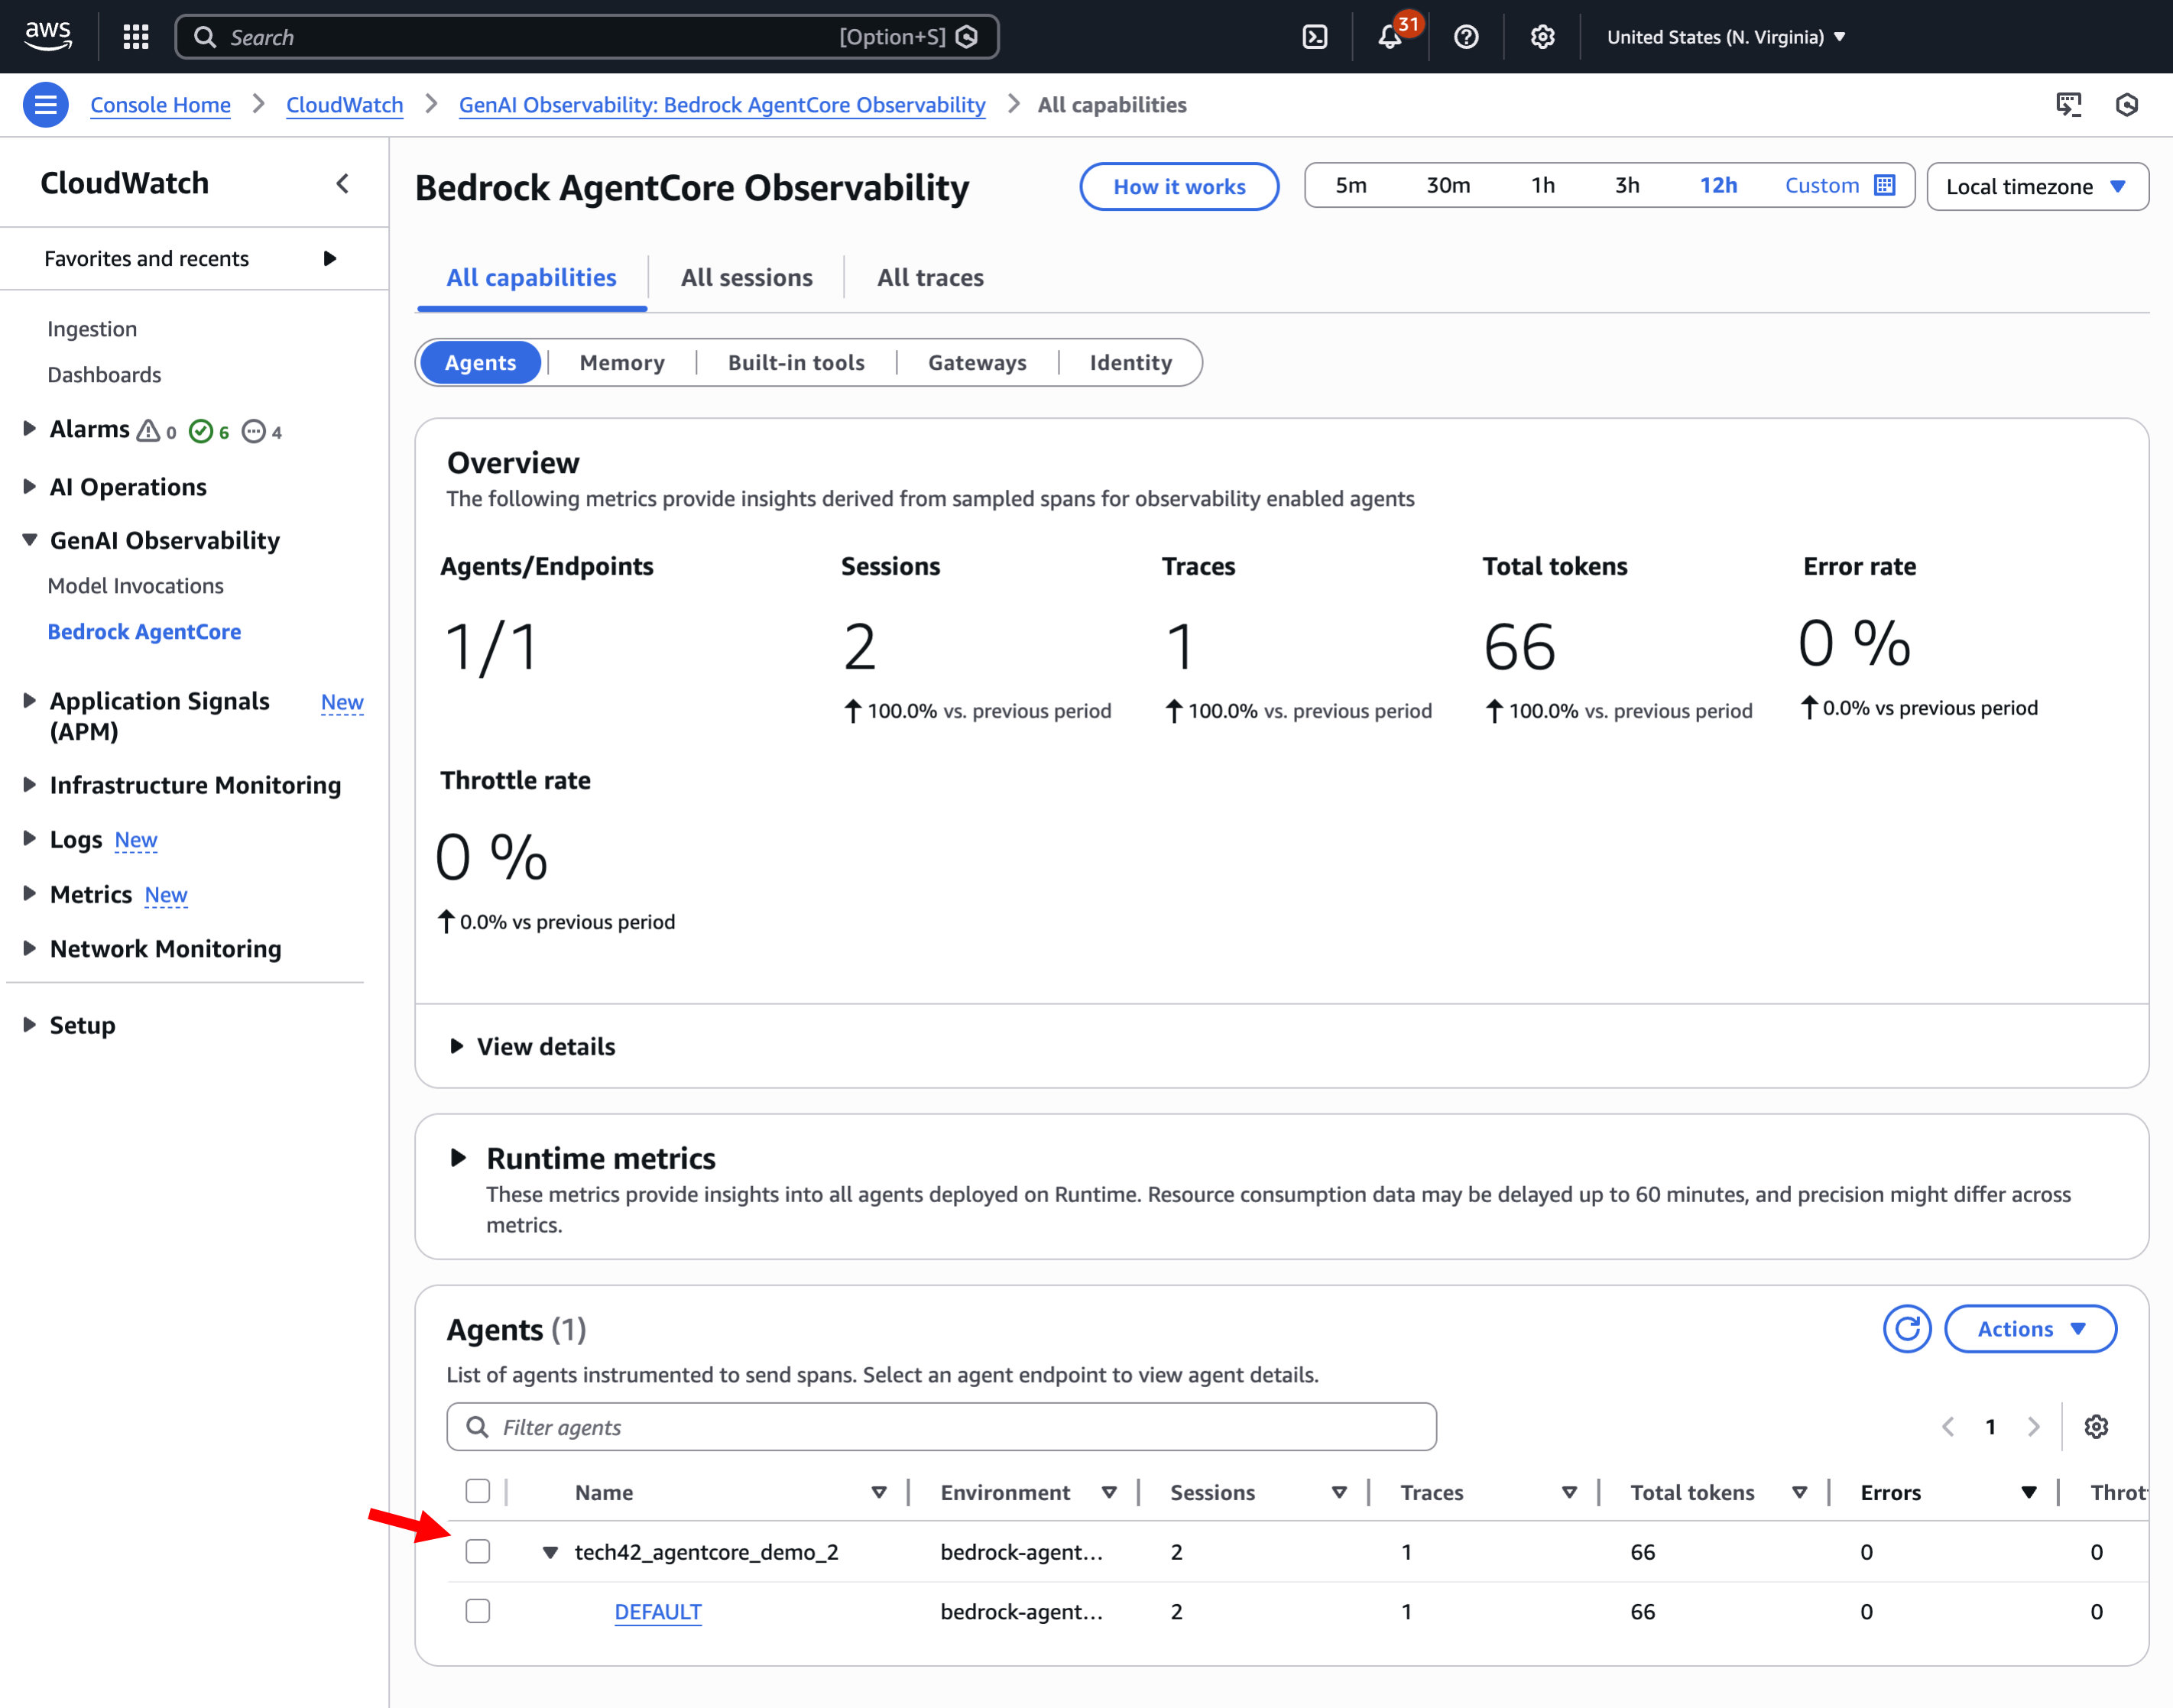
Step 4.1.g: Click on "Observability" in the left menu
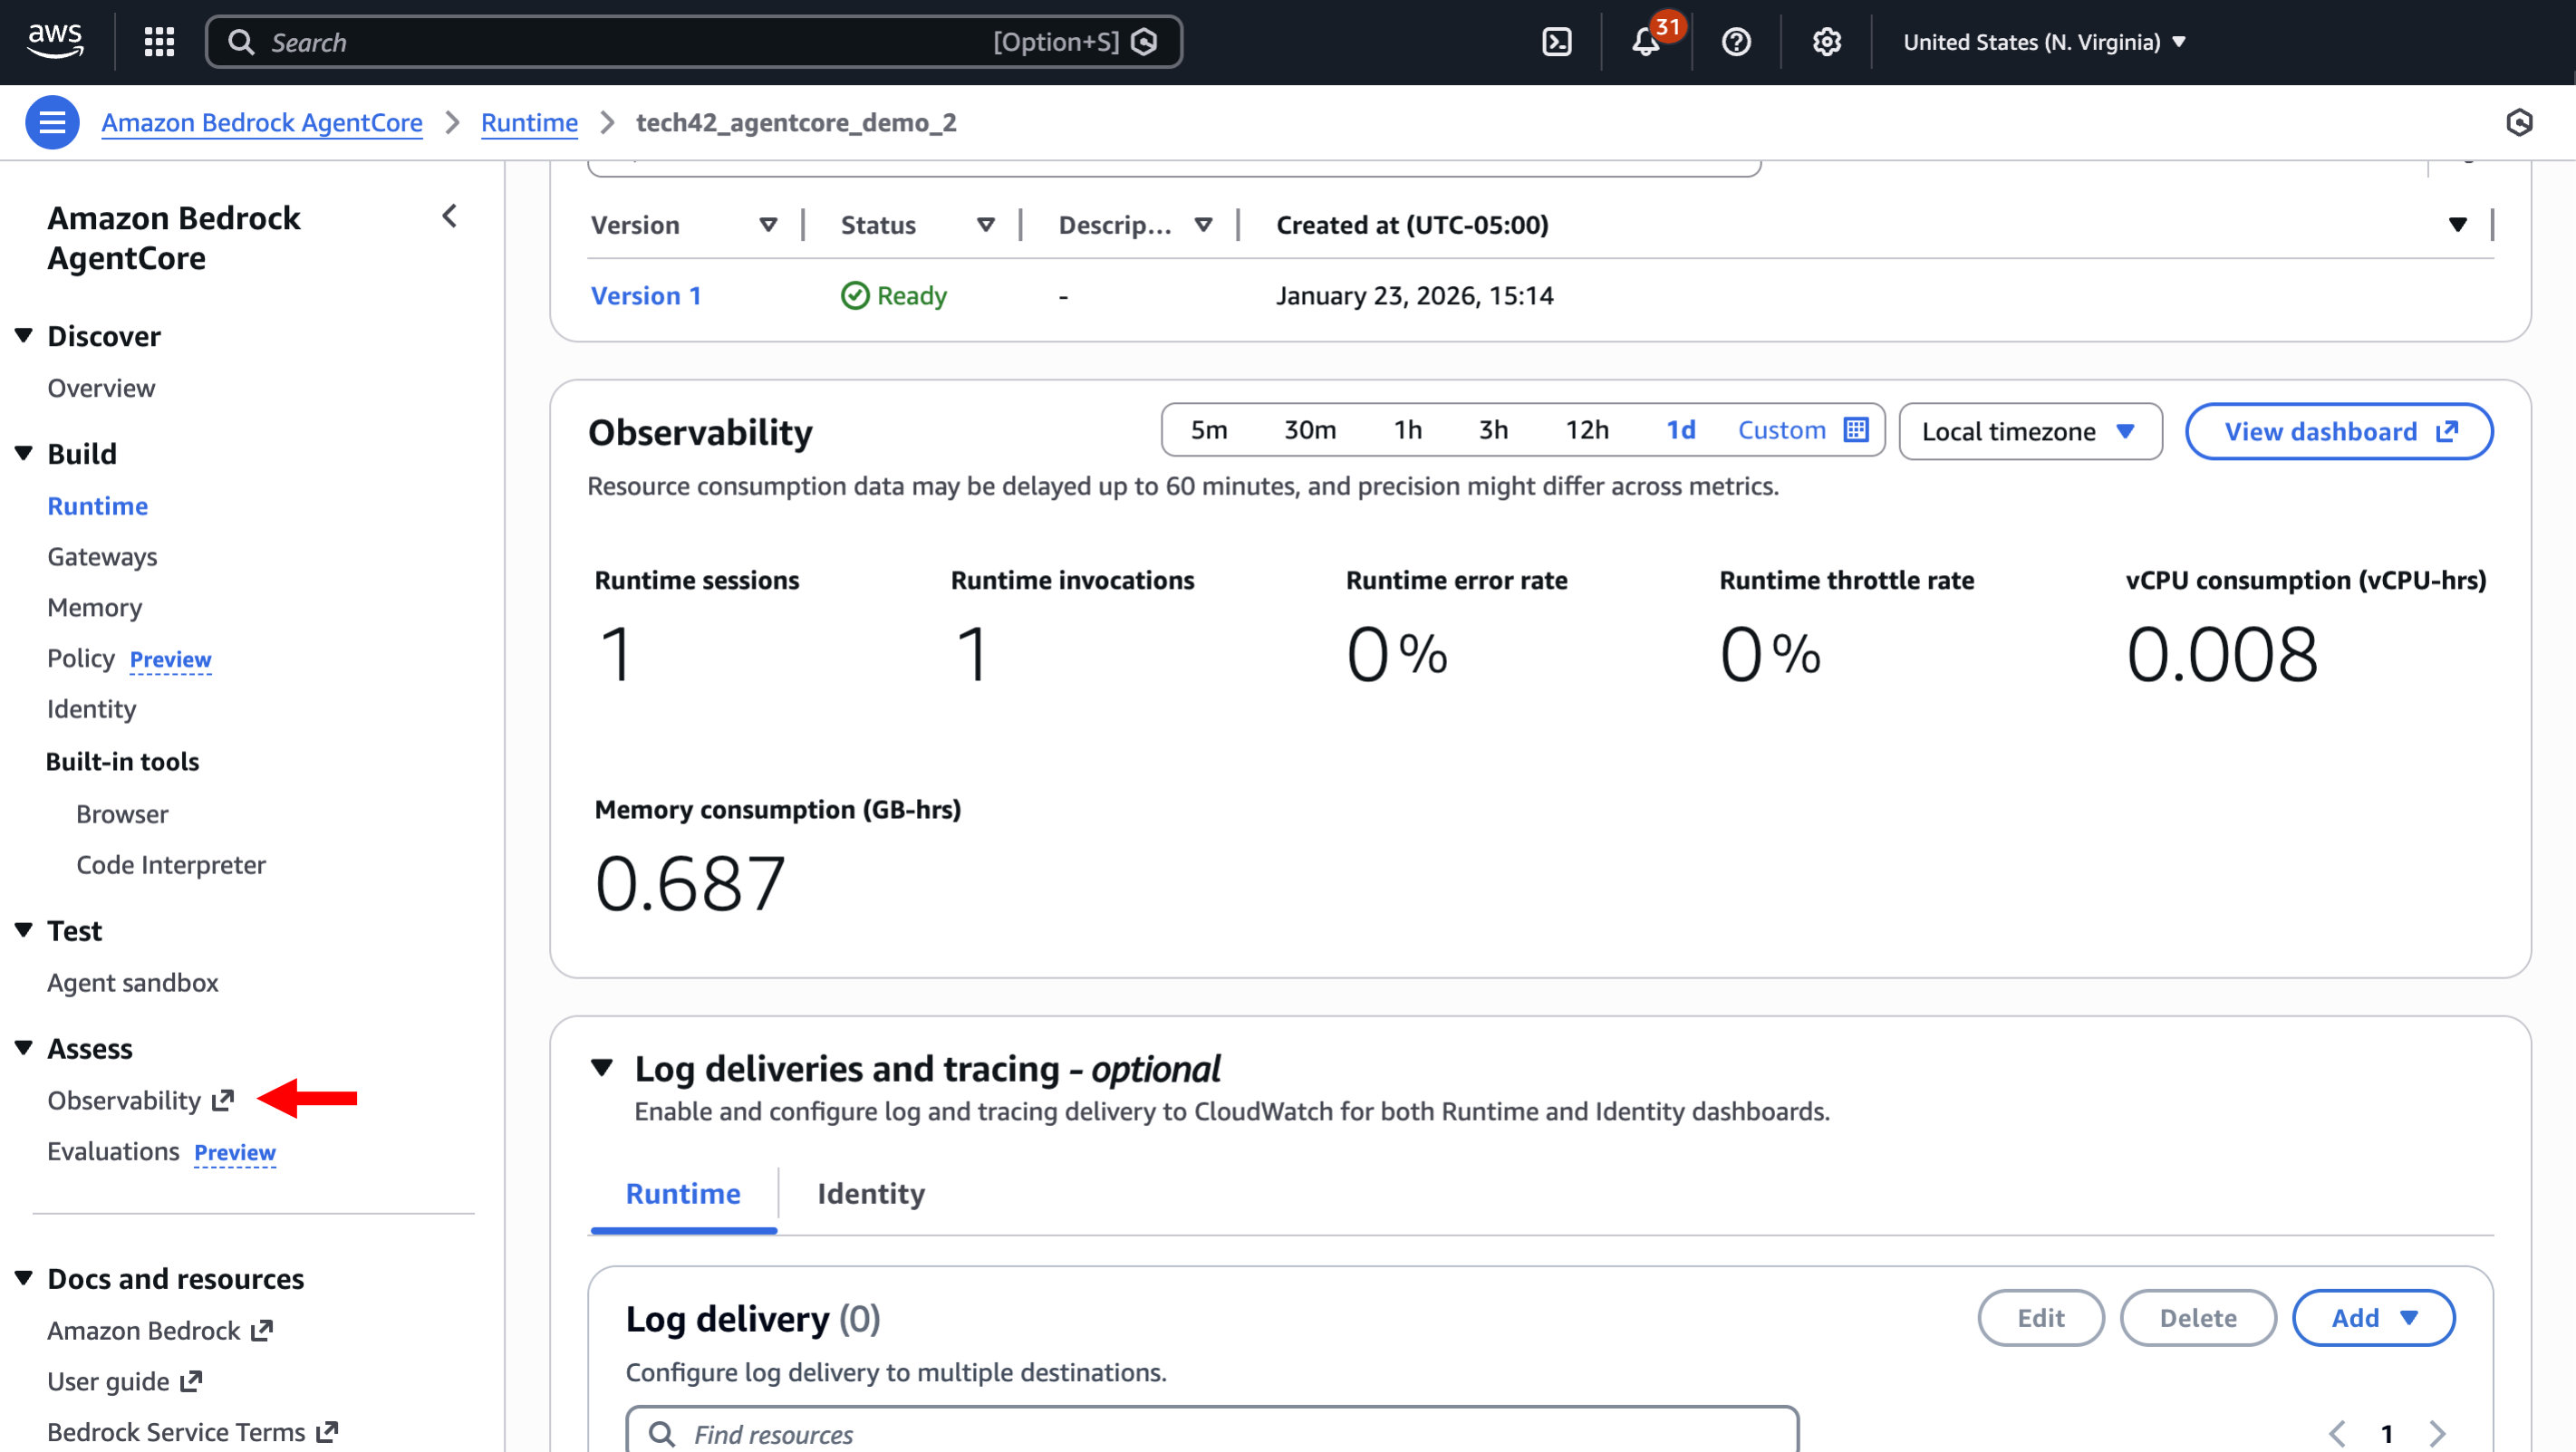
Step 4.1.h: You should see your agent listed. Click on it to see sessions and traces.
4.2. Langfuse
This section guides you through setting up observability using Langfuse. If you're not using this, skip this section.
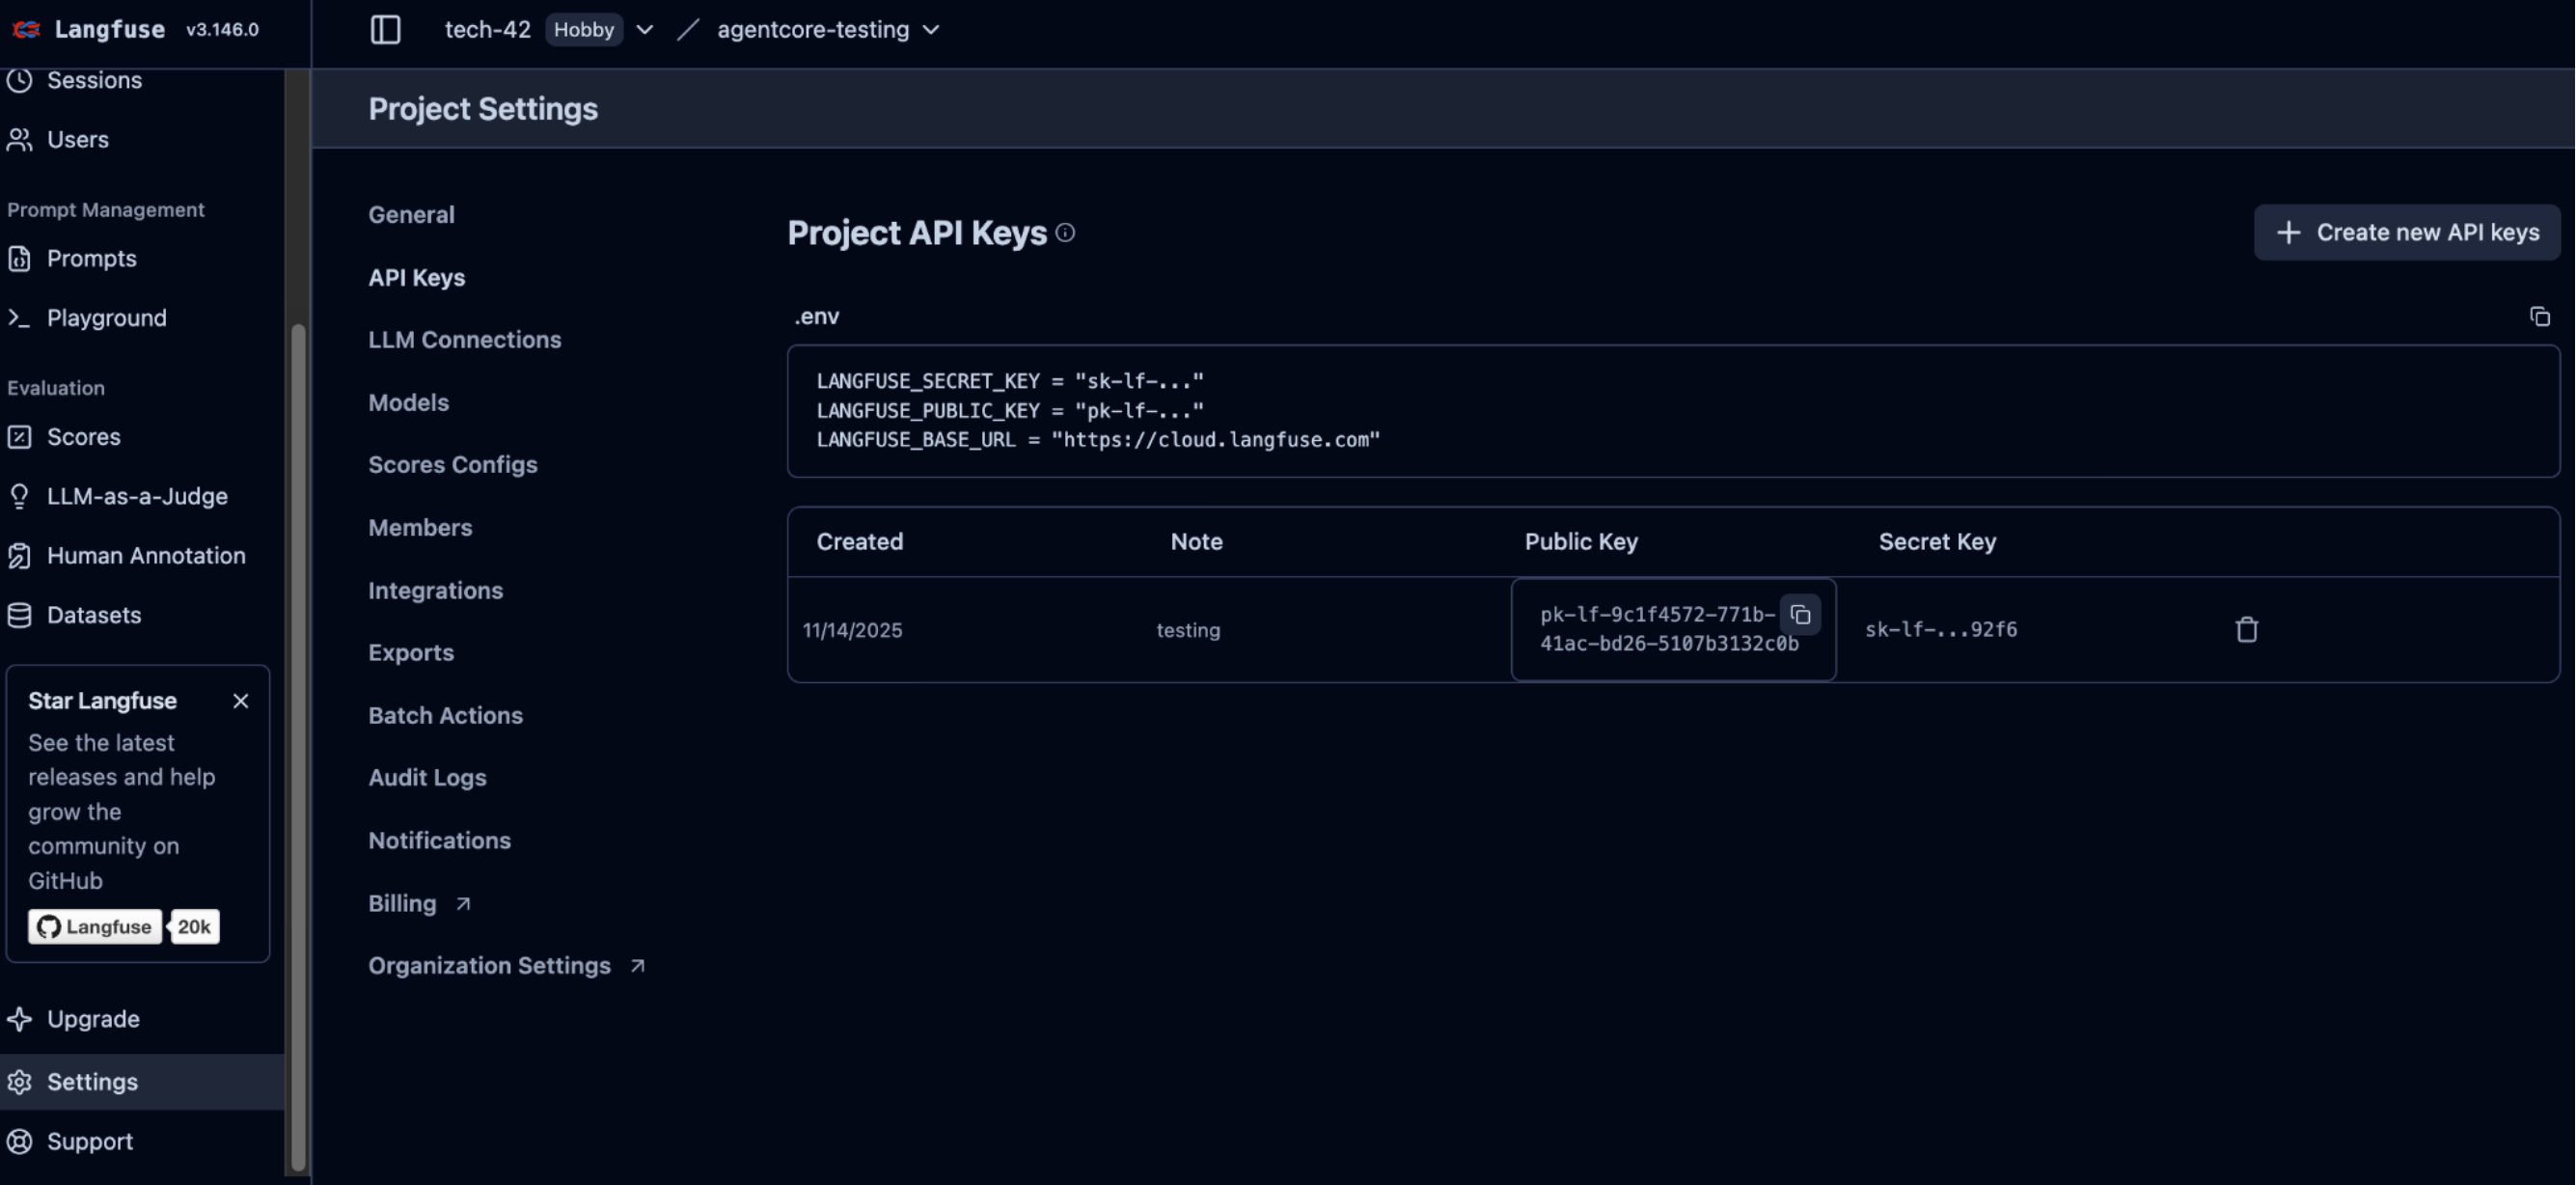
Step 4.2.a: Log into your Langfuse account (cloud or self‑hosted)
Step 4.2.b: Select the project you want to instrument
Step 4.2.c: Go to Project → Settings to view existing API keys or create a new key pair
Step 4.2.d: Copy the Public Key and Secret Key and store them in your application environment as LANGFUSE_PUBLIC_KEY, LANGFUSE_SECRET_KEY, and LANGFUSE_BASE_URL
Step 4.2.e: When deploying the agent via CloudFormation (see step 2.1.d), set the following parameters in the CloudFormation template:
- DISABLE_ADOT_OBSERVABILITY: true
- LANGFUSE_SECRET_KEY: <your credentials>
- LANGFUSE_PUBLIC_KEY: <your credentials>
- LANGFUSE_BASE_URL: <your credentials>
5. Accessing Agent Logs
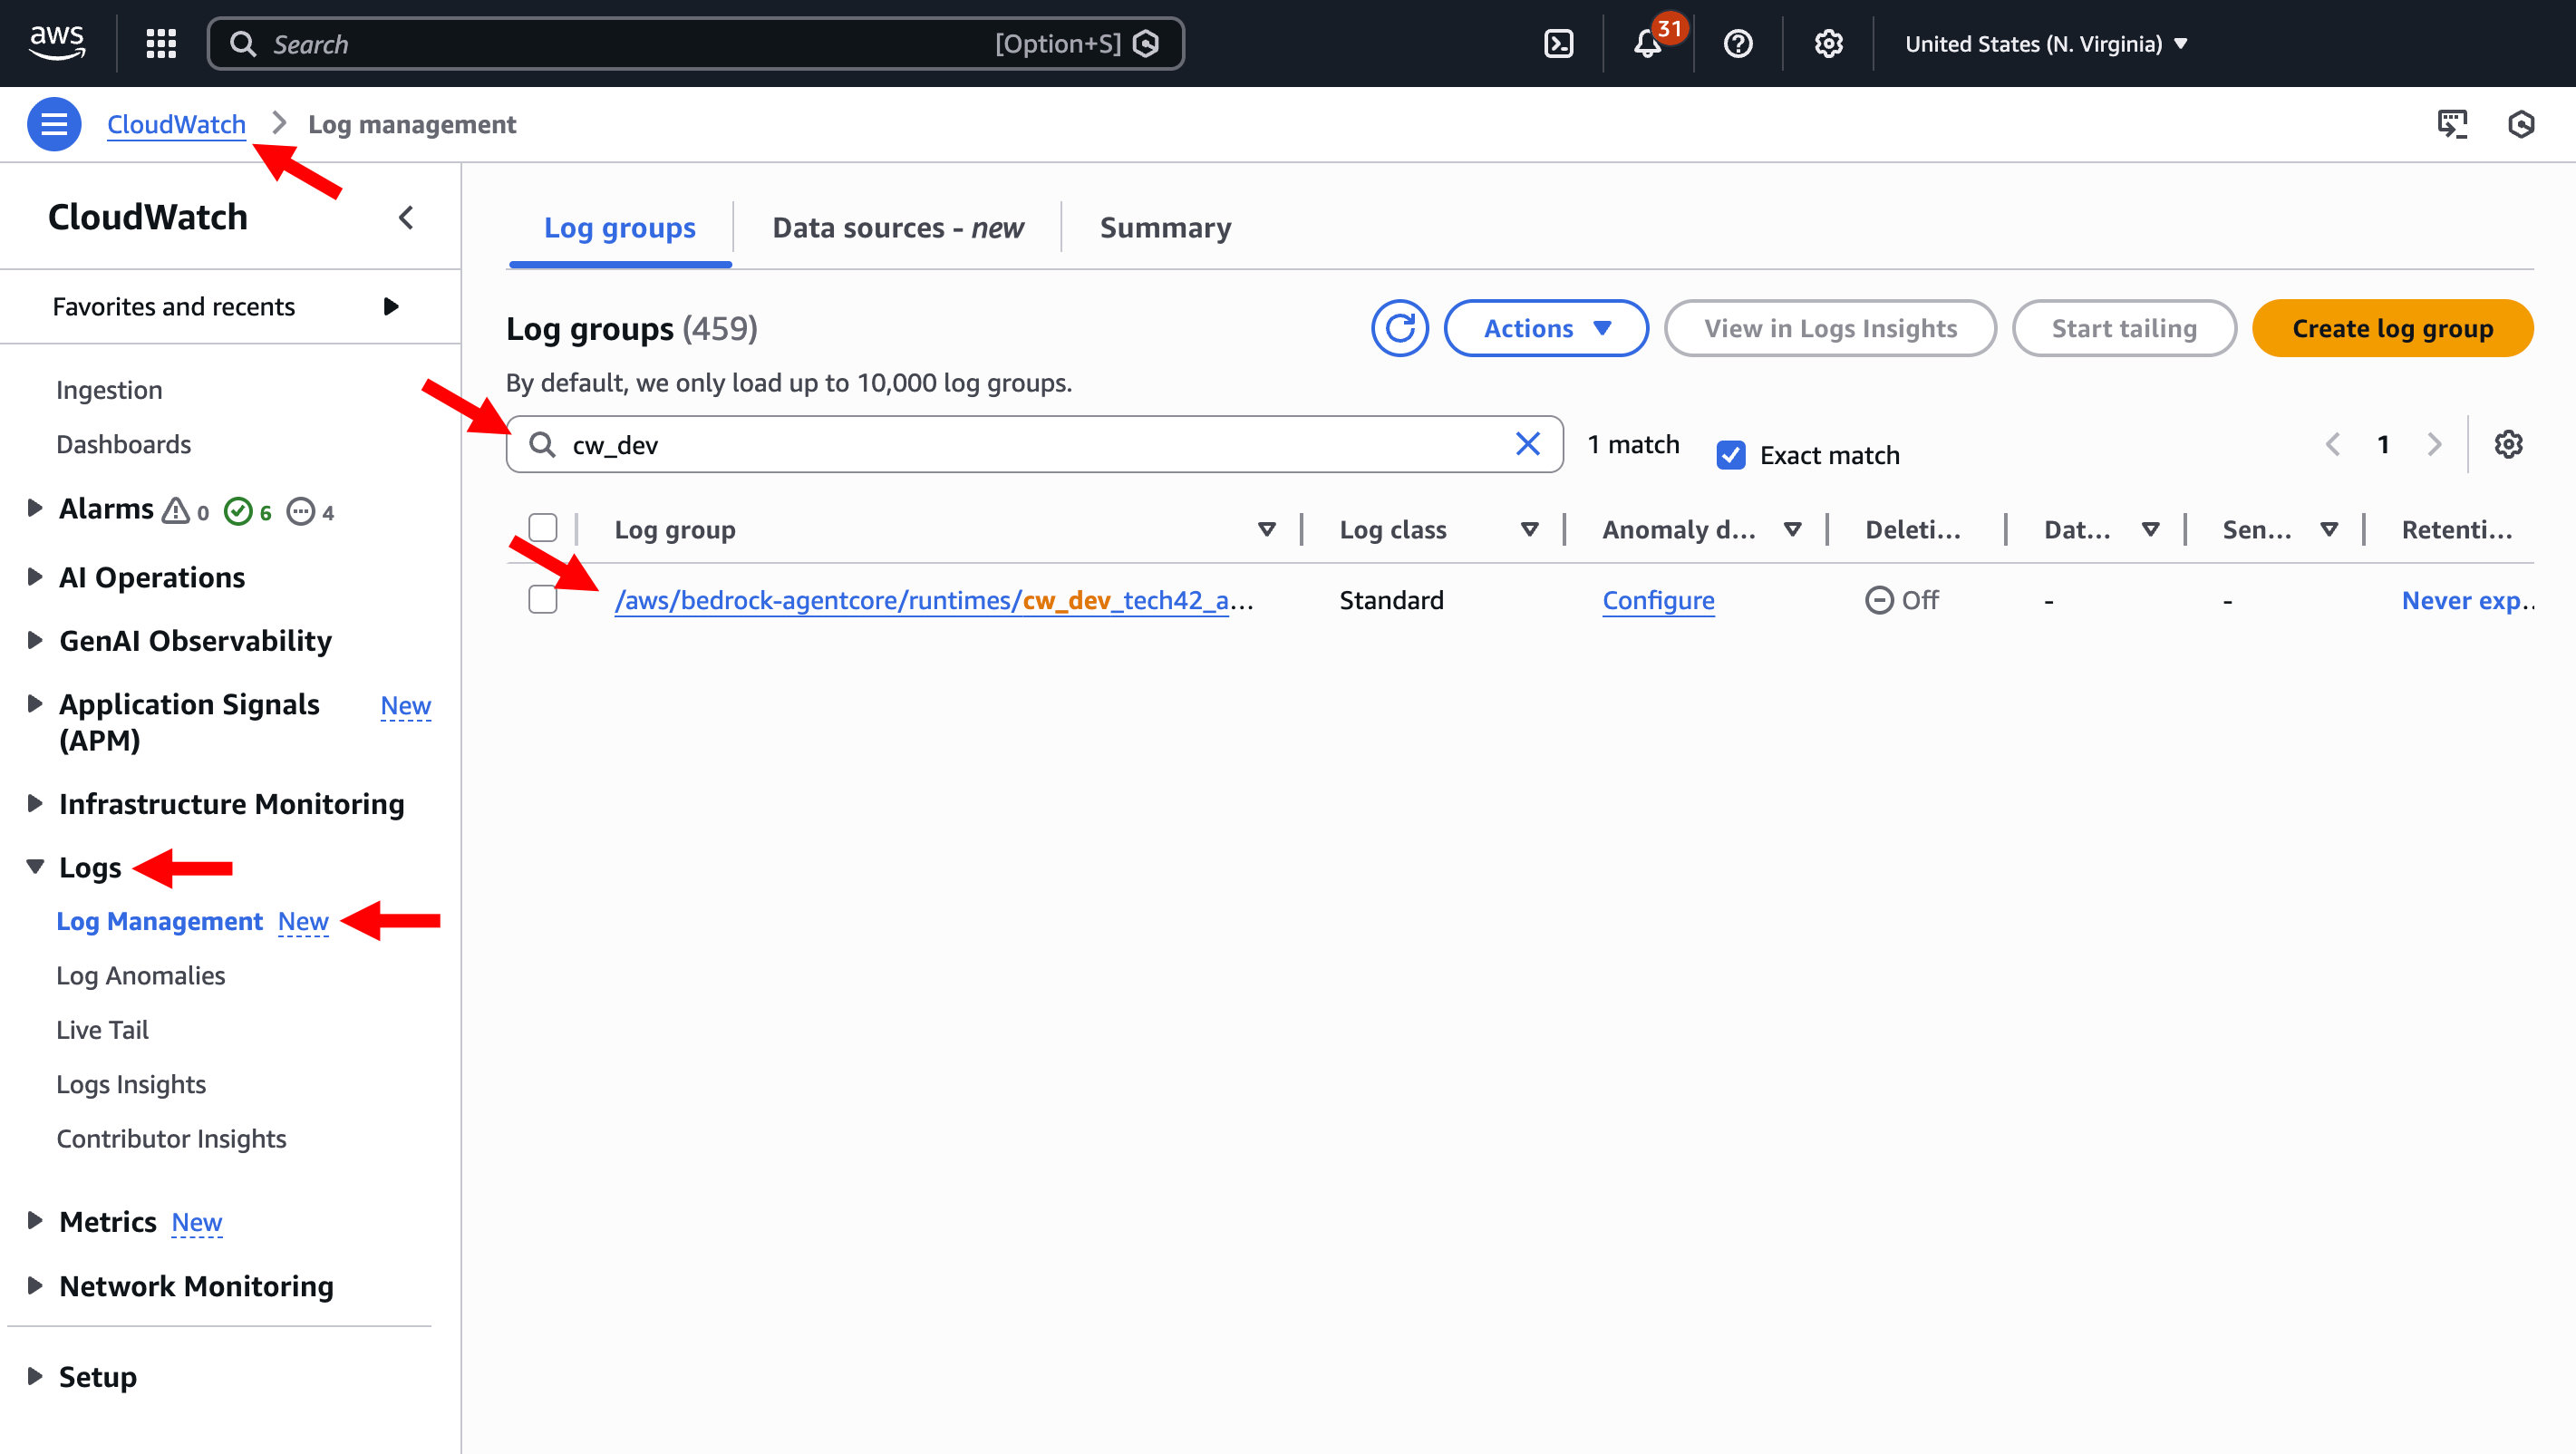
Step 5.a: Search for and open CloudWatch in your AWS Console -> Expand "Logs" and click on "Log Management"
Step 5.b: Search for the agent name to the search bar to find the log group
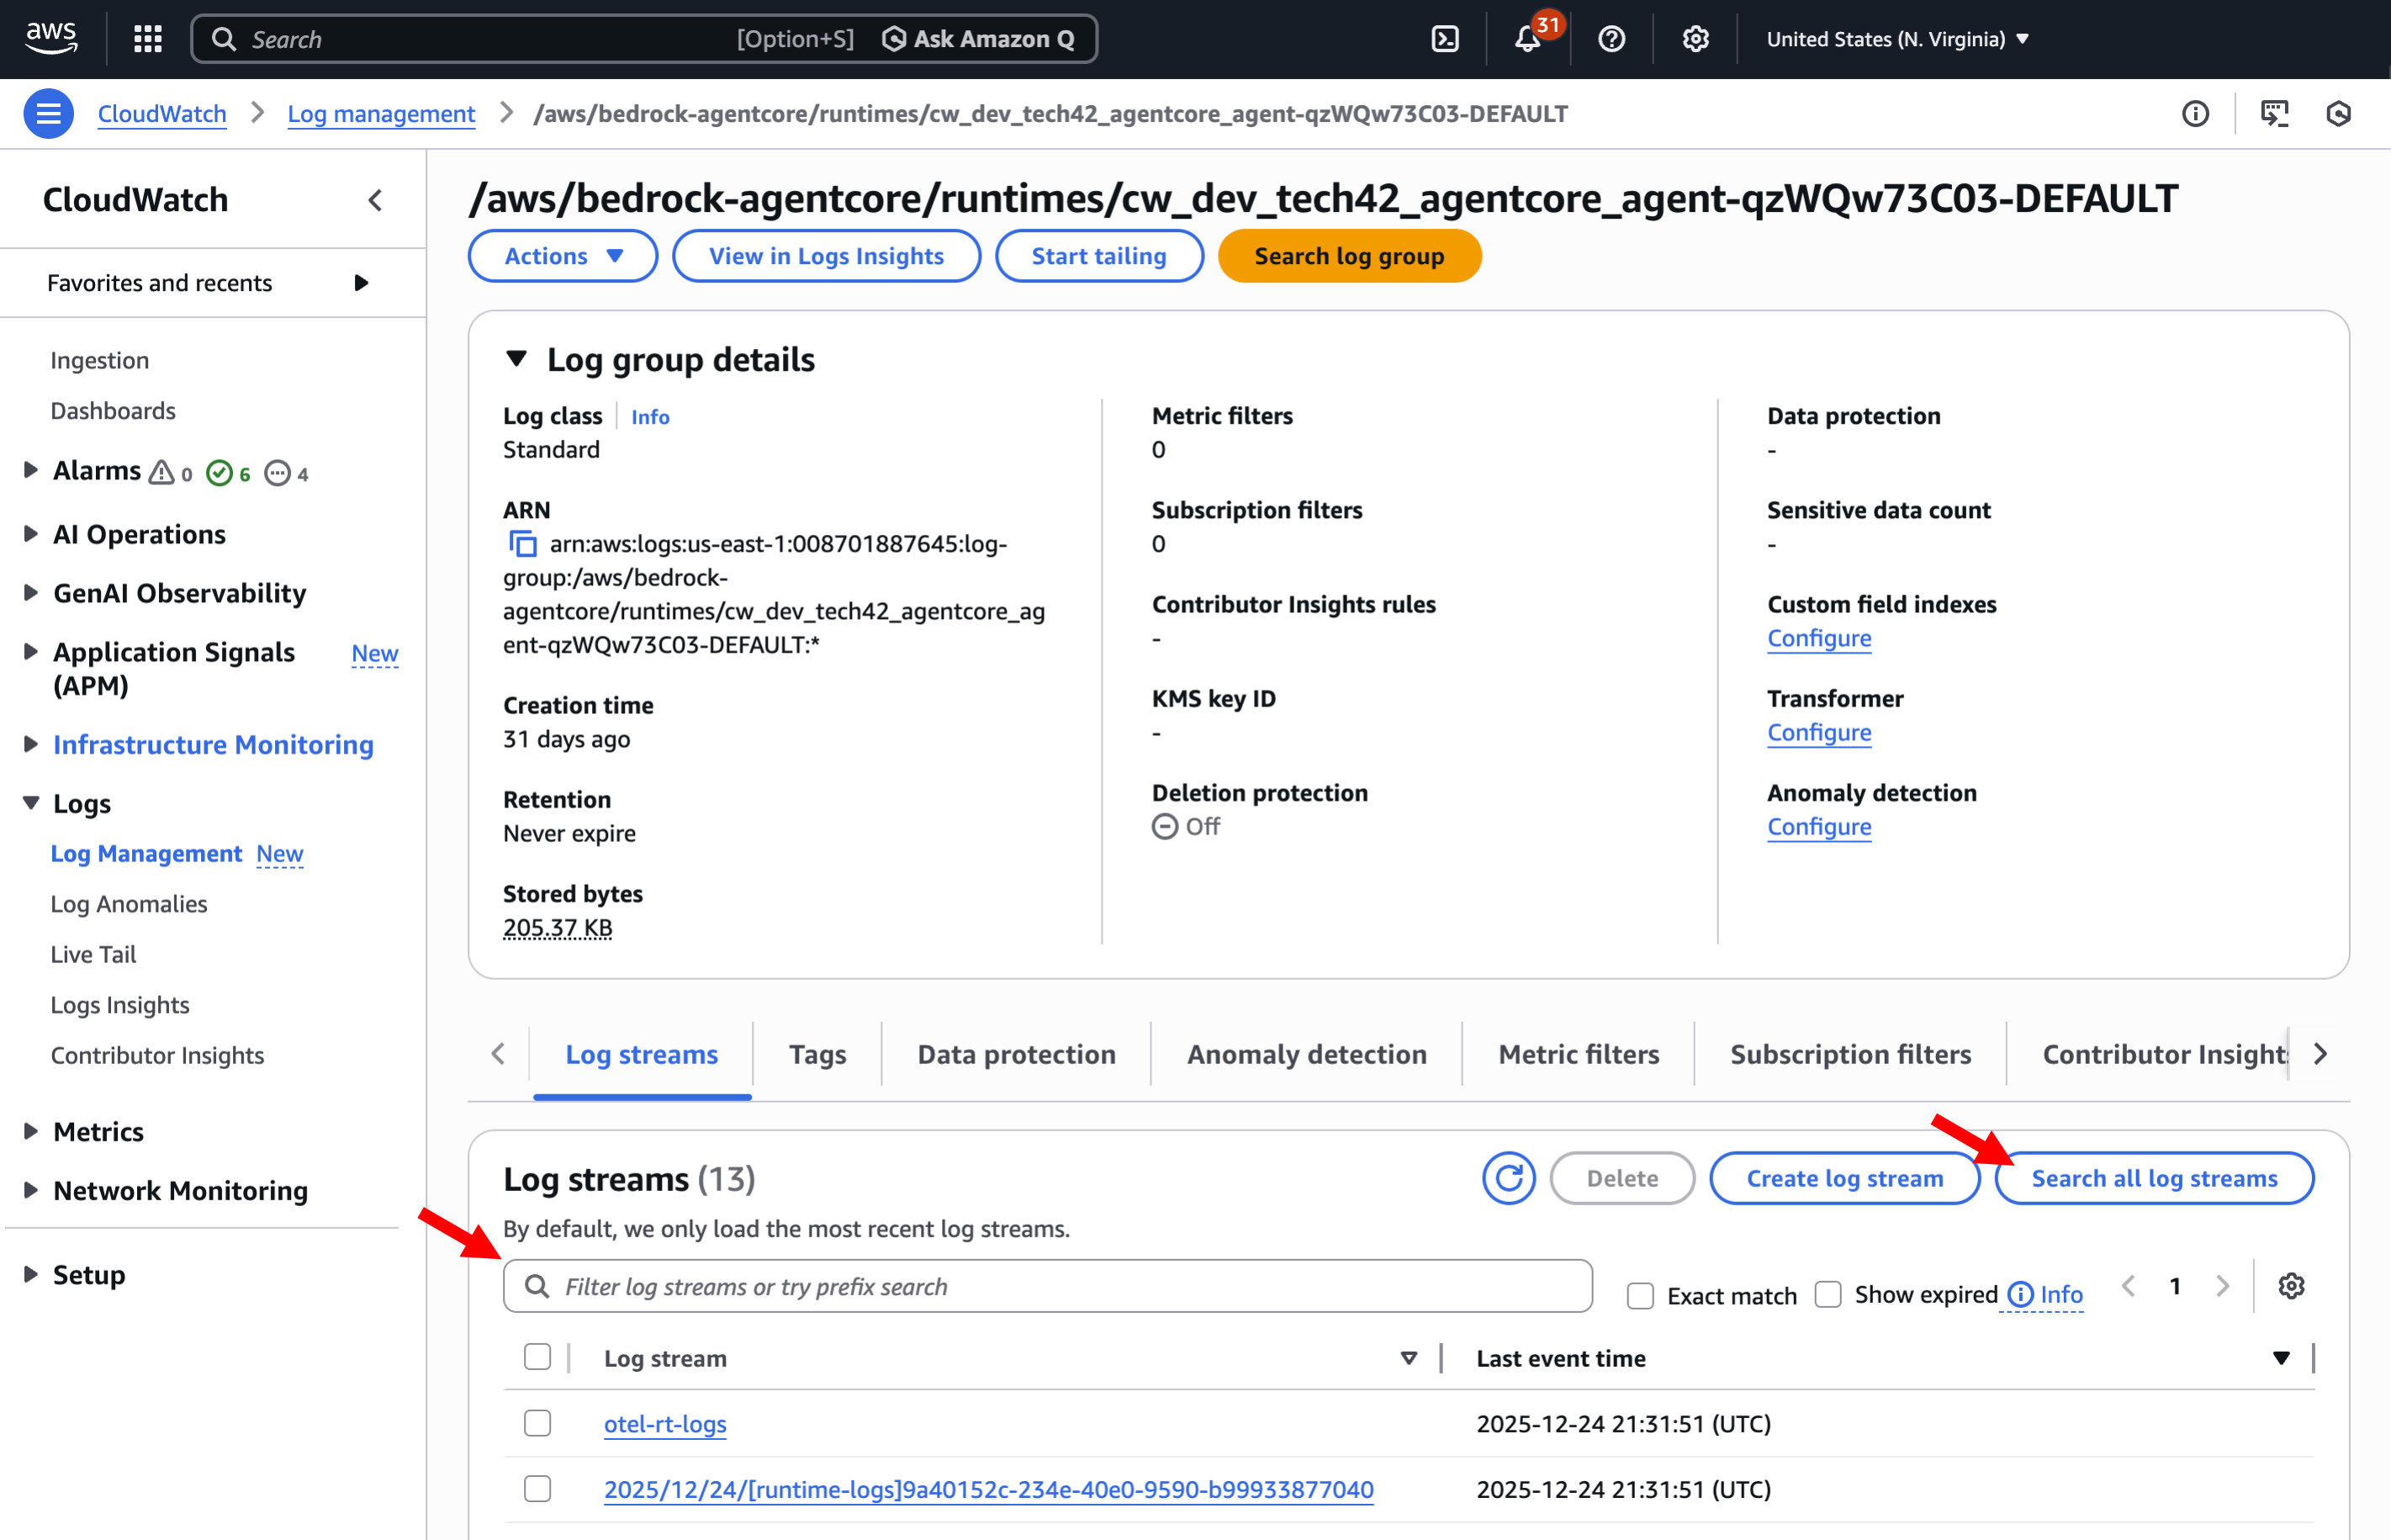
Step 5.c: You can click on an individual log stream or click on “Search all log streams” to access logs
6. Payload Schema
Here are the details of the payload schema for interacting with your agent:
- query (str, required): User query to process
- system_prompt (str, optional): Custom system prompt
- mcp_config (dict, optional): MCP server configuration
- model_config (dict, optional): Model configuration. See following Strands documentation
for available model configurations: - memory_id (str, optional): AgentCore Memory ID
- session_id (str, optional): Session ID for memory and Langfuse trace grouping
- actor_id (str, optional): Actor ID for memory
- user_id (str, optional): User ID for Langfuse trace user attribution
- enable_browser (bool, optional): Enable AWS Bedrock AgentCore Browser tool
- enable_code_interpreter (bool, optional): Enable AWS Bedrock AgentCore Code Interpreter tool
- enable_retrieve (bool, optional): Enable AWS Bedrock Knowledge Base Retrieve tool
- retrieve_config (dict, optional): Retrieve tool configuration with keys:
- numberOfResults (int): Number of results to return (default: 5)
- score (float): Minimum similarity score (default: 0.5)
- knowledgeBaseId (str): AWS Knowledge Base ID
- region (str): AWS region for Knowledge Base
- enableMetadata (bool): Include metadata in results (default: False)
- retrieveFilter (dict): Filter criteria for retrieval
7. Testing
7.1. Testing in the AWS Console
Step 7.1.a: In a new tab, search for and open Amazon Bedrock AgentCore -> Click "Agent sandbox" in the left menu
Step 7.1.b: Select your agent in the Runtime agent field and use the DEFAULT endpoint -> Enter the sample prompts listed below -> Click Run to validate that the agent response is delivered
7.1.1. Basic Query Test
To test, update your input in the sandbox for this query:
7.1.2. Browser Search Test
To test, update your input in the sandbox for this query:
7.1.3. Code Interpreter Test
To test, update your input in the sandbox for this query:
7.1.4. Knowledge Base (RAG) Test
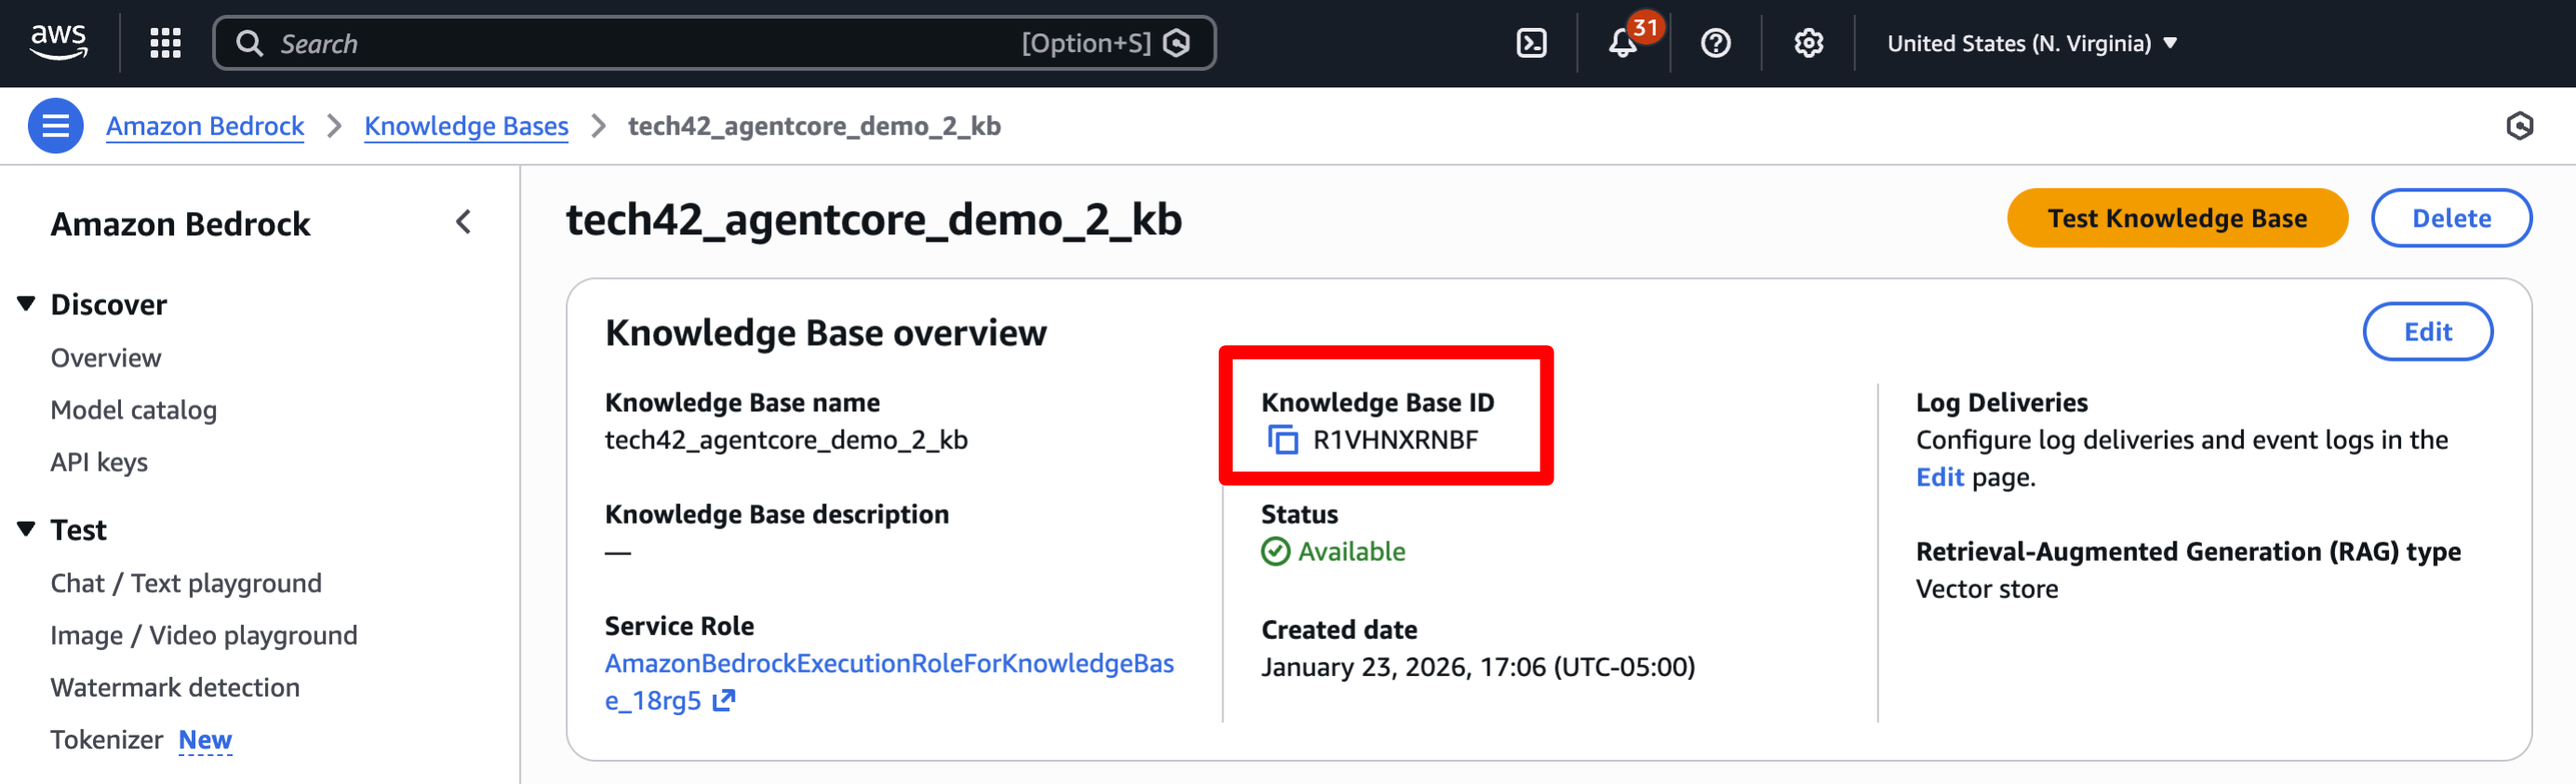
Step 7.1.4.a: In a new tab, search for and open Amazon Bedrock -> Click "Knowledge Bases" in the left menu -> Click on the knowledge base associated with your agent
Step 7.1.4.b: Copy the Knowledge Base ID and use it in the code below
Step 7.1.4.c: Now go back to your Agent sandbox and send this message, remembering to replace the query and knowledge base ID:
7.1.5. MCP Test
To test an MCP connection example, update your input in the sandbox for this query:
7.1.6. Gurardrails Test
Step 7.1.6.a: In a new tab, search for and open Amazon Bedrock -> Click "Guardrails" in the left menu -> Click on the guardrails associated with your agent
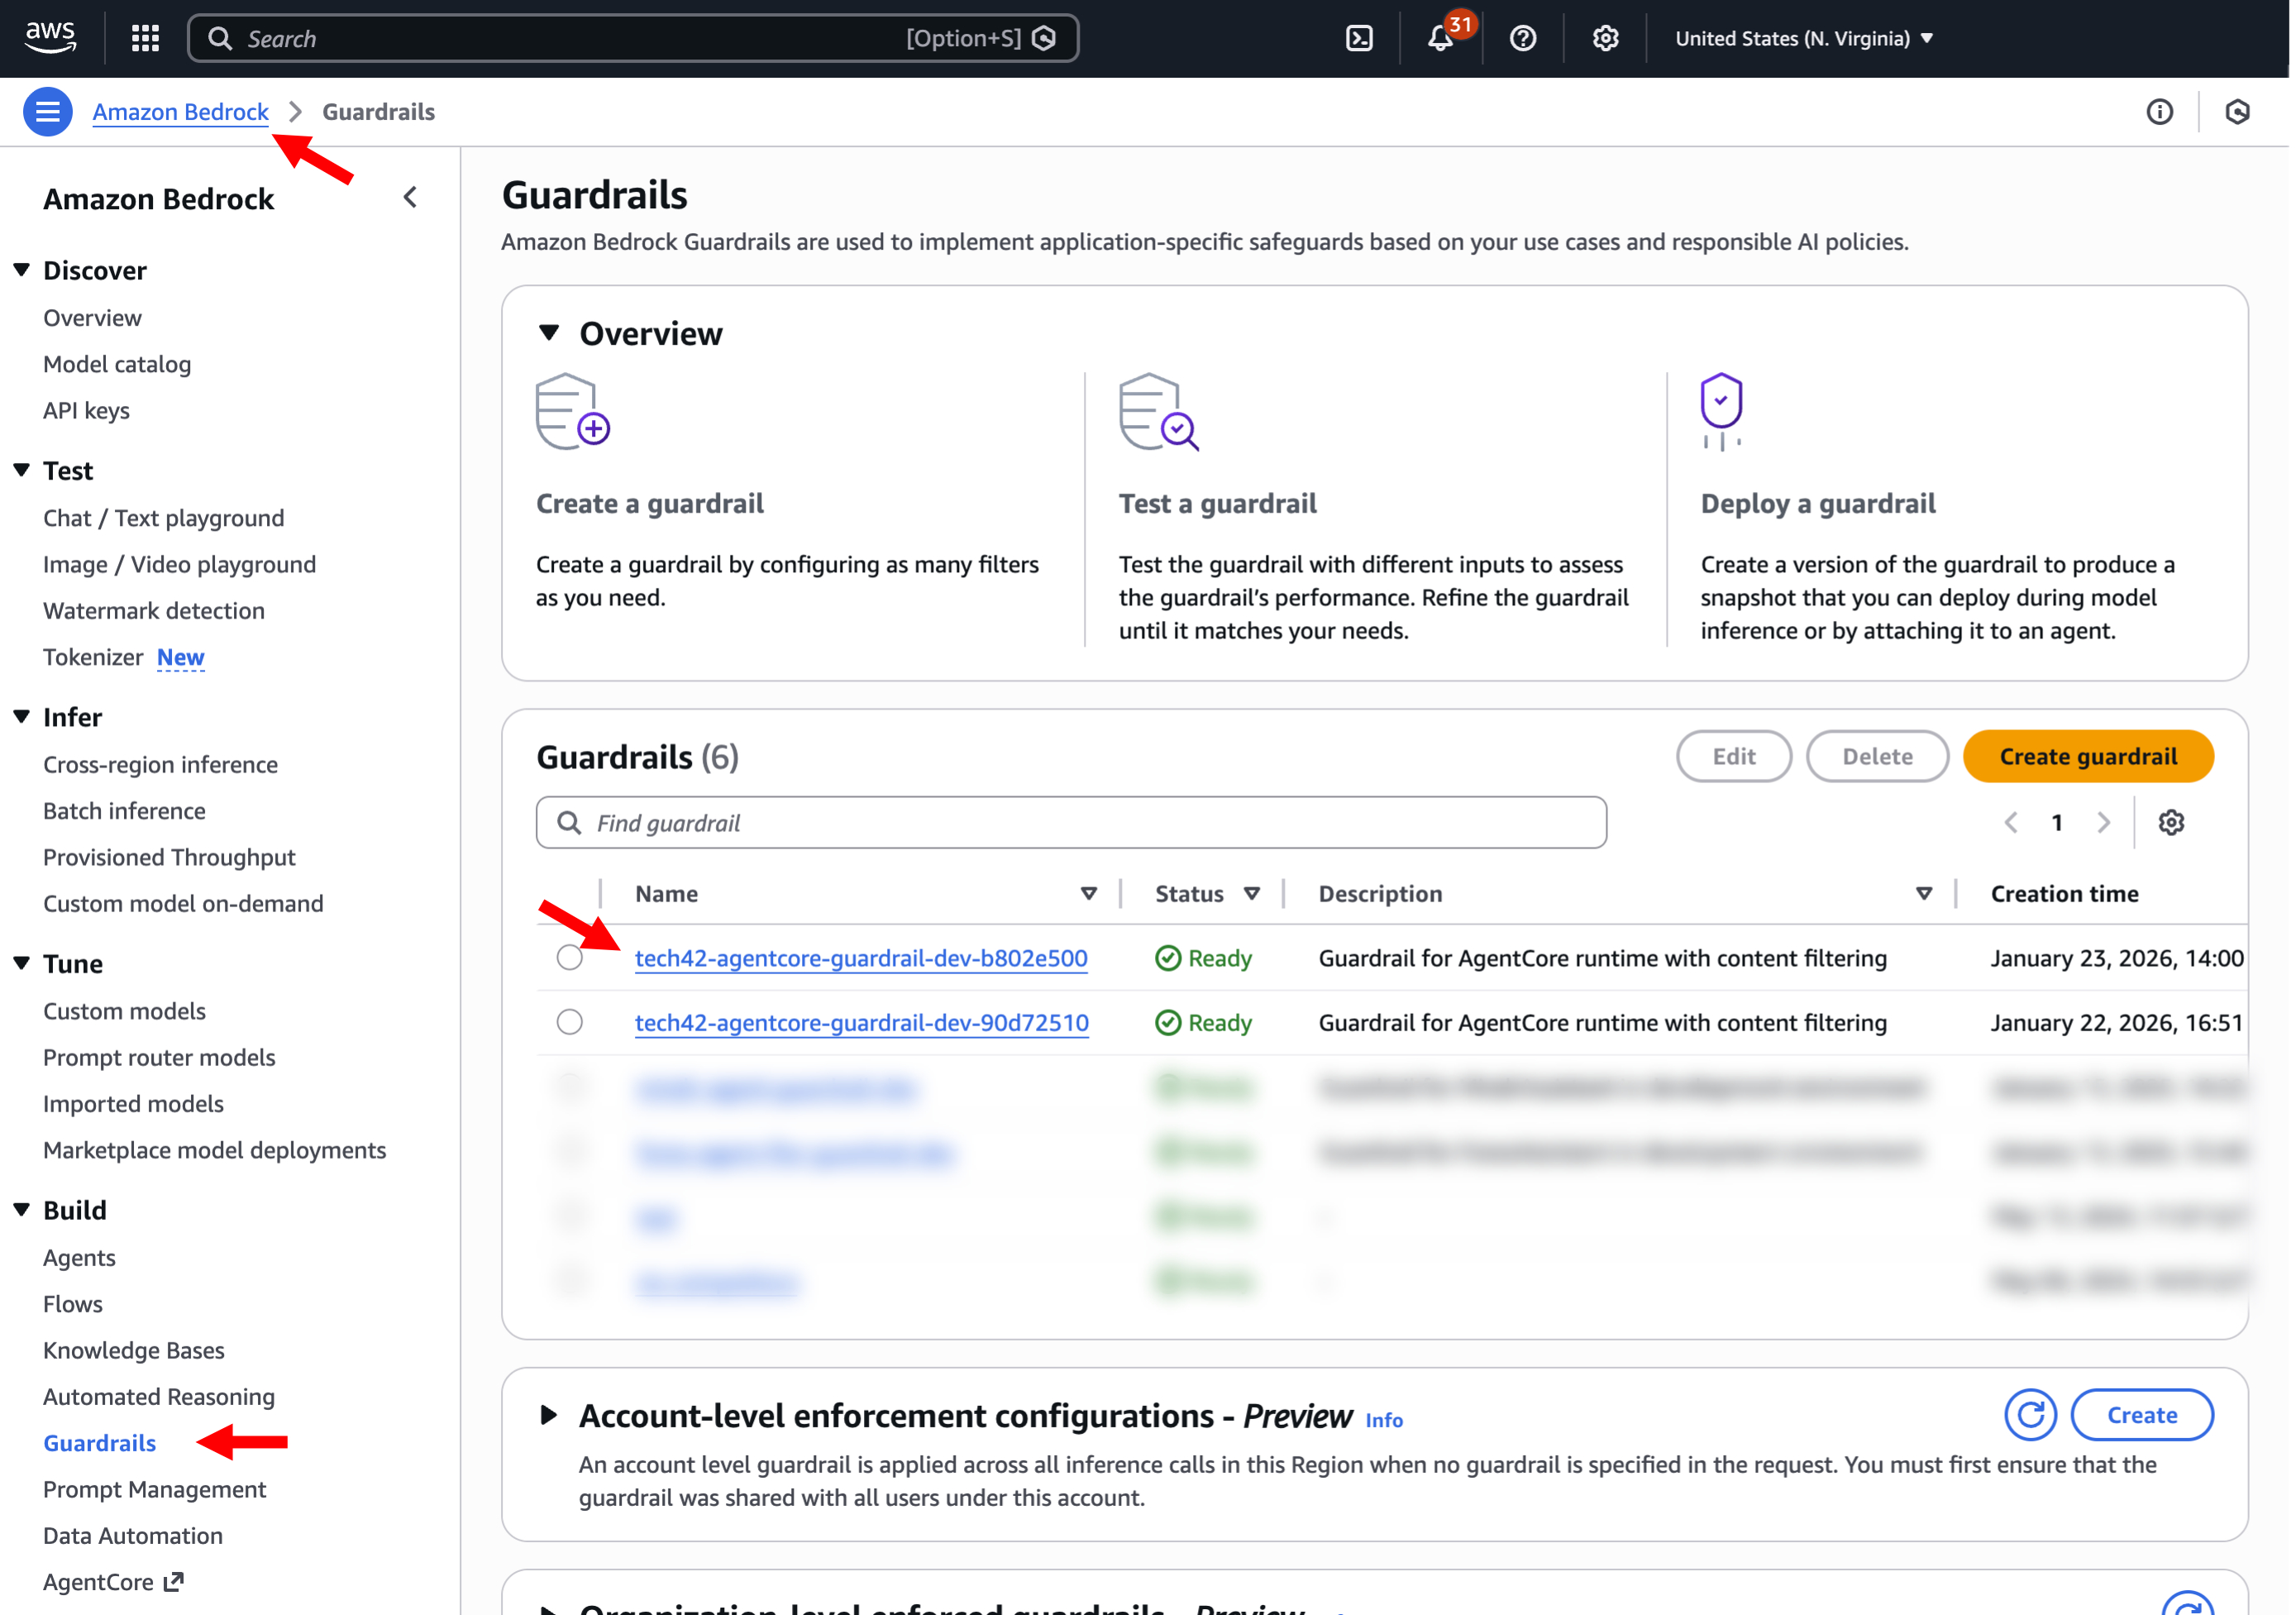
Step 7.1.6.b: Copy the guardrail ID and use it in the code below

7.1.6.c: Now go back to your Agent sandbox and send this message, remembering to update your guardrail ID:
7.1.7. Memory Test
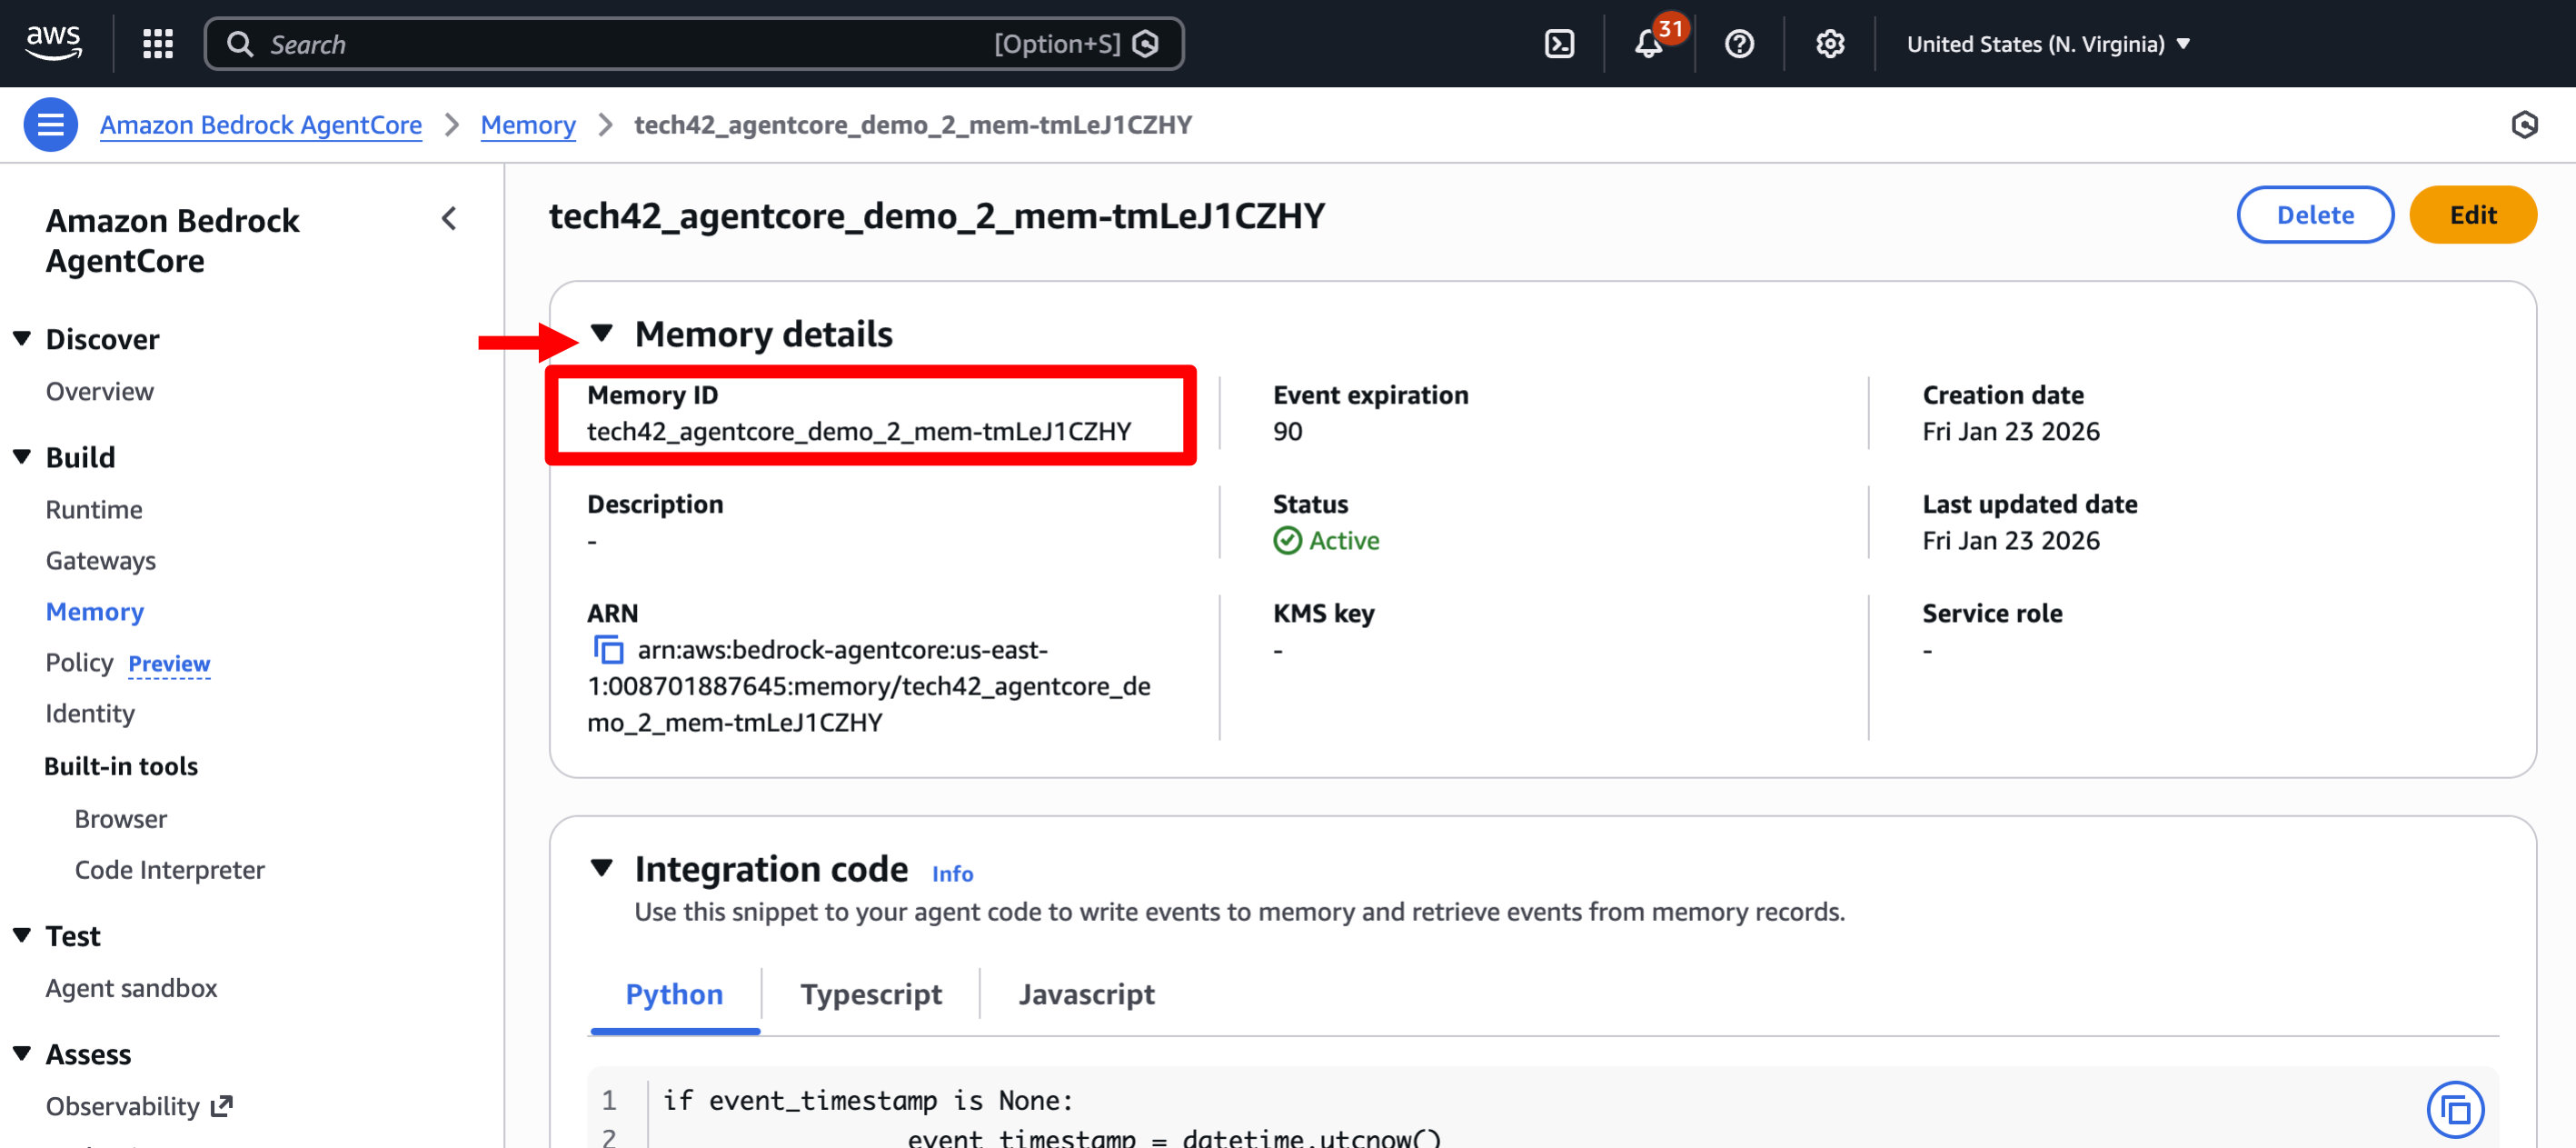
Step 7.1.7.a: In a new tab, search for and open Amazon Bedrock AgentCore -> Click "Memory" in the left menu -> Click on the memory instance associated with your agent
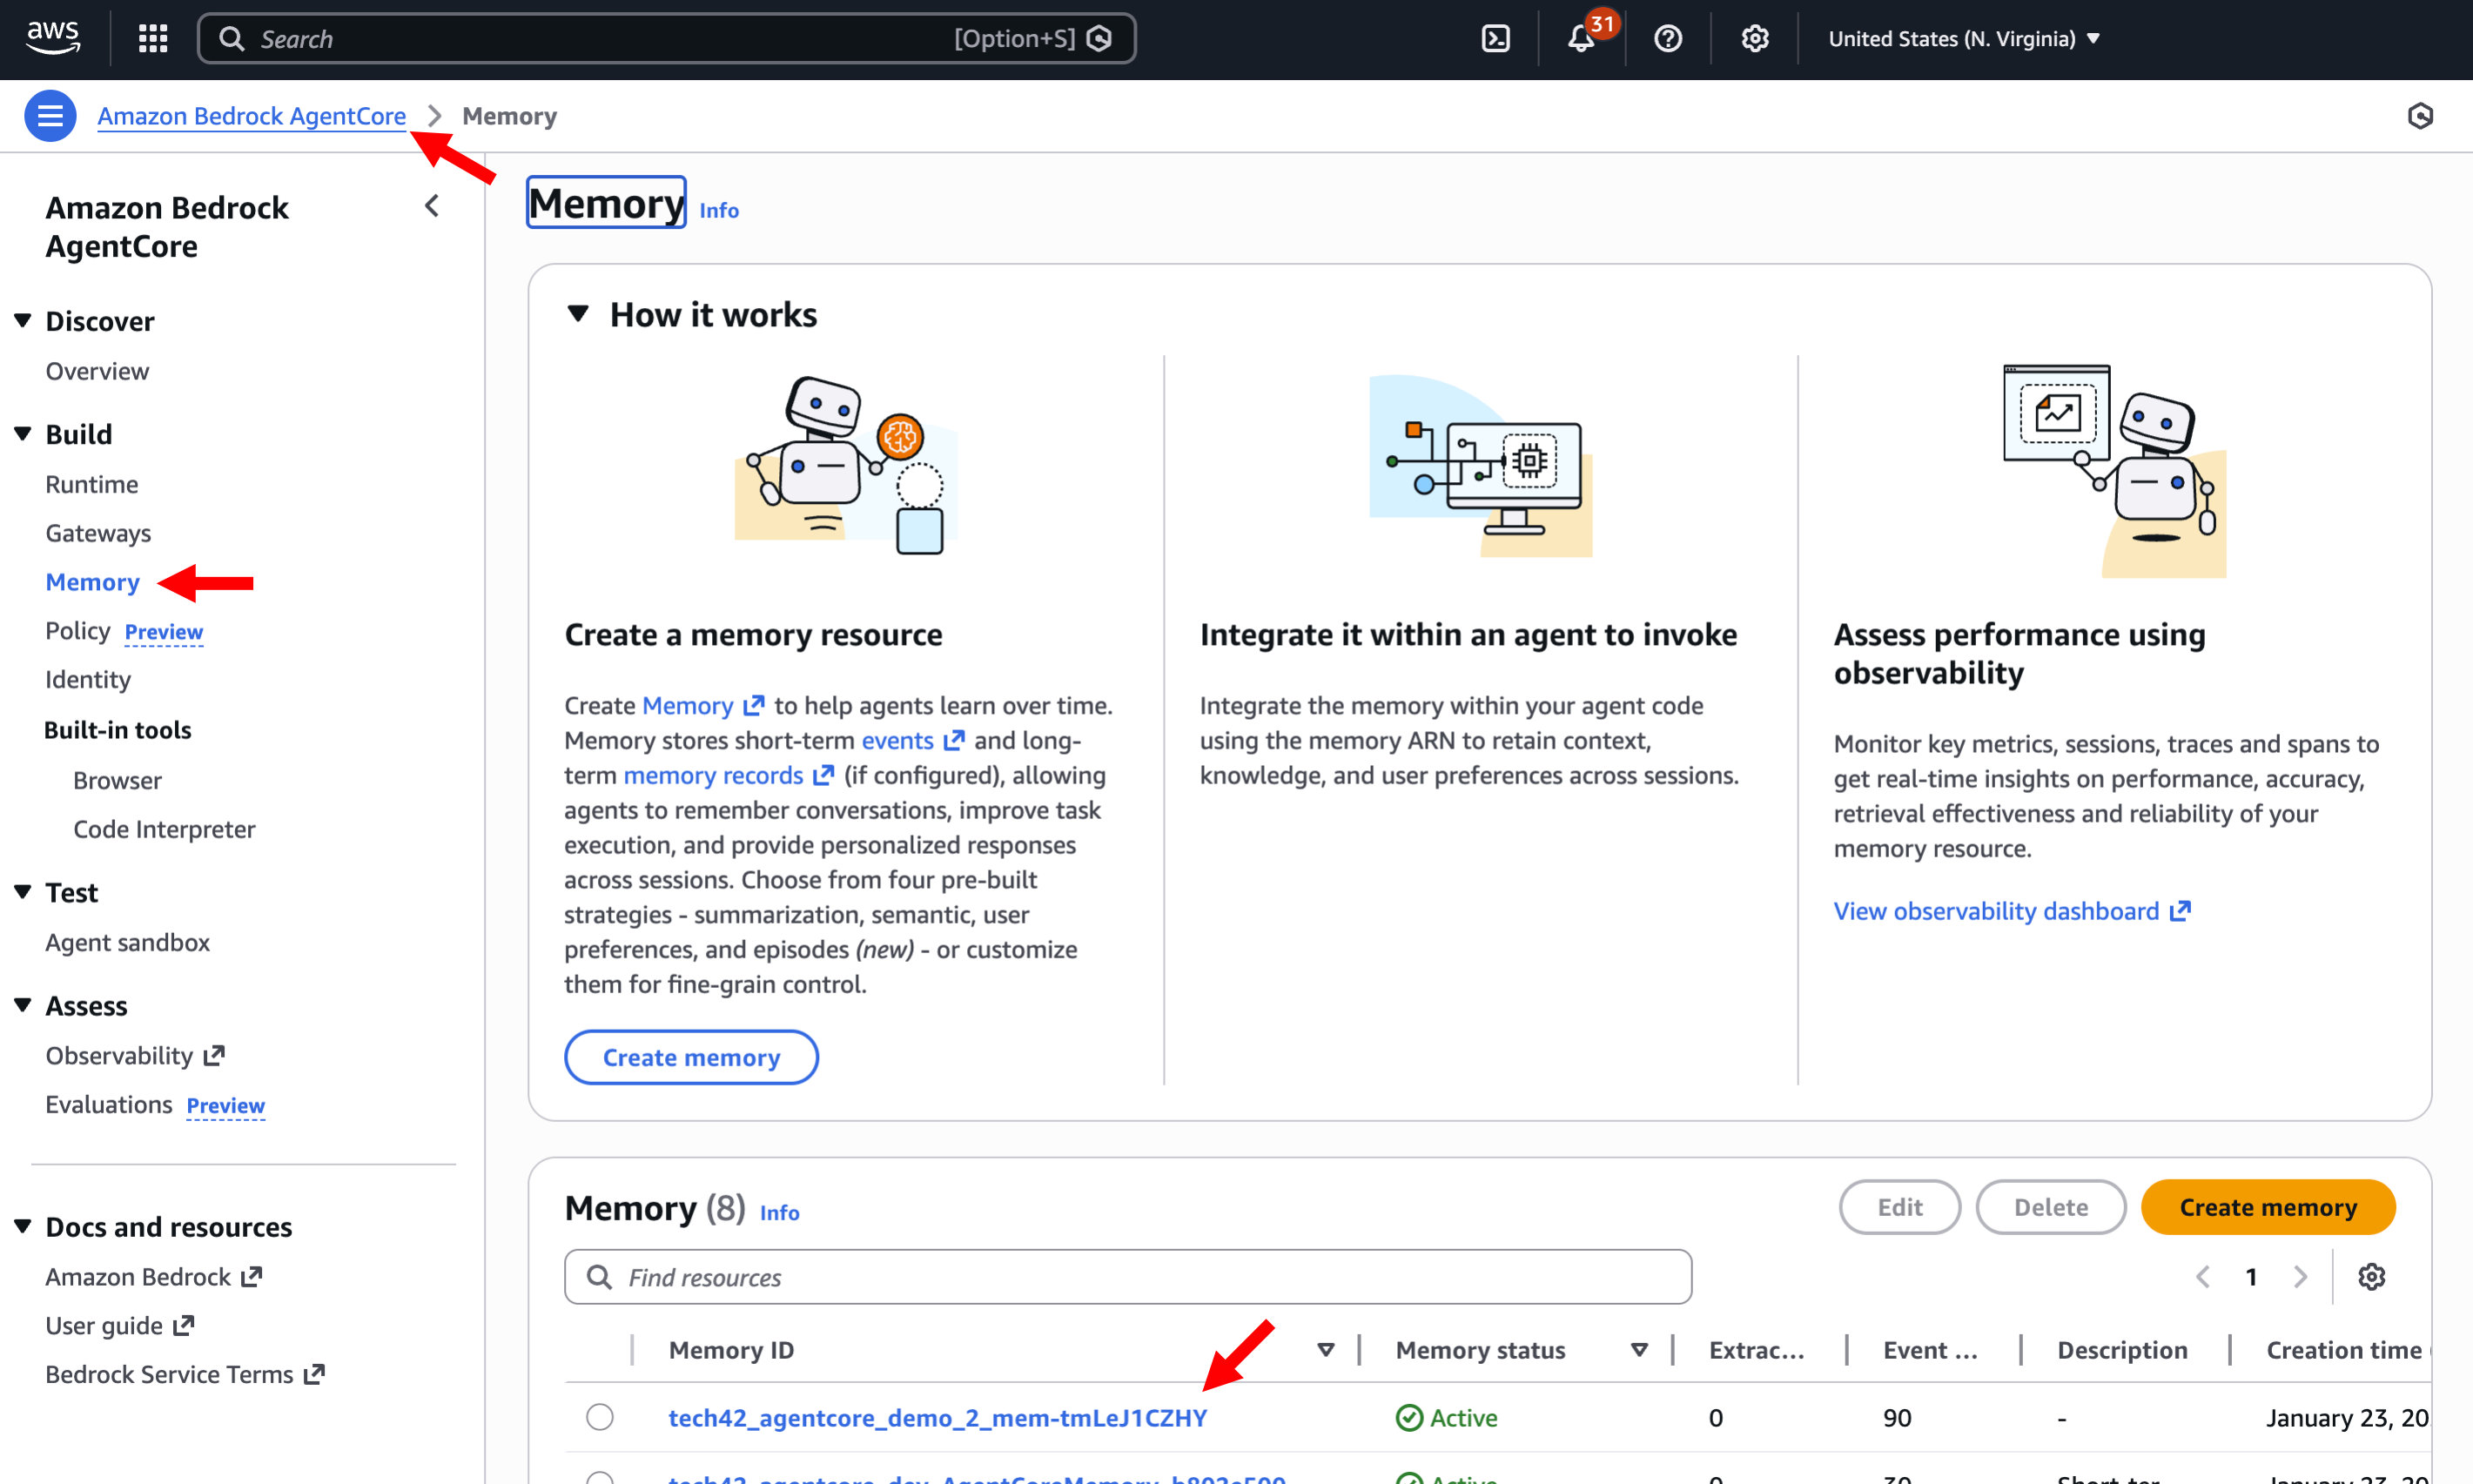
Step 7.1.7.b: Expand the "Memory details" section-> Copy the Memory ID which you will need for your agent test code in the next step
Step 7.1.7.c: Now go back to your Agent sandbox and send this message, remembering to update your guardrail ID (or feel free to customize with details you want your agent to remember)
Step 7.1.7.d: Now send a new message (keeping the same session_id and remember to update your guardrail ID) that asks the agent about the details you previously provided. You can use the example below or update based on the information you provided above.
7.1.8. Model Switching Test
Using the model_id setting, you can instruct your agent to use different models. To test, update your input in the sandbox for this query:
7.1.9. Reasoning Test
You can also enable your agent to process requests with reasoning enabled. To test, update your input in the sandbox for this query:
7.2. Testing with the AgentCore_Tutorial Notebook
See our GitHub repo and AgentCore Starter Pack video for more detail on testing with the agentcore_tutorial.ipynb notebook.
8. Clean Up
To delete your agent setup, navigate to CloudFormation -> Select your agent stack -> Delete the stack
Navigate to Amazon Bedrock-> Select Knowledge Bases -> Select and delete the Knowledge Base tied to your agent
Navigate to S3 -> Select and delete the bucket tied to your Knowledge Base
9. AgentCore Pricing
AgentCore resources are serverless such that you are only billed per usage. Bedrock Knowledge Base uses OpenSearch serverless, which has an ongoing cost for the uptime of the minimum OCUs (OpenSearch Compute Units) required. Prices below may vary and differ depending on when this guide is updated. For most updated pricing see links below:
9.1. AWS Bedrock AgentCore Pricing
- AgentCore Runtime
- Per vCPU-hour -> $0.0895 per vCPU-hour
- Per GB-hour -> $0.00945 per GB-hour
- AgentCore Short-Term Memory
- Per 1,000 events -> $0.25 per 1,000 new events
- AgentCore Observability (CloudWatch-based)
- Span ingestion: $0.35 per GB
- Event logging: $0.50 per GB
- AgentCore Browser Tool
- Per vCPU-hour -> $0.0895 per vCPU-hour
- Per GB-hour -> $0.00945 per GB-hour
- AgentCore Code Interpreter Tool
- Per vCPU-hour -> $0.0895 per vCPU-hour
- Per GB-hour -> $0.00945 per GB-hour
- Bedrock Guardrails - Content Filters
- Per 1,000 text units -> $0.15 per 1,000 text units
- Bedrock Guardrails - Denied Topics
- Per 1,000 text units -> $0.15 per 1,000 text units
9.2. AWS OpenSearch Serverless (Bedrock Knowledgebase) Pricing
- Indexing OCUs
- 2 OCUs (0.5 x 2 AZs) minimum @ $0.24/OCU-hour = $175.20 per month
- Search OCUs
- 2 OCUs (0.5 x 2 AZs) minimum @ $0.24/OCU-hour = $175.20 per month
- Storage
- ~10 GB minimum @ $0.024/GB-month = $0.24 per month
- Total -> 4 OCUs + storage = ~$350.64/month
10. Support
If you have questions, need support with this Starter Pack, or are interested in extending your AgentCore setup with custom integrations, custom MCP servers, or more, please reach out to us at support@tech42consulting.com or send us a message here.
[[agentcore-accelerate-1]]